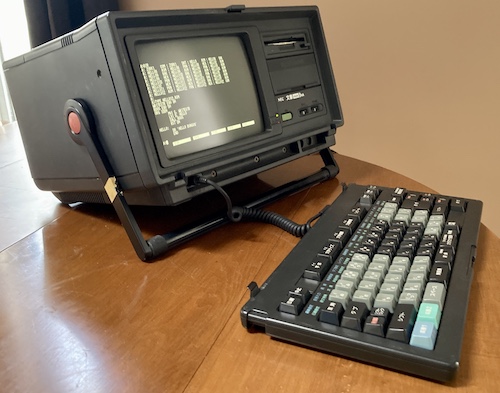
A Mini5 Hello World
Tags: computer nec cpm mini5 bungo homemade-software word-processor retrochallenge retrochallenge-october-2022
Yes, it is finally time to sit down with the mini5HA again. My goal was to figure out how to make a working program for CP/M using its built-in assembler, and I wasn’t going to give up until I had at least a “hello world.”
Once I got comfortable with using the mini5HA in the previous entry, it was time to get down to business. I had little or no experience with CP/M, so it was time to consult the documentation before going any further.
CP/Mers, Assemble?
The first thing I noticed when reading about CP/M is that there’s a tool called asm which purports to be an assembler, but it failed to launch, complaining first that the boot disk was read-only (it was) and then that the M: drive could not be selected.
What was I trying to assemble, you may ask? I wrote a quick program based off some code that I found on the web. Not knowing how to use ED very well, and not particularly enjoying the Intel format, I was extremely careful not to make any typos. I will share the “final” program later in this entry, because as you’re about to see, I made a lot of mistakes.
The M: drive, presumably the RAM (“Memory”) disk, indeed could not be selected. I couldn’t even format it. I was really confused about this, but I didn’t have much else to go on. I assumed that the Japanese hobbyists had been using those alternative Amstrad tools, rather than what came with the machine, because of something like this.
Eventually, I looked at the documentation. It turns out that I was typing this:
A> ASM HELLO.ASM
But in the case of ASM specifically, that extension to the filename is not necessary. ASM – and as far as I can tell, only ASM – interprets everything after the period as a command-line switch. What I was actually telling it to do was:
- Take the source file from drive
A - Put the resulting assembled hex file on drive
S - Put the resulting listing (“print”) file on drive
M.
Two out of three of those drives don’t exist, so of course it was angry! After I changed it to just
A> ASM HELLO
I ended up successfully assembling the source file, and then getting a HELLO.HEX and a HELLO.PRN file on the disk. Sweet! But did it work?
It Didn’t Work!
The HEX file isn’t quite a binary. It’s the Intel Hex format, which is an ASCII representation of the hex bytes of the executable.
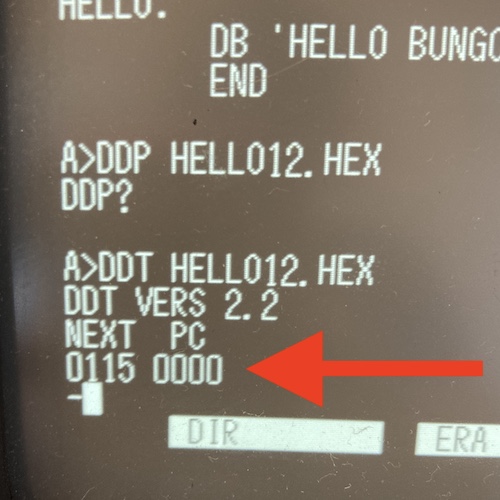
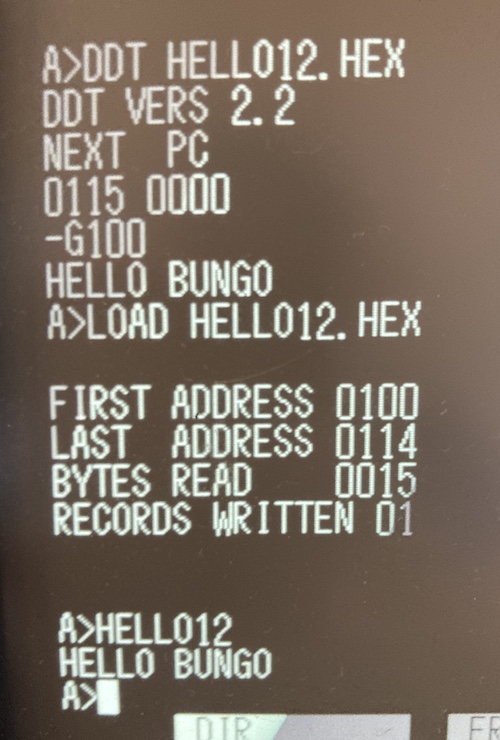
To load the hex file and run it, you can use the DDT (“Dynamic Debugging Tool”) interactive debugger, which is very well-featured1. I think it has more gadgets than MSDOS DEBUG, to be honest.
When I ran it with G, however, nothing happened. The program would just immediately exit. I tried a few different things in the program to try and figure out what was going on, but ultimately settled on the program listing you’ll read later.
When I was tinkering around with ways to end the program, it would sometimes even get stuck in an infinite loop and I’d have to power-cycle the machine to stop it.
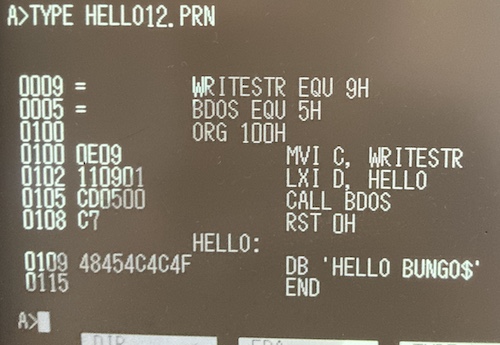
That part I mentioned up above about “ASCII representation” tripped me up - I kept trying to use the CP/M DUMP utility to read the HEX file as a binary, and wondering why “HELLO BUNGO” wasn’t showing up in the resulting hex dump. It was in the PRN printout:
Blog friend Chartreuse set me right about the proper use of DUMP, and also explained to me that DDT doesn’t actually know where I have set my program to start in memory.
Debugging my Debugging
That ORG 100h statement only mattered to the assembler and (later) the program loader, but the debugger didn’t know to go there. It’s starting execution of the program at PC = $0000 , as clearly indicated on the screen before I started my debugging session:
Instead, I had to type this to set the program counter to $100 and begin execution:
- G100
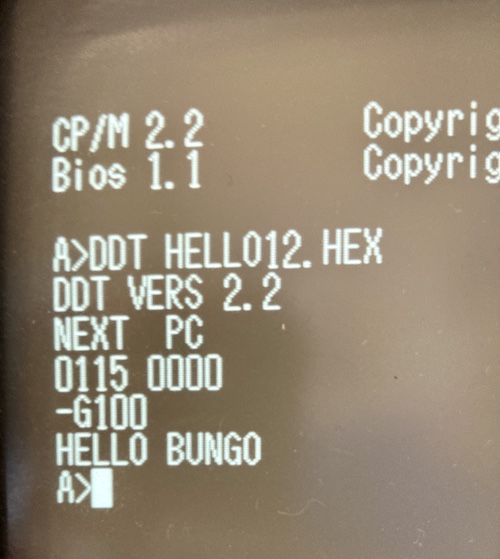
Success. But how do I make a COM file out of this? The answer is the confusingly-named LOAD, which takes in a hex file and does the dance required to produce a COM executable.
The Program
Okay, let’s go over the program and analyze it. I cobbled this together from the assembler manual and the aforelinked “please help me with CP/M hello world” forum post, which didn’t seem to have a solid conclusion, but got me down the right road.
WRITESTR    EQU 9H
BDOS        EQU 5H
ORG 100H
    MVI C, WRITESTR
    LXI D, HELLO
    CALL BDOS
    RST 0H
HELLO:
    DB 'HELLO BUNGO$'
    END
Pretty simple program, even if you don’t like the Intel mnemonics and register names. We’ll go over it line by line here:
WRITESTR    EQU 9H
BDOS        EQU 5H
This sets up defines for where the program can find the BDOS syscall and the WRITESTR function number to invoke. EQU is the rough equivalent of #define in C, except obviously without macro magic.
Like in MS-DOS, calling operating-system services in CP/M mostly consists of setting registers to indicate the function ($9 ) and the arguments (the address to the string,) and then calling into the operating system to handle it.
Please note that there are two sets of system calls: BIOS (the hardware abstraction layer) and BDOS (the disk-drive and “OS” services.) There aren’t a huge number of syscalls available from the CP/M standard, but I’m sure NEC has snuck a bunch in there as well to make their lives a little easier.
ORG 100H
The ORG directive tells the assembler where it should expect the machine code that is generated after the directive to be placed in memory at run-time. Since everything before this is just defines, no code has been generated yet. CP/M has a “transient program area” (TPA) that starts at $100 , and so that’s where we will assume our program will end up.
    MVI C, WRITESTR
    LXI D, HELLO
    CALL BDOS
Here we are moving the function number for WRITESTR into the “C” register, followed by the starting address of the string we want to print. Then we call BDOS, which reads these registers and calls the code for writing a string to the screen. Knowing print routines as I do, this is probably lengthy and incredibly complex, and luckily I’m not the guy who has to write that part.
RST 0H
We are done. RST (reset) does basically a warm-restart of the CP/M command interpreter. To the human, it seems like we’ve returned to the operating system.
Now for the last chunk:
HELLO:
    DB 'HELLO BUNGO$'
    END
This defines a label HELLO so we don’t have to figure out the exact address of where the string will end up in the resulting executable. That’s the assembler’s job. DB is define byte, and lets us write our string. We terminate that string with $ because that’s what WRITESTR expects.
The CP/M assembler manual says that END is optional, but if it is included, it must be the last instruction in the file. So I added it for luck, and that’s where it goes.
It’s Mr. ED
ED is the built-in text editor that comes with CP/M. It’s designed to work like an old-school line editor. Some of you may be familiar with ed and sed on Unix, which have a common ancestry with CP/M’s ED.
Chartreuse was again a huge help, and linked me to the I Love ED on CP/M blog post, which has a great command reference.
I ended up creating new files every time (hence HELLO12 in the pictures) because I didn’t know how to load the “old” file contents into the buffer in order to edit it, and I also had a lot of problems going back and “fixing” a line if I made a typo and then hit enter. Unfortunately, I only figured out how to operate ED after I got a program that worked.
Here’s the commands in ED that I used most often:
E: Exit and save file to diskI: Insert at current line, entering editor mode- Ctrl-Z to exit editor mode
- {Line}:K to kill a line (delete it)
#A: load the file into the buffer from disk#T: display all lines of the buffer (if at start)B: go to start of file-B: go to end of fileKI: Delete and replace a line, entering editor mode
Conclusion
My journey with CP/M is just beginning, but I’m overjoyed that the mini5HA comes with good (or at least existent) low-level development tools, unlike most computers that I’ve gotten in the past. I was having no luck at all trying to get Nevada Edit and another assembler onto floppy disks for the mini5HA2, and now I might not even need them if I can just deal with the cozy rustic charm of ED.
Obviously there’s a big gap between “hello world” and anything else, but I hope at some point to be able to make at least a character-mode version of some game for this computer. Who knows? Maybe I’ll end up doing a port of CP/M to the Soggy-1000.
-
It has a very useful
D(Dump) command which I am currently using to explore the mini5HA’s memory space, to try and figure out how to dump the ROM from software. Hey, I’m too lazy to discharge a tube and completely dismantle this machine in order to get the motherboard out. ↩ -
I do now have a good 22disk format definition, so maybe there is still hope for writing a floppy with a working Zork. Stay tuned… ↩