SyncMaster of the Universe
Tags: computer samsung samsung-245b video repair capacitors failure
When I was visiting my buddy, he pointed out that he had a 24” LCD monitor in the garage that he was throwing out. Sometimes it wouldn’t turn on, he explained. I don’t remember what he said after that, but the monitor ended up in the back of my crappy van full of cool junk, and now it’s here. Ready to be used for… monitoring?
This here is a Samsung SyncMaster 245B. It’s a surprisingly chunky LCD from the halcyon year of 2007. It sports a 1920x1200 pixel panel, and it is not working. The blue light on the power button will blink, but nothing happens when you try to turn it on.
After hauling it home in the aforementioned cool junk van, I decided I would take a look at my new monitor… someday. And after tripping over it multiple times in a row, that day became “today.” Looking at the internet, the commonly reported problem is that the 68Ω resistors on the power board get baked to death, go super high resistance, and then kill the monitor. On top of that, you have the usual Samsung issues with cheap electrolytic capacitors and general disdain for the concept of thermal management.
![]()
Taking apart the monitor was not as easy as I would have liked. I unscrewed the stand (more on this later) and then worked around the periphery of the monitor using a series of spudgers, starting at this convenient arrow.

It was slow going, until a majority of the plastic clips freed up with sickening crack-pop sounds. Thankfully, the case plastic is quite thick, and it didn’t explode into a million pieces from my thuggish prying.
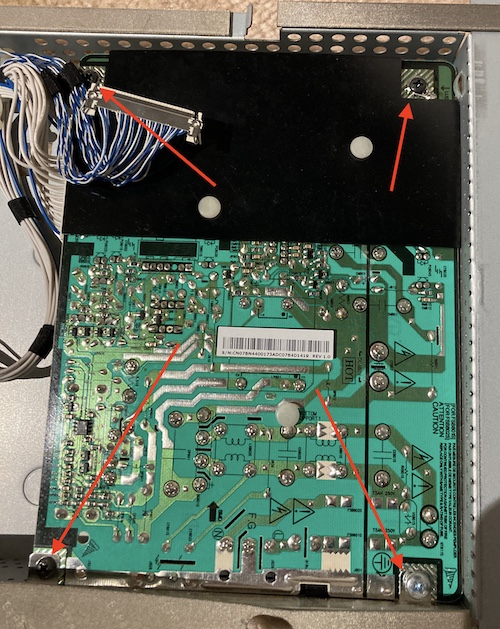
To remove the power supply, you have to pull the four screws out, and then pull up this padded section here. It reveals a hole that you can slide the power plug and switch bezel out through, and then you can work all the super-tight connectors off the power supply board.
It tickles me a little bit that they have an elaborate black rubber cover over the transformer and other switching components, but the big primary side capacitor’s solder joints are just left out in the elements for you to bump into, while you try to unscrew it and wiggle it out of the case.
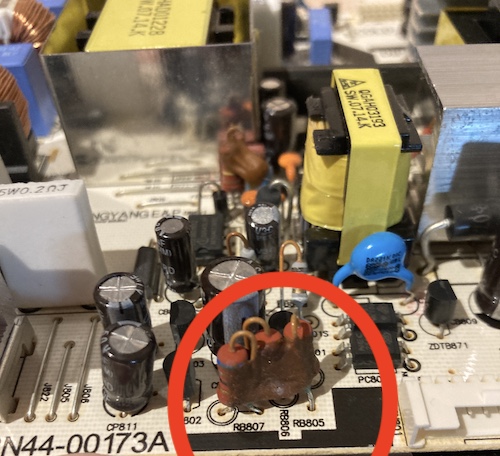
I decided to first tackle the problem resistors. These 1W resistors are supposed to read 68Ω, but once I split them out of the bundle of silastic goop holding them, there was evidence of blue-green corrosion on the legs. I only measured one of the resistors as it was removed, and it revealed itself to be 95Ω out of circuit. That’s a little more than it should be.
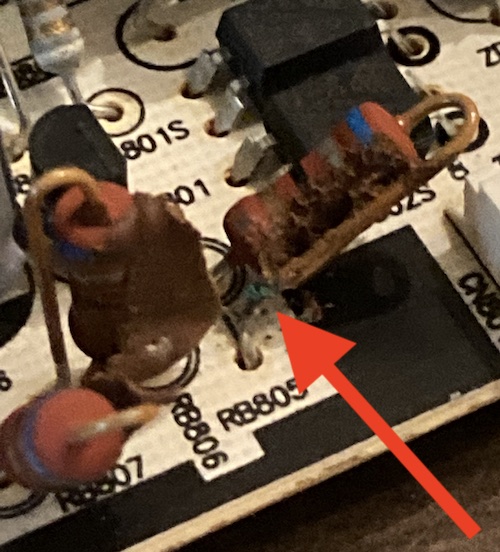
Annoyingly, the legs are folded over onto the pads to hold them in place. It’s a little hard to remove them using a desoldering gun, and I ended up pulling one pad while wiggling a little bit too hard to make one resistor loosen up. Luckily, the pad it connected to was right next door.
My first order of resistors were 5W power resistors, but they were way too big to mount into the board safely. I went back and reordered some much less ridiculous Vishay axial 2W resistors, figuring that the extra wattage would translate to a longer life, at least until the ultra-cheap caps blew and killed the monitor again in the future.
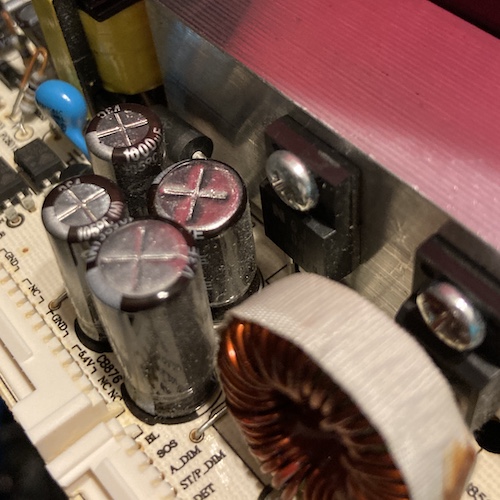
Speaking of ultra-cheap caps, I noticed this 105°C, 470µF/35V cap right next to a super-hot switching transistor. It looked like the shrink wrap around it had deformed and pulled back from the top. I pulled it out of circuit and checked the ESR. Marginal failure, but still a failure. Unfortunately, I didn’t have a 470µF cap in that voltage rating on hand. I had a Digi-Key cart going, and so I stuck a handful of Rubycon 10,000-hour replacements in there.
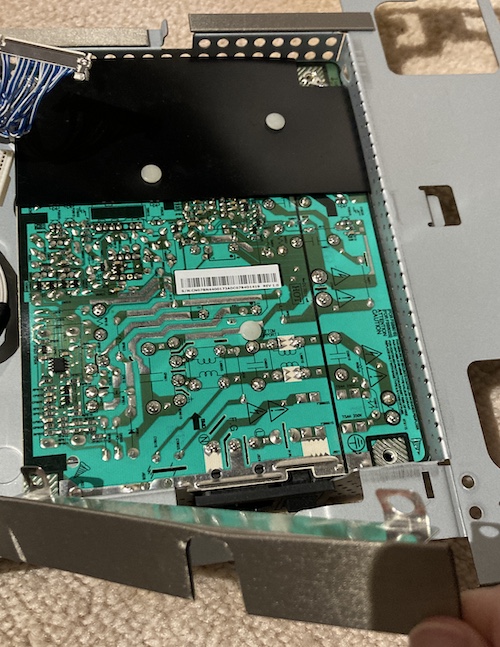
Reassembling the monitor was pretty easy, as long as I remembered to slot the boards into their little bent-metal trays before I tried to do the screws up.
With some hesitation, I went to power the monitor up. On the first try, it flickered the “analogue” video mode indicator up for a few frames and then went dark again. After restarting the monitor, the indicator came on and stayed on.
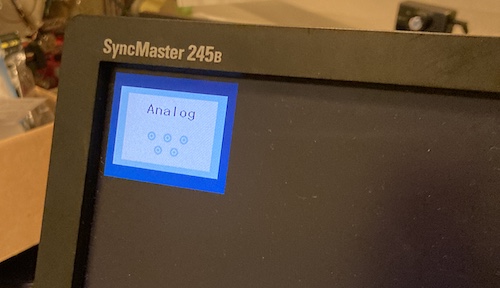
The monitor flipped between analogue and digital inputs for awhile, searching for a signal, and then dropped to a bouncing “please connect cable” screen.
Excellent. The monitor was alive, although something was emitting a nasty (if faint) buzzing noise, likely one of the caps I didn’t bother touching. I let the monitor run for awhile like that, waiting for an abrupt failure or little cough of smoke, but found nothing.
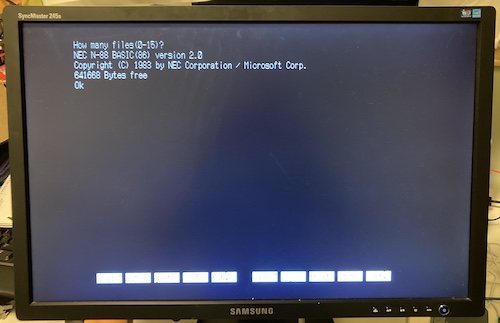
Since it was the closest, I decided to use the PC-9801RA2 to test the monitor. I hooked up the GBS-Control upscaler to the display, and fired up the computer. After some video mode tweaking, I had a legible N88-BASIC(86) display.
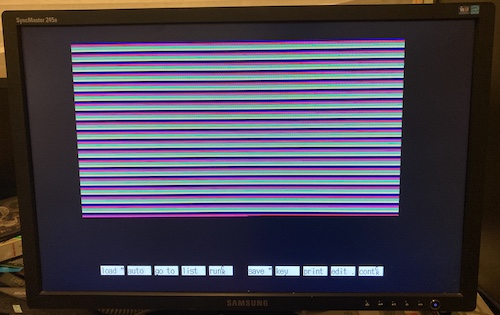
I wrote a quick (to write; very slow to run) program in BASIC to test for colour in the graphics plane:
1 CLS
10 FOR Y = 0 TO 200
20 FOR X = 0 TO 640
30 PSET(X, Y), Y MOD 8
40 NEXT X
50 NEXT Y
And as I waited (and waited,) the screen filled up with some glorious interlaced colour. I’m sure there’s a faster way to fill the screen with a test pattern, but I don’t know it.
I’d call this fixed, or at least fixed well enough to be usable until the next crappy cap implodes.
Tate Mode Unlock
Why bother saving this monitor at all? Well, besides the obvious platitudes about rescuing perfectly good equipment and diverting it from the international e-waste industry, this monitor can rotate to a portrait mode.
This, in theory, is useful to me as a consumer of supergun-related products. A lot of arcade games use a portrait-style display, which is referred to in the community as TATE MODE.
None of my other monitors can do this trick, and so it seemed like a good idea to take this one home and nurse it back to health just in case this one would save my butt one day trying to play a shooter.
Unfortunately, there are two problems with this monitor’s rotate mode:
- It only rotates one direction: clockwise. Although it’s the most common, not all tate-mode games use a clockwise monitor rotation: for instance, Galaxian is inconveniently a counter-clockwise rotation on the PlayStation Namco Museum anthology. Luckily, most emulators can display either way, and I don’t anticipate using this monitor with real arcade boards.
- It doesn’t actually rotate. When I tried to turn the monitor, it just bumped up against something in the mechanism and wouldn’t move.
Once I got the stand off as part of the repair, I suddenly realized why it wouldn’t rotate. Samsung put this giant bearing in here, and then locked out the rotation mechanism with a screw. I can sort of understand why they’d want to do this, in order to make it easier to carry and set up, but other manufacturers manage to do that with a little button you can push to unlock the rotation.
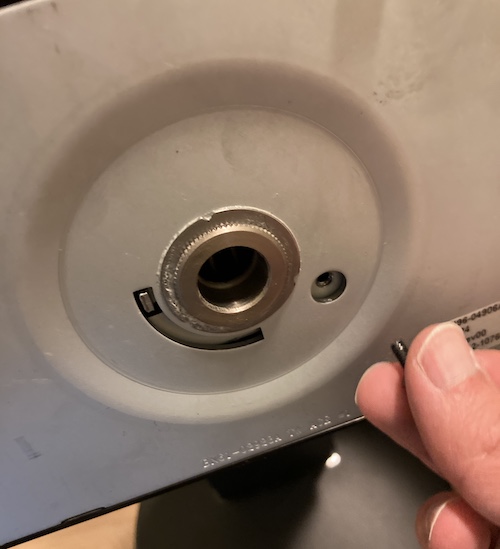
Luckily, removing the screw was pretty straightforward once I figured it out, but why isn’t this on the outside of the stand?
I assume the use case here is “set the monitor up as either horizontal or vertical orientation,” not “let them decide.” But allowing it to pivot like on the Dell monitors would have been a cool move, Samsung.
Unfortunately, I was about to have a bigger problem with this monitor.
Sitting and Hurting
I popped the LCD onto a shelf in my basement and came back to it a few months later, to use in place of another Samsung monitor1 that was acting up. Unfortunately, I now noticed that there were several columns either fully or partially missing from the display. While the shape was consistent, what’s odd is that this artifact seemed to change colour depending on what else was being shown on screen.
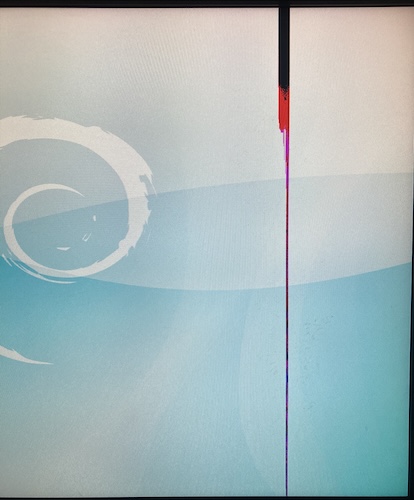
At first, I hoped that this was just some kind of glitch with what I was running on it, but I noticed that this nasty blob even persisted when the monitor had no signal and was hunting between digital and analogue inputs. I don’t know if something bumped into the panel while it was in storage, if I did something wrong during reassembly that took awhile to show up, or if it was just fated to die this way.
Ultimately, this is a very disappointing end for such a big and bright monitor. I’ll still keep using it as a bench monitor until a nicer one – maybe another 15kHz Dell – comes along, but it’s not what I hoped to get out of this project.
At the very least it is at least usable, unlike how it showed up on my door. Can’t win them all!
Repair Summary
| Fault | Remedy | Caveats |
|---|---|---|
| Does not turn on | Replace corroded 1-watt 68Ω resistors with 2W. | |
| Several capacitors look dodgy | Measure ESR, replace those that failed. | |
| Screen won’t rotate | Remove hidden lock-out bolt. | Screen now rotates too much. |
| Screen damaged | Store things better next time. |
-
My hit-by-lightning Samsung 910MP, who else? ↩