Getting Kermit onto the MBC-555
Tags: computer sanyo mbc555 floppy homemade-software
My Sanyo MBC-555 has been a good little computer, but it’s not especially useful. I haven’t been able to get software onto its strange disk format, and the software I do get can’t be run under DOS 1.25. If I want to test out a prototype serial card, I need to get Kermit onto the computer, and the best way to do that is to be able to write it to some disks.
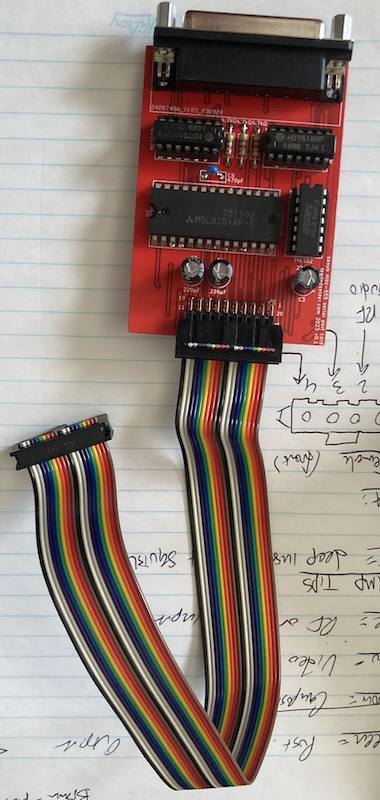
As I was just saying, I had a simple goal for this one. I’ve built this prototype serial card for the MBC-555, which should work.
In order to use a serial card, I need software. There’s lots of programs that use a serial port, but I decided on Kermit for its versatility. In case you are unfamiliar, Kermit is a seasoned and proven terminal emulator and file transfer utility that uses its own custom protocol. It also just so happens to have an MBC-555 port, which makes it perfect for our purposes.
With Kermit, I’ll be able to transfer files onto the computer using a serial port. BBSes will also be accessible to the system, which I think would be a fun way to spend a weekend afternoon. Unfortunately, it’s a bit of a chicken-and-egg problem: I can’t transfer Kermit over serial without already having Kermit.
Having been around for decades, the Kermit project of course experienced this “bootstrap problem” in the past. Their solution was to make a special encoded file format, *.BOO, which allows you to transfer a binary executable using solely ASCII text, similar to the BinHex format popular on Apple computers. The user will then type in a “baby Kermit” in BASIC or assembly, which can then unpack the bootstrap file in order to produce a fully-functional Kermit (or any other executable you wish to encode.)
However, I decided to skip the bootstrap solution in favour of just writing an executable for Kermit onto a floppy disk image. I’ve got lots of good options on hand for consuming a disk image with the MBC-555, such as the Greaseweazle disk dumper, and the Gotek floppy emulator.
I also came up with the idea of writing my own test program in assembly using DEBUG.COM. That sounds like fun, sure, but we’ll be here all week. We can save that heroism for later.
My first step was to figure out the disk encoding, and try to find a tool that understands it, unlike the HxC utility.
Make a blank disk
A blank disk is probably the easiest image to understand. To make one, I opened an image of Sanyo DOS 1.25 in MAME. Then, I inserted a second copy of that image into the virtual drive B, and used FORMAT from DOS to format it. The image in drive B is now a “blank” image, as far as the Sanyo cares.
For the rest of this article we’re going to assume that we’re dealing with single-sided 160k disk images, because that should be enough space to get whatever I want on there. I also only have a single-sided disk drive in the MBC-555, which is a detail that will be very relevant later.
I opened the resulting image in a hex editor. Let’s notice some things on a blank disk image:
- There is nothing on the disk beyond track 0 (everything is $e51)
- Only sectors 0, 1, and 2 have anything in them
Remember that the MBC-555’s boot ROM loads the BIOS into RAM from the first sector of the boot disk. This means that the boot sector of a bootable Sanyo disk is going to look a lot different from one for any other MS-DOS system.
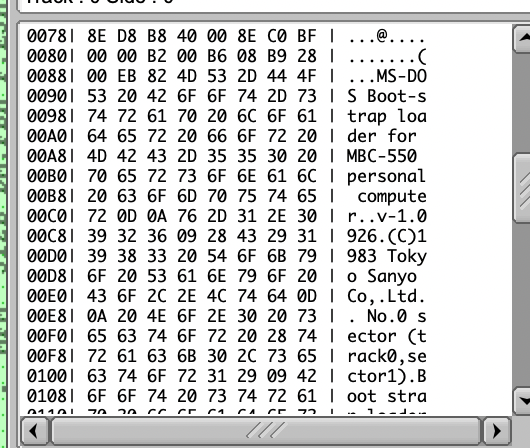
Sector 0 actually describes itself in text which is amazing, if a bit cryptic because of the space constraints:
MS-DOS Boot-strap loader for MBC-550 personal computer v-1.0926. (C)1983 Tokyo Sanyo Co,.Ltd.. No.0 sector (track0,sector1).Boot strap loader 1- 2 sector (t0,s2-t0,s3).File Allocation Table and it’s back up.. 3- 6 sector (t0,s4-t0,s7).Directory.. 7-30 sector (t0,s8-t3,s7).IO.SYS..31-46 sector (t3,s8-t5,s7) MSDOS.SYS
In other words:
| Logical Sector | Contents |
|---|---|
| 0 | Bootstrap loader |
| 1 | FAT |
| 2 | Backup of FAT |
| 3 to 6 | Directory structure |
| 7 to 30 | IO.SYS, on a bootable disk |
| 31 to 46 | MSDOS.SYS, on a bootable disk |
I believe that the HxC utility expects to see a format more like the early IBM PC MS-DOS FAT122, which based on this FAT12 description would look something like this:
| Logical Sector | Contents |
|---|---|
| 0 | Boot sector |
| 1-9 | FAT 1 |
| 10-18 | FAT 2 |
| 19 to 32 | Directory structure |
| 33 … | Data |
Obviously these are wildly different sector numbers, so at least based on this, the Sanyo’s version of MS-DOS 1.25 is not using a standard FAT12 layout.
Although sector 0 on our new blank disk sounds like it might have something akin to a bootloader, it doesn’t have anything to bootload. FORMAT did not produce a bootable system disk, which makes sense since we did not apply anything like an /S switch or equivalent, and as a result, there’s no MSDOS.SYS or IO.SYS on the resulting blank disk. IO.SYS is what the bootloader actually puts into memory, which is part of why it needs to be at a static offset on the disk. This new, empty disk is strictly for data, which is what I expected.
Keep in mind that I want to modify a Sanyo DOS 1.2 disk here. A bootable Sanyo MS-DOS 2.11 image does not have this readable text header in sector 0, and based on poking around in the HxC utility, this disk layout appears to have changed for the later OS. There seem to now be two sectors each for the two FATs in DOS 2, which means that the directory structure now starts on logical sector 5. It also has become a nine sectors per track image! So this is not terribly useful information, but it’s all we have to go on.
Based on the provided sector sizes, the geometry on this DOS 1.2 disk appears to be 8 sectors per track, as logical sector 7 starts on track 0 sector 8, and logical sector 30 is on track 3 sector 73. The Sanyo reportedly can handle 9-sector disks, but let’s not make things more complicated for ourselves unless we have to. Assuming 8 sectors per track, and 40 tracks per disk, we know that a total 160kB single-sided floppy disk has to have 512-byte sectors ((160 * 1024) / (40 * 8) = 512.)
I guessed that because there were so few sectors allocated in which to store the directory structure, there had to be a really low limit on how many files you could have on a floppy. I then proceeded to do COPY 0.txt 1.txt, COPY 1.txt 2.txt for a couple minutes until I found out that 64 files (of course) is the limit:

That means that each entry in the directory table is (4 sectors * 512 bytes) / (64 entries max) = 32 bytes. The filename is stored in 8.3 format (8 bytes for filename followed by 3 bytes for extension with $20 for blank spaces,) followed by some attribute bytes that are probably stuff like access time and hidden/locked/deleted. I wrote a quick tool to dump some of this out.
I also determined that FAT entries were probably 12-bits long, like conventional FAT12, because this happened:
| Disk with… | …produces FAT |
|---|---|
| No files | FE FF FF 00 00 |
| One file | FE FF FF FF 0F |
| Lotsa identical files | FE FF FF FF FF .. |
| Sanyo DOS 1.25 | FE FF FF 03 40 .. |
Remember in the case of .. FF 0F that FAT is little-endian. However, I didn’t really know what an entry in the FAT actually meant. My guess was that for the case of many identical files, every entry in the FAT was pointing to an identical entry on disk to save disk space. I had no idea what the first three bytes did, so I ignored them and moved on for the time being.
After puzzling this out, I decided that I didn’t need to write my own disk loader at all. GNU mtools is an open-source utility for handling DOS disks and disk images, and it’s not nearly as opinionated as the HxC tools. I decided I would probably be able to convince GNU mtools to accept this weird disk layout with some kind of configuration file, but it turns out that it did fine on its own, right out of the box:
% mdir -i onefile.dsk
 Volume in drive : has no label
Directory for ::/

FOO      TXT        42 1983-03-10   0:02
        1 file                   42 bytes
                            159 744 bytes free
Okay, mtools, if you’re so smart, then let’s try copying a text file into this new disk…
Well, that was easier than I thought it would be.
% mcopy -i empty.dsk readme.txt ::
% mdir -i empty.dsk
 Volume in drive : has no label
Directory for ::/

readme   txt        16 2023-12-27  23:05
        1 file                   16 bytes
                            159 744 bytes free
Let’s see if Sanyo DOS can read the modified disk in the emulator:
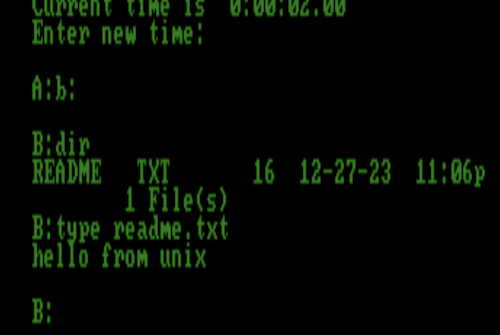
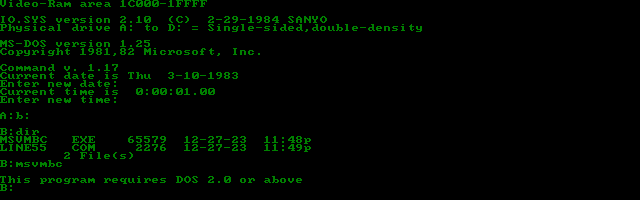
Oh wow, that was easy! How about copying an executable, now?
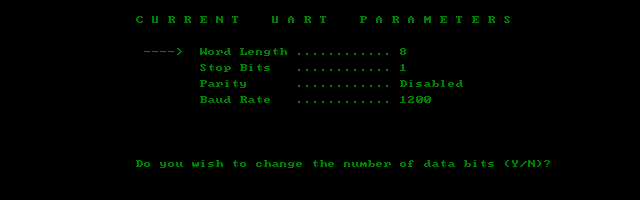
LINE55, a tool for configuring the Sanyo’s serial port settings (baud, etc) is pretty small. I grabbed it from this multiple-Sanyo-computers software archive and threw it onto the disk image with mcopy as well.
It runs when the disk image is mounted in MAME:
Okay, I guess this all works. I don’t know whether to be glad it worked, or a little cheated that I didn’t actually have to pull my hair out trying to figure out how FAT works for a week. Now let’s copy on Kermit and give it a try and we can get back to testing the serial card quickly…
Aaaaaargh.
The Road To DOS Dos
Sanyo DOS 2 seems like it has been a huge improvement, but there’s just one big problem. All this time I’ve been using Sanyo DOS 1.25 – not because I want to – because I have to. The only disk image of Sanyo DOS 2.11 that I have is double-sided, and my early Sanyo MBC-555 has only single-sided drives. In case you haven’t had your coffee yet, that’s one fewer side.
Yes, I could put in double-sided drives. I even have an adequate donor for them (an MBC-1100.) I don’t want to, though, for some reason. It’s probably because a pair of single-sided drives aren’t very useful, even in working condition, and would then immediately become akin to e-waste as soon as they’re split from their home of over forty years. That would make me sad. Plus, the folks who bought this thing in the first place had to figure it out. I can too.
My first instinct was to head to MAME. I messed around with trying to boot from the Sanyo DOS 2 image and then formatting a disk in the second drive, like this:
% ./mame mbc55x -flop1 Sanyo_DOS_v2.11.img -flop2 blank.img
…but it always came out two-sided.
Eventually, I asked a question on the VCF forums about converting the double-sided image to single-sided.
One solution presented in the thread was to use the Windows utility WinImage to convert the original disk. I tried the “Change Format” option to turn a known-good 2.11 image to 180kB, but the resulting image did not boot in MAME. I decided not to pursue this technique any further.
In the same thread, veteran poster krebizfan told me about the /1 switch to FORMAT in passing.
That is, if I typed:
FORMAT /1 /S B:
I’d be able to format the disk in drive B as single sided (/1) and transfer a working DOS 2 system to it (/S.)
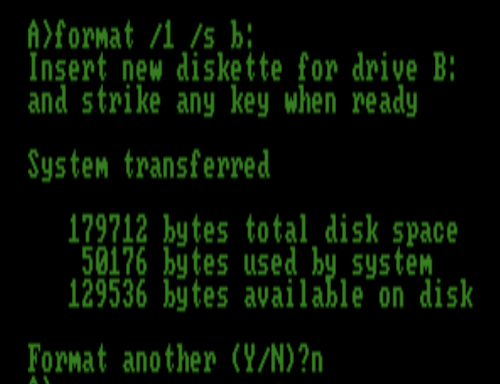
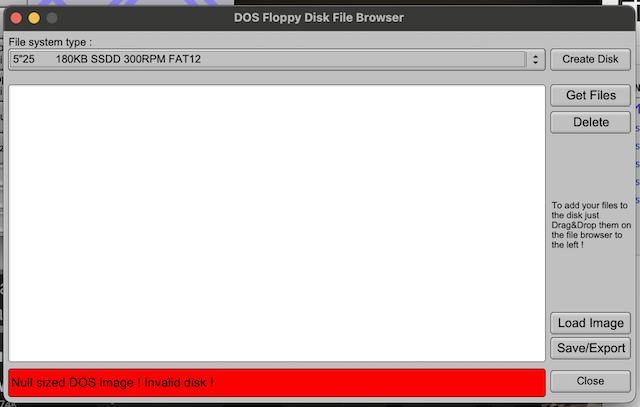
This worked perfectly, producing a viable image that the HxC utility could view but not browse the filesystem of, complaining of a “null-size DOS image.” mtools again was able to figure out what it looked like:
% mdir -i sanyo-dos-2.11-single-sided.dsk
 Volume in drive : has no label
Directory for ::/

COMMAND  COM     16117 1983-09-17  13:25
        1 file               16 117 bytes
                            129 536 bytes free
The file utility seems to be able to determine a structure, although a few things seem a little funky. Notice that the number of sectors per track has increased:
sanyo-dos-2.11-single-sided.dsk: , code offset 0xe4+3, OEM-ID “Sanyo1.2”, root entries 64, sectors 360 (volumes <=32 MB), Media descriptor 0xfc, sectors/FAT 2, sectors/track 9, heads 1, FAT (12 bit by descriptor), followed by FAT
MAME is able to boot this image using the usual command line:
% ./mame mbc55x -flop1 sanyo-dos-2.11-single-sided.dsk
After some wrestling with my collection of misfit 40-track floppy drives, I was eventually able to write a Sanyo DOS 2.11 diskette and pop it into my MBC-555. Did it work? No. The Sanyo ran the drive for a little while and then seemed to give up, without doing the gentle seeking behaviour that I’m used to when trying to boot a DOS 1.25 image. By ear, it seemed identical to what happens when you put in any other unbootable disk. Most likely, the bootloader wasn’t found, or if it was found, it wasn’t able to give a useful vector into IO.SYS.
Even though the images are byte identical, the HxC utility treats them as different when renamed to IMG versus DSK. The gap between sectors is wider on IMG, including the lead-in on the index area. That’s interesting. I don’t think it should affect reading though, as the disk controller is used to slight variations in disk geometry/timing like that?
I decided to rule out at least one problem and go to the Gotek floppy emulator running FlashFloppy firmware. This let me sidestep a lot of problems:
- Converting the disk image to single-sided (the Gotek is configured for double-sided;)
- The annoyance and time it takes to write the disk;
- Anything in the physical device chain that might have gone wrong (“new” diskettes, the sketchy drive I repaired once already, dirty heads)
My plan was simple: I would try to boot the Sanyo off of the Gotek, and then do the FORMAT /1 /S technique to write a real boot disk in the second drive. This would allow me to keep my single-sided floppy drives later, once the Gotek was unplugged. I’d also be able to provide a flux-dumped single-sided boot disk, for all future MBC-555 single-sided diehards like myself.
I copied the Sanyo DOS 2.11 image from the WinWorldPC collection onto the USB stick, and booted the computer.
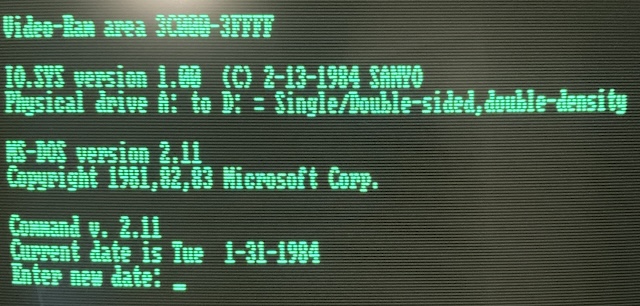
MS-DOS 2.11 on my Sanyo MBC-555. Finally!!!
It was at this time that I went to go figure out why the keyboard wasn’t working. You can read about that in a future article, where I explain what I broke and then how I fixed it…
With the keyboard back in action, I was able to do a FORMAT /1 /S B:. Unfortunately, the first time failed. It seems like the second drive in the Sanyo has gunked itself back up again from disuse, which means I’ll probably have to dismantle it and do a more thorough cleaning. For the time being, I swapped cables and changed the DS0 jumper to DS1 on the first drive in order to use it as the B drive, and started a format again.
This time it worked! I now had a physical 5.25” diskette with a single-sided format and Sanyo MS-DOS 2.11 loaded on it. I swapped the cables back and rebooted, and now the Sanyo was happily booting off its new diskette4. The drives did take a long time to settle on each action, though, which makes me think it may be time for the infamous C9 tantalum capacitor fix on my unit as well…

I looked over the differences between the dump and the MAME-created images for quite some time, but I couldn’t find a smoking gun about why writing the MAME image didn’t work. The boot sector has identical CRCs between both the working and non-working disks, as you would expect. Again, the sector gap is a little different, but I don’t think that matters very much to a reasonably intelligent disk controller like the WD1793 inside the Sanyo.
I’m guessing I screwed up some setting during the write, and the disk image was completely reasonable.
Getting Kermit on a Real Machine
Now, I had a dilemma. I could keep going down the road of trying to inject files into a disk image, writing the disk image to a real disk, and then booting, or I could just use the Gotek I still had plugged in to load a disk with Kermit installed.
Laziness won out: I threw my now-misnamed empty.dsk image onto the Gotek’s USB stick. With LINE55 and KERMIT loaded on the disk I would finally have enough to test the serial card.
% mdir -i kermit.dsk
 Volume in drive : has no label
Directory for ::/

MSVMBC   EXE     65579 2023-12-27  23:48
line55   com      2276 2023-12-27  23:49
        2 files              67 855 bytes
                             91 648 bytes free
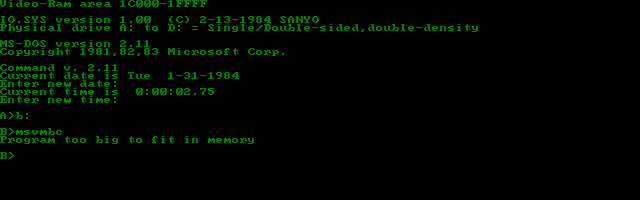
First, though, I thought I would check to see if there’s something else that was going to jump out and surprise me. And indeed there was. When I ran MSVMBC in MAME, I got the error “program too big to fit in memory.”
I wasn’t sure how much memory the emulated MBC-555 had. I hoped that it was less than my upgraded actual MBC-555, but it was worth checking before I went to all the trouble of loading up the Gotek. In the MAME driver for the MBC-555, I found a function called set_ram_size(), which seemed like it would be helpful. When run, it produces an output of the configured ram size on the error log as a side effect, which I figured I could easily get by opening the debugger and enabling error tracing:
> trace mbc55x-ramsize.log,,logerror
Tracing CPU ':maincpu' to file mbc55x-ramsize.log
> g
When I was done playing around, I found a big file called mbc55x-ramsize.log in the MAME directory. It didn’t have the expected Ramsize message, however. I found that I had to forcibly soft-reset the debugger to get MAME to re-run the machine_reset code, at which point I had a log reading this at the top:
Soft reset
[:] Ramsize is 131072 bytes
[:] RAM_BANK_SIZE=65536, nobanks=2
[:] Mapping bank 0 at 00000 to RAM
[:] Mapping bank 1 at 10000 to RAM
[:] Mapping bank 2 at 20000 to NOP
[:] Mapping bank 3 at 30000 to NOP
[:] Mapping bank 4 at 40000 to NOP
[:] Mapping bank 5 at 50000 to NOP
[:] Mapping bank 6 at 60000 to NOP
[:] Mapping bank 7 at 70000 to NOP
[:] Mapping bank 8 at 80000 to NOP
[:] Mapping bank 9 at 90000 to NOP
[:] Mapping bank 10 at A0000 to NOP
[:] Mapping bank 11 at B0000 to NOP
[:] Mapping bank 12 at C0000 to NOP
[:] Mapping bank 13 at D0000 to NOP
[:] Mapping bank 14 at E0000 to NOP
[:] Video reset
Only 128kB of RAM in MAME, the stock amount of RAM! That doesn’t seem like enough to run a big ol’ 64K program like Kermit. Since all my sockets are filled on my real computer, I should have 256kB, assuming all goes well. There are also some intriguing bodge-mods to get the thing up to 512kB that I’ve read about in Soft Sector magazine, which I think is worth considering if I start trying to do some programming on this thing.
Let’s see if I can figure out how to increase MAME’s emulated machine’s memory size to the same 256k as the real computer. The machine config section in the driver reads this:
RAM(config, RAM_TAG).set_default_size("128K").set_extra_options("128K,192K,256K,320K,384K,448K,512K,576K,640K");
I tried the dumbest thing I could think of:
% ./mame mbc55x -flop1 roms/mbc55x/Sanyo_DOS_v2.11.img -flop2 kermit.dsk -debug -ram
Error: option -ram expected a parameter
% ./mame mbc55x -flop1 roms/mbc55x/Sanyo_DOS_v2.11.img -flop2 kermit.dsk -debug -ram 256K
This worked, according to the trace log:
Soft reset
[:] Ramsize is 262144 bytes
[:] RAM_BANK_SIZE=65536, nobanks=4
[:] Mapping bank 0 at 00000 to RAM
[:] Mapping bank 1 at 10000 to RAM
[:] Mapping bank 2 at 20000 to RAM
[:] Mapping bank 3 at 30000 to RAM
[:] Mapping bank 4 at 40000 to NOP
[:] Mapping bank 5 at 50000 to NOP
[:] Mapping bank 6 at 60000 to NOP
[:] Mapping bank 7 at 70000 to NOP
[:] Mapping bank 8 at 80000 to NOP
[:] Mapping bank 9 at 90000 to NOP
[:] Mapping bank 10 at A0000 to NOP
[:] Mapping bank 11 at B0000 to NOP
[:] Mapping bank 12 at C0000 to NOP
[:] Mapping bank 13 at D0000 to NOP
[:] Mapping bank 14 at E0000 to NOP
[:] Video reset
Four 64k banks of RAM now instead of just two! Opulent.
Now, I was finally able to start Kermit in the emulator:
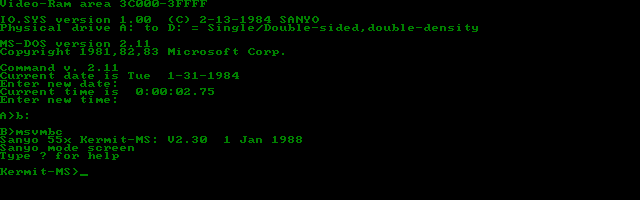
Okay, now that I know Kermit should work on an emulated 256K MBC-55x, let’s see if it will work on my real computer. Hopefully all my expansion RAM is good…
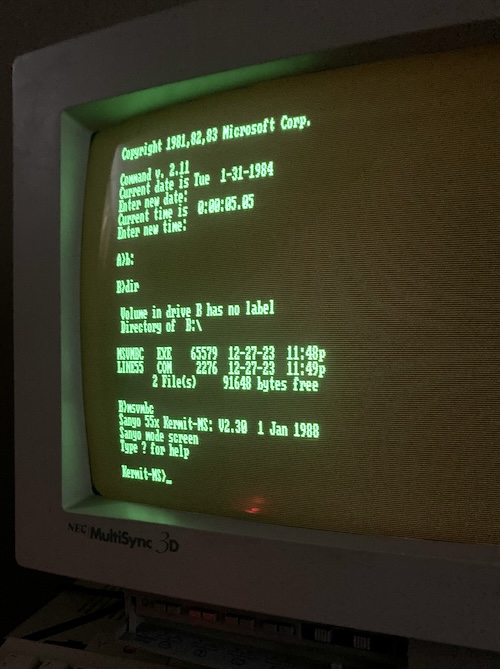
Success!
Conclusion
Although it seems like this was a lot of fuss for very little payoff, I finally have the ability to get executables onto the Sanyo.
One of those executables is Kermit, with which I can… get more executables onto the Sanyo. Kermit is also handy as a general-purpose terminal emulator, so there are lots of fun things we can do to put the prototype serial card through its paces now.
-
Why $e5 ? It was the value picked by IBM for the IBM 3740, the system which introduced the concept of the diskette. When encoded into (0,1)RLL (FM,) it has the most transitions of any possible byte, which makes it really easy to detect a flaw in a freshly-formatted diskette. This persists even though the WD1793 in the MBC-555 is capable of doing MFM encoding. Thanks to Thom Cherryhomes for pointing this out in his amazing video on 86-DOS. ↩
-
FAT12 was introduced in 1980 for QDOS, and adopted by MS-DOS in its initial creation in 1981, so I expected the 1983 Sanyo MS-DOS 1.25 to be using this format. ↩
-
Physical sectors are 1-indexed and logical sectors are 0-indexed. To get the physical track and sector from a logical sector number, you can do
track = (logical_sector + 1) / 8andsector = (logical_sector + 1) % 8. If you substitute9for the8, this produces different numbers than those provided by Sanyo in the disk header. ↩ -
I also ripped the diskette to SuperCardPro (SCP) format and uploaded it to the Internet Archive. If this helped you, please let me know! I’m sure there has to be someone else who needs DOS 2 on their single-sided Sanyo. ↩