Commodore 64 black screen failure round-up
Tags: computer commodore64 commodore repair
Through the kind contribution of a friend, I was able to move a bunch of broken Commodore 64s into the hands of other folks. And then help those folks fix those Commodore 64s, because they’re broken and that’s where all the fun is at. Here’s the tale of the first C64 of the bunch to be fixed. And the second.
The origin
I was invited to head out on a road trip to go visit John from CelGenStudios, who had a literal carport full of cool junk that he wanted to get rid of. As all Canadians know, winter means that the value of having “covered car storage” often outstrips the value of all the things inside it. Sometimes having a free garage bay is worth more than the car inside it!
Among other cool things, that you’ll hear about in future articles, there were at least seven dilapidated Commodore 64s. I say “at least” because we took these back from BC to the local retro-computer club, where they were given away to the members. I kinda lost track of how many were out in the community, but they all came back for a later “Fix-It” event. Broken stuff? My favourite.
These machines were in bad shape, with most missing top and bottom cases and keyboards, and some missing major components from their sockets. However, donating them instead of playing the eBay casinos is a very generous thing to do.
Thank you to John not just for this junk, but all the other junk too! It is great to see it distributed to a bunch of other weirdos.
The symptoms
Of course, we started by looking through the pile of power supplies to see which ones were going to lose regulation and turn the C64 into ash. Fortunately, we found a supply of the “good” generation and hooked it up with a multimeter present, and made sure that it didn’t drift and wreck any of the RAM.
As with a lot of Commodore 64s, the problem here is that when I plugged it into a TV and turned it on, there was just a black screen. I did notice a sync flash, but there was also some strange noise in that flash that quickly disappeared.
I quickly re-measured the +5V DC on the known-good power supply, and was happy to know that it was within range, so at least we weren’t undervolting or overvolting the system.
What’s a PLA?
First, I suspected the 906110 PLA. The PLA (“programmable logic array”) IC handles all of the decode logic for the Commodore 64 motherboard. You can think of it as sort of like the traffic cop giving directions so that the CPU or video chip requests are always going to the right place.
All of the logic is integrated into one part to save costs. If Commodore had to stuff a C64 board with dozens of 74s, it would be larger, consume more power, and cost more money, especially if someone on the assembly line installed one of those 74s backwards once in awhile. For companies bigger than weird hobbyists, if you’re planning on building a whole lot of machines, the up-front cost of producing a mask for “a chip that contains all my decode” is easy to justify against future per-unit savings. Especially if you also own the chip fab that makes those chips.
The PLA’s pinout consists of sixteen inputs (I0 through I15) and eight outputs (F0 through F7.) There’s also a chip select pin, which disables all the outputs when it’s not asserted.
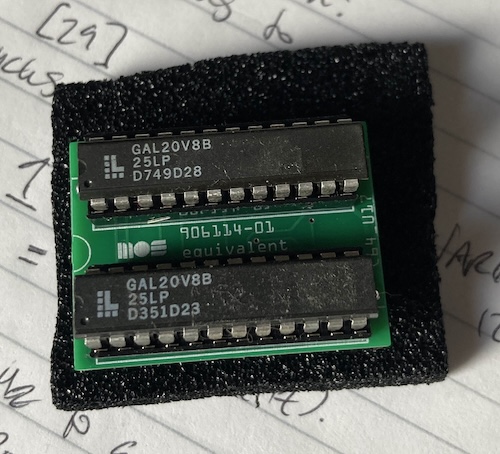
Since the PLA is commonly fingered in most failures of C64s, I decided to look there first. I didn’t have a known-good one on hand, outside of my single working C64, so I built up a GALPLA board, and brought it with me. The GALPLA implements the PLA’s equations using a pair of GAL20V8 programmable logic devices.
At the same time, I wanted to actually verify the old chip was bad before swapping it. If I don’t know for sure that the chip is bad, I won’t know for sure that I’ve actually fixed the computer if it starts working when I swap the PLA. It might just be a manky socket, or some other intermittent issue that will reoccur later.
To make sure the old PLA was bad, I decided I would take a look at the outputs on the scope. Since I was away from home, I brought my new Zoyi1 pocket scope with me, which is a thoroughly imperfect yet also really handy little tool.
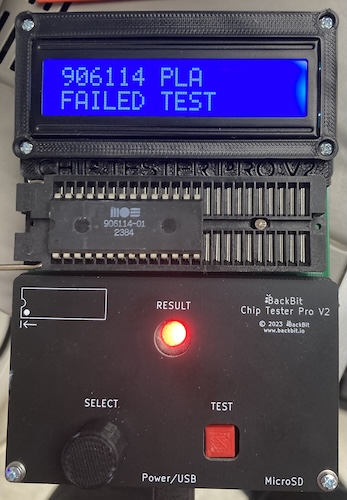
And then when I got there, I found out that one of the other club members, Jason, had brought a BackBit chip tester! I’d never used this particular model before, and I knew it had an entry for the 9061102 PLA.
Surprise: that test failed instantly! I was so surprised at my luck that I went and got another PLA out of a different broken machine and ran that, which passed. My cobbled-together GALPLA was also tested, and passed.
After swapping the GALPLA into the system, we now had a sync flash on startup, although the computer was still not working properly. Now, it would boot to a BASIC startup screen, and report “OUT OF MEMORY ERROR IN 0.”
Out of memory?
I know that this is in greyscale; we were probably using the wrong video cable for the composite port on this 1702. Don’t worry, the C64 was generating perfectly fine colour.
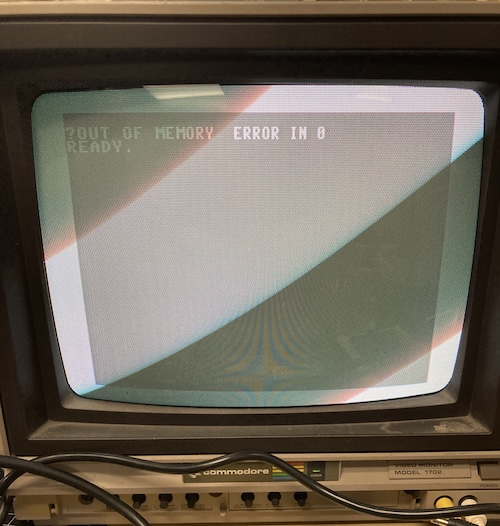
However, we can see well enough to know that BASIC is in distress. The most likely cause for this error is that one of the soldered-down DRAM chips has gone bad.
Some piggybacking with a known-good 4164 didn’t seem to change the outcome of the startup, so it was determined to run the C64 diagnostic and remove the ones that it complained about one at a time. Turns out that three RAM chips failed, and were progressively eliminated by a Versa64Cart loaded with a diagnostic image (and S-video output adapter) brought by Baptiste. Each RAM removed was socketed when it was returned to the board.
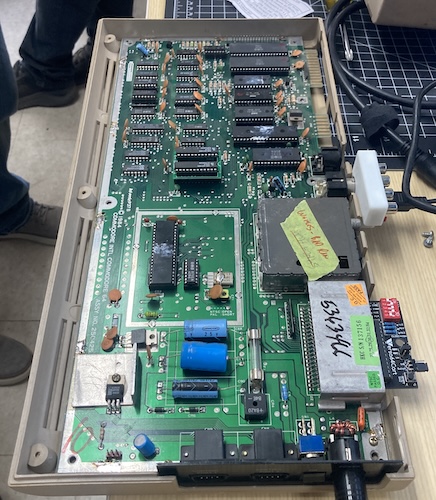
There was some concern at this point that the GALPLA might be too tall to clear the keyboard, but we may be able to trim away the plastic clips on the pin headers to lower it, if we really have to. For now, it seems fine, but we also didn’t have a complete top case to test with.
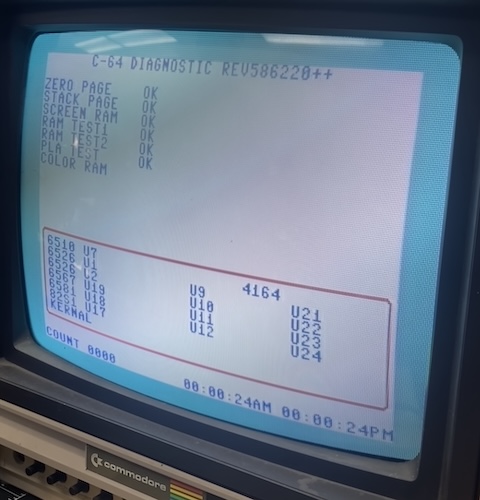
Eventually, we were given a clean bill of health by the C64 Diagnostic software. Some later inspection showed that there seemed to be some occasional corruption on the very leftmost column of text. The BackBit VIC-II test passed, but we ran out of time to do some more parts swapping on this one.
Fixed! Sort of. At least it’s booting. Who’s next?
Painful memories
We fixed a handful of other C64 boards from this hoard through the same process, for a total of four out of six boards working by the time I went home. Hopefully we can get at least one more!
However, since these three other boards were basically fixed by high-speed parts swapping, I won’t write too much about them, but I will share the one machine that I found interesting, because I’m still not sure what was going on.
One interesting failure we found was that of another black screen C64. The 82S100 PLA in it had failed according to the tester, so we swapped it from a parts board that was had no power coming into the +12V regulator (will check this one later, too!)
After that, we got a sync flash, indicating (I assume) that the CPU was now capable of using the PLA to address the VIC-II video chip in order to turn it on, but then something bad happened after that and it wedged itself on a black screen.
At that point, it was time to stick in the DesTest MAX cartridge, which consistently did not run – at most, we’d sometimes get a solid white screen.
DesTest MAX claims that it only needs a few devices in the documentation:
The 6510 CPU, VIC-II and PLA need to be functional, though the ROMs, CIAs and SID are not required and can be removed if socketed.
Well, since you asked nicely… I tested the CPU in the BackBit, which failed “8 tests.” I’m curious what those exact tests are, or how many tests there are, but I couldn’t figure out a way to make it tell me. Maybe there’s a log file on the SD card?
I would never have thought to test the CPU, which means that this tester probably helped save this machine. After swapping a 6510 from the computer that won’t power on, I was able to get an annoying white flash from the startup but nothing else.
At this point, I decided to remove all the socketed parts not needed to run the DesTest MAX cartridge. A lot of things were socketed, which made me suspicious that this was not this computer’s first time under the knife.
Working methodically, I removed both CIAs and tested them – they were fine. I removed one ROM at a time and tested after each one3, and found that once the 901225-01 character ROM was removed from U5, the computer was now able to boot the DesTest MAX cartridge.
I reinserted all the CIAs and all the ROMs except for U5, and it continued to boot the cartridge properly, so I once again scavenged the U5 ROM from the power-stricken C64 and swapped that in. Success – DesTest MAX booted and went through the whole suite of tests!
Look! I was even able to boot BASIC.

After replacing one of the ROMs, a dead CPU, and a dead PLA, this motherboard was once again alive.
I am still not sure why this ROM kept the computer from booting, as DesTest MAX does not attempt to interrogate the original system ROMs before running. My best guess is that it was stuck on output-enable for some reason and was putting junk on the bus. Maybe that’s also why the CPU died, and maybe the PLA helped jam that output enable on in the first place.
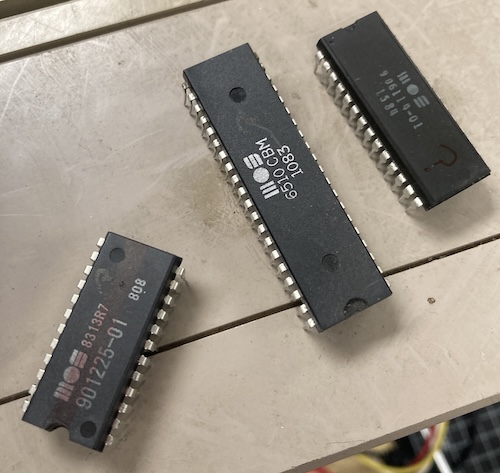
Once I had removed the parts, I realized that the U5 ROM had been marked through with a red Sharpie by (I assume) some previous technician. Did they know this part was bad, and just couldn’t find a replacement?
I didn’t hold onto the part, but it wasn’t thrown away, either. I may try to set it up on a breadboard and see if I can verify this hypothesis in isolation when I can get it back.
If you have your own theory about this failure, please feel free to speculate below.
Conclusion
Black screens are not always the PLA. I know it was the PLA for both of the machines shown here, but at least half the PLAs tested passed on the other computers. It seemed anecdotally like the 82S100s were more successful, but our sample size is too small to draw conclusions.
I learned two things on this adventure. One is that a mask ROM can fail so severely that it hangs the entire bus up, and the other is that a specialized chip tester might actually be worth the money.
For the latter case, I had long avoided specialized testers – I like my TL866 and my GQ-4X4 for their versatility, but they are limited in their ability to run complex test vectors (mostly because of crappy software.) They certainly can’t test a 6510 CPU, which is something I would never have bothered with testing (or maybe could not have identified on a scope) without this thing making it easy.
I’m not sure when I’ll add a complex tester to my arsenal, but I have definitely been convinced that they can come in handy.
There’s still some faulty Commodore 64 boards around, especially that pesky one with the mysterious power problem. It would be really impressive to fix all of them, but it is possible that they will turn out to be more difficult, or involve replacing a more complex chip than a PLA. I’ll be sure to let you know when we figure those out too.
Repair Summary
| Fault | Remedy | Caveats |
|---|---|---|
| Black screen (with sync.) | Replace bad PLA and bad RAM. | There are further visual faults whose origin could not be identified by automated testing, and we didn’t have enough time to do a deeper dive. |
| Black screen, but a different computer (also with sync.) | Replace bad CPU, PLA, U5 character ROM. | The exact mechanism of the ROM keeping it from booting is unknown at this time. |
-
Not sponsored. If you’re a test equipment vendor and you want to sponsor me, get in touch. I guarantee you I will misuse your stuff enough that you won’t need a QA department. ↩
-
We found out that the same test will also work for an 82S100 PLA, because we had a few systems with those around. Most passed! ↩
-
Like the Retro Chip Tester Pro, I assume the BackBit has some way to identify ROM chips from the checksum, but couldn’t figure out how to make it do this. ↩