Bad video RAM had Sanyo seeing red
Tags: computer sanyo mbc555 video repair
My PC-incompatible Sanyo MBC-555 is now working, although it still looks like it fell out of a garbage disposal. Beyond its nasty exterior appearance, the video output isn’t particularly good either. There’s red garbage all over the screen. I decided to tackle this problem first, before getting my hands, face, cat, and desk sticky with epoxy.
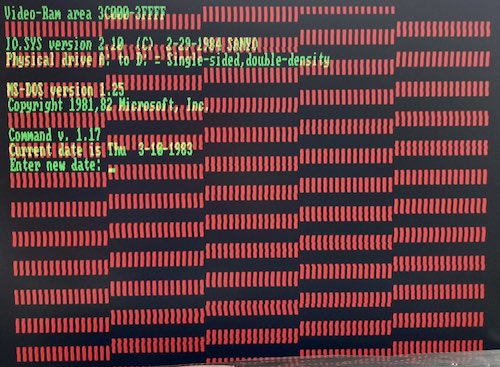
I had a suspicion that the “red” video RAM was simply bad. It appeared to be stuck on, but only for half of each character. After checking the SAMS Computerfacts schematic for the Sanyo MBC-55x, I found that the “red” colour plane is provided by two TMS4416 4-bit DRAM memory ICs.
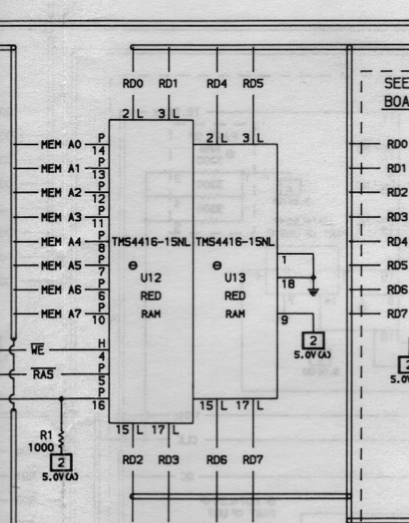
Because of the unusual way that the MBC-555’s MC6845 VDP indexes video memory, and the fact that they’re only 4-bit RAMs, it will take a concerted effort from both of these in order to generate one 8-pixel column for one character. My guess was that one of the two RAM ICs – either U12 or U13 – was bad.
Since the errant red colour appears to start on the “second row” of the text, I went further and guessed that U13, the higher-numbered red RAM, was at fault. Unfortunately, both of these DRAMs are soldered to the board, so I had to desolder them – which was surprisingly easy, thanks to my dispenser needle clogging up and then coughing up a generous glob of Amtech rework flux. Waste not, want not.
I quickly removed and socketed U13. Then, I plugged the removed RAM chip into my tester. That tester is made by Simon Raybould, and I got the 4-bit DRAM tester from eBay at this listing. He doesn’t seem to have a web page for the product, so hopefully that link won’t break in the future.
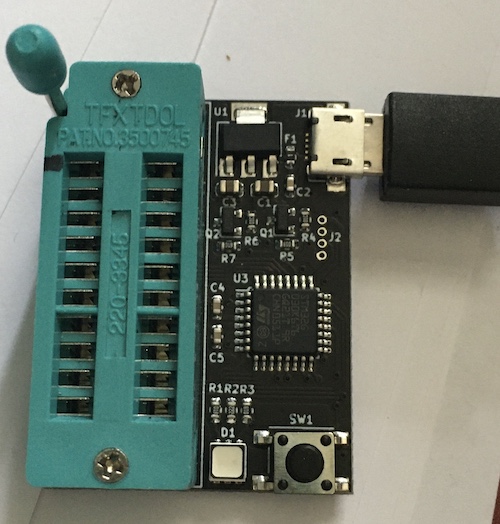
The RAM tester itself is a very nice piece of hardware, with surface-mount everything, a really compact board, and USB power. I strongly recommend picking up a (surprisingly cheap!) combo pack of 1- and 4-bit testers if you like screwing around with old computers, as I don’t know how long Simon will be making them for.
Anyway, that’s enough of the sales pitch. The TMS4416 was plugged into the tester. When I pushed the “test” button, the tester came back almost immediately with an angry red LED. U13 was bad – I had guessed right the first time!
After waiting a few weeks for a replacement TMS4416 set to arrive from AliExpress (also tested with the RAM tester on arrival, to make sure all of them were good,) I slapped one into the board and reassembled the computer.
At first, I just got garbage on the screen, both floppy drives ran non-stop, and nothing seemed to be happening no matter how long I waited for a boot. I began to fret, but eventually figured out that I had plugged the floppy cable into the motherboard one row off. The way I figured that out is: the 74LS368 bus driver on each of the TEAC floppy drives was getting white hot. Oops!
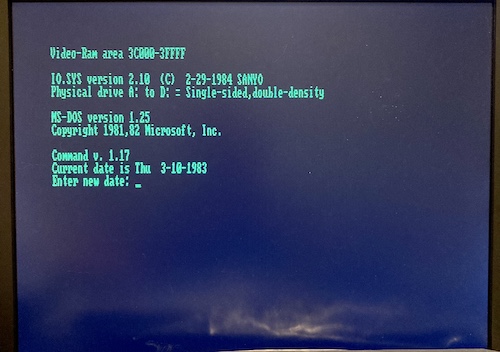
Hey, look at that. We have no more stuck red behind our text!
To make sure blue was still working, I wrote a quick program to cycle through all eight colours:
10 FOR I = 0 TO 7
20  X = 80 * I
30  LINE (X,0)-(X + 80, 200),I,BF
40 NEXT I
50 WHILE C$ = ""
60  C$ = INKEY$
70 WEND
Here’s how it looks in MAME:

And on the real hardware:
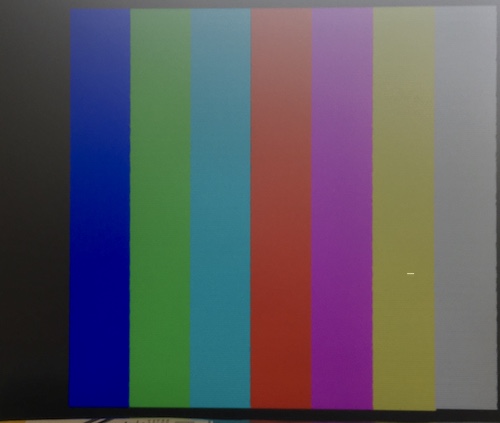
Yes, I’d say the colour problem is fixed. And I got to test the (barely functional) keyboard, too. Time to relax by hyper-fixating on another broken part of this odd computer.
Repair Summary
| Fault | Remedy | Caveats |
|---|---|---|
| Red garbage on screen | Replace TMS4416 DRAM at U13 |