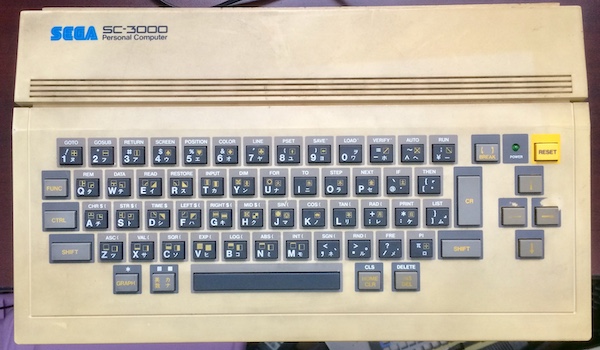
The Sega SC-3000 goes to a key party
Tags: computer sega sc3000 keyboard repair failure
I fixed up my SC-3000’s cartridge slot almost a year ago, but I haven’t been using the computer. Why not? Because the keyboard is super unusable. It’s time to fix it now, though, because I just paid a king’s ransom for a copy of Flicky.
The BASIC problem (ha!) is that when I was in BASIC, I had to type very very hard in order to push the keys in the top left of the keyboard. You could see them recede extremely far into the case, so much so that I was worried I was breaking something by pushing so hard. I shelved the machine and resolved to come back to it when I had a clean enough workbench to fully dismantle it and give the little Sega the love it deserves.
Wait, what’s this about BASIC?
Oh yes - I was going to write up this story as a mini-update, but failed to make it interesting in any way.
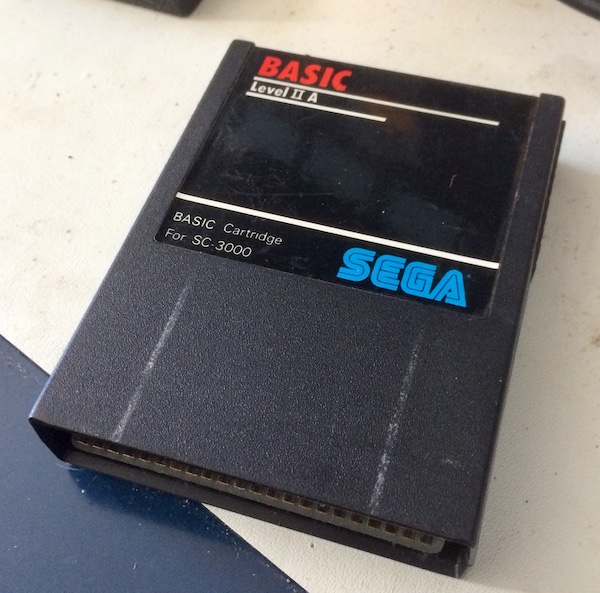
At last I was able to find a copy of BASIC on Yahoo Auctions. I decided to stop holding out for the very pricey “Level IIIB” and settled for “Level IIA,” with the expectation that I wouldn’t be getting super hardcore into BASIC.
As far as I can tell, the difference between “Levels” is that lower levels have fewer commands. I’m not sure if SEGA “Level 2” corresponds to the TRS-80 “Level 2,” but perhaps it was some kind of international BASIC standard. “B” cartridges add some extra work RAM as well, which is nice to have if you’re doing anything more than 10 PRINT "BUTTS":20 GOTO 10. Level IIA seems to be the cheapest/least featureful of the available Sega BASIC cartridges.
If I ever get to the level of interest in this machine where Level IIIB would be needed, it’s much more likely to end up with me developing software as a DIY ROM cartridge with a machine-language program on it. Or Forth. An SC-3000 Forth cartridge would be amazing, way cooler than kiddie BASIC.
CP/M would also be neat. Unfortunately, I don’t think CP/M agrees with the memory map - the Sega puts the cartridge at the bottom of memory for some reason, and CP/M expects low memory to be RAM. Maybe I could put some extra RAM in there, like the bigger “B” BASIC cartridges do… an experiment for another time.
Where was I? Oh yes. Now that I have a BASIC cartridge, I could test the keyboard. And like I said, the top left keys have to be depressed with a lot of force, pushing really deep into the case before they respond. It’s almost like the keyboard isn’t properly attached to the case up at the top…
Teardown
Tearing the SC-3000 down is about as hard as it usually is. It seems like every time I get into this machine, I forget that the clips need a lot of force to dislodge and that I should use a metal screwdriver instead of plastic trim removers. This time, a noble blue plastic spudger that has been with me from the start broke while trying to work my way through the case. RIP - thank you for your service.
Once the machine’s ventilation cover is removed, I can pop the keyboard out of the motherboard connectors and take a look at it. At first, I had assumed that one of the screw posts supporting the keyboard had sheared off. In fact, one of the screw posts holding the keyboard PCB to the keyboard had broken! And not just one - five.
Even a little bit of typing force on any of the corners makes the board flex a lot. No wonder I had to push so hard to get the top-left of the keyboard to work!
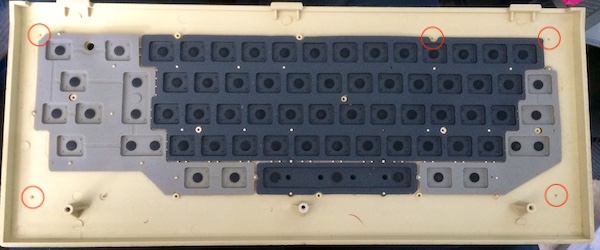
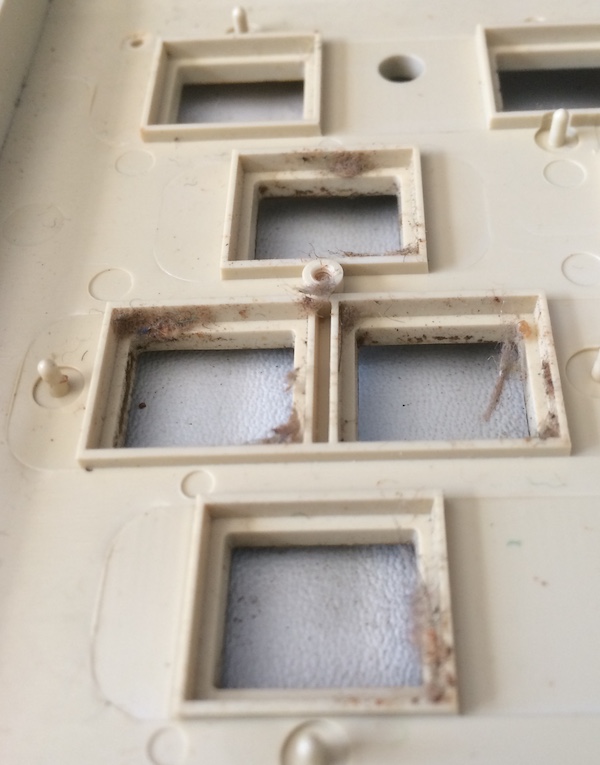
Every corner of the plastic had a broken screw post (circled). I’m guessing someone dropped something heavy on this poor little computer to break them all simultaneously, because I don’t think that normal use could do it. I started tearing the keyboard apart.
One cool thing about this keyboard is that, since it is all different colours, Sega used different rubber sheets for each chunk of keys. The space bar is especially interesting as it’s hard plastic that has had rubber moulded over it, with three contacts. Someone cared a whole lot about the spacebar at Sega!
The PCB has these interesting ‘cushions.’ I think they are some kind of paper, but I suspect they are there to firm up the typing feel and make the best of the membrane keyboard. Obviously they had some kind of internal cost pressure that made them go with the rubber keys, because the later SC-3000H model has actual keys.
There’s a lot of gross schmoo around the arrow keys. I think whoever owned this pretty much only used it for games, because the dirtiest and most worn keys are the cursor keys and INS/DEL (which starts games.) Then again, there isn’t much in the way of productivity applications for the SC-3000, so I shouldn’t be that surprised.
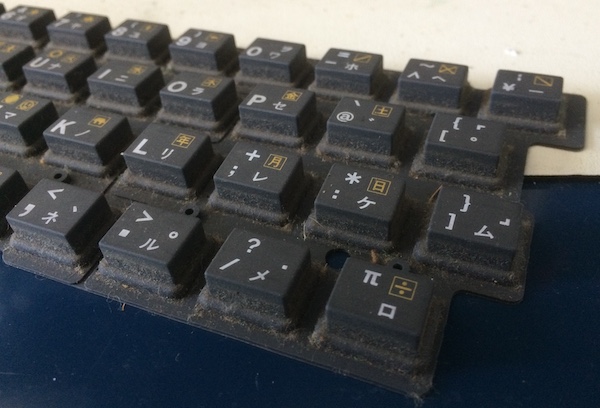
Although the cursor keys are the nastiest by far, the ‘main’ keys have a lot of hair and dust on them as well.
I took everything to the kitchen sink and started giving it a wash with warm water and soap. The membranes cleaned up fairly well, with the dense gunk on the arrow keys and INS/DEL coming off with some firm pressure from my thumb.
I wanted to do a more thorough cleaning job on the top case, but I was worried about damaging the already-worn silkscreen on top. As it is, I managed to get all of the finger gunk out of the lines around the keyboard and made some progress on removing some of the brown marks on the plastic. It might be a good candidate for retro-brighting, but I’m not planning on restoring it to museum quality.
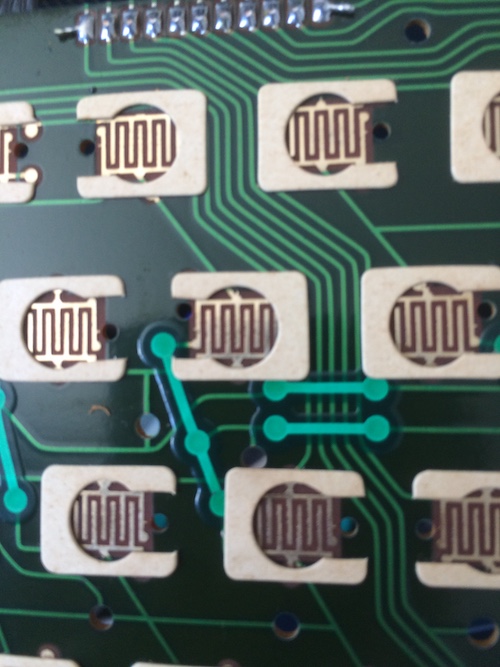
I also scrubbed the carbon pads on the keyboard with some new printer paper to make sure no dish soap residue or corrosion remained on them.
Repair
I chose to use plastic-modeling cement to repair the broken-off post here. This is because when I repaired a post on the CoCo1 with cyanoacrylate super glue, I was warned by a reader that I had used the wrong kind of adhesive. Modeling cement will melt the plastics together, offering a far superior bond to super glue that hopefully won’t just immediately break again.
These posts are so small that they need all the reinforcement they can get, so I’m glad that I know better now than to just use super glue. Even though it’s been several months since I learned this, though, I was not smart enough to order plastic-modeling cement at the time so I would have it on hand now. My procrastination now meant I had to wait a week for some to be delivered, as visiting my local hobby shop was inconvenient during the Coronavirus shutdown… and also usually ends up with me buying toy cars.
Testors-ing my Patience
I ended up using Testors plastic cement as it’s what Amazon had. Originally, I wanted to get a bottle of Tamiya glue - just out of childhood nostalgia if nothing else - but this is what I could get on short notice. Even if it wasn’t quite “right,” the smell still brought back some good memories. When it arrived, I discovered it was the “non-toxic” variety, which doesn’t seem to work nearly as well as the red stuff.
I don’t know what kind of plastic the SC-3000 case is. Apparently the non-toxic glue only works on polystyrene and ABS, and doesn’t dissolve plastic to join them. As a result, it did absolutely nothing to the Sega. Without other options, I ended up using Gorilla Glue super glue again (sorry) and that at least tacked up, though I left it overnight to make sure that it wasn’t going to crack off as soon as I turned a screw in it.
Moral of the story: do not use “non-toxic” model glue. Follow the Leaded Solder moral philosophy and only buy those shop supplies which have poisons in them.
Reassembly
Once I waited a while for the glue to set, I went to thread in the screws. To my delight, the posts didn’t break off. One of them cross-threaded a bit, but considering the alternative it wasn’t a terrible outcome.
Once I got the keyboard assembly and top case back together, typing felt alright and I no longer could push the keyboard down as far. I excitedly put together the machine and plugged it in.
Testing
The first thing I ran was Basic IIA:
Sorry about the constant hum and snotty video. Yes, this is the actual colour of the background in SC-3000 BASIC.
As you can see, typing was very difficult for me. Most of the keys were just as hard to press as before, if not more so. The left arrow no longer works, which cuts into my game-playing quite a bit. I think that, despite my cleaning, the conductive layer has atrophied on the rubber’s carbon contacts, or there is a substantial amount of corrosion on the keyboard pads that I didn’t notice. However, the keyboard feels much more structurally sound than before, which isn’t going to last if I have to keep pushing with so much force to actuate the “1” key.
To make myself feel a little better, I decided to plug in Flicky, but then realized I could not play it with a non-working cursor key on my keyboard. I also had to spend a lot of time scrubbing the cartridge before it would play; the notoriously finicky SC-3000 cartridge slot did not like the grime this cart came with from the Home Islands.
I tried a Sega Genesis pad in Joystick 1 (it works on the Master System - and the pinouts seem to be the same between Master System and the SG-1000,) but the Genesis pad didn’t seem to work properly either. Most of the buttons and directions on the pad only made Flicky run to the right, and I soon lost one of my precious chicks to the devious machinations of an enemy cat.
So I recorded the attract-mode loop instead:
I will test again with a genuine Master System or “proper” SG-1000 pad. Hopefully the problem is not deeper into the logic board, as on the SC-3000 (unlike the SG-1000 on which it is based,) controller decoding has been moved into an 8255A interface chip, instead of being implemented as discrete 74LS257 muxers. That said, an 8255 is probably less difficult to replace than a proprietary “MITEC-2” gate array like the SC-3000 also uses.
For now, I’ve put the computer back away. I needed the workbench space for other computers, and the SC-3000 seems very delicate to leave out in the open. It would be a shame to drop or leave something heavy on it.
A very disappointing result after so much loving attention on this machine. I suspect it’ll be apart again soon enough as I simply can’t stand to see its stained tan goodness stuck in a box, not-working. You need a keyboard to write Forth!
Here’s a picture of the cleaned rubber keyboard, at least:
My plan for the next steps on this machine:
- Dismantle it again and really scrub the rubber carbon pads as well as the logic board contacts. Test the assembled ‘sandwich’ out with a multimeter to make sure the matrix is working.
- Figure out how controllers are supposed to work. Test with Zippy Race, which we already know works properly.
Repair Summary
| Fault | Remedy | Caveats |
|---|---|---|
| Keyboard works unreliably. | Repair broken case plastic. | Keyboard works even more unreliably now. |