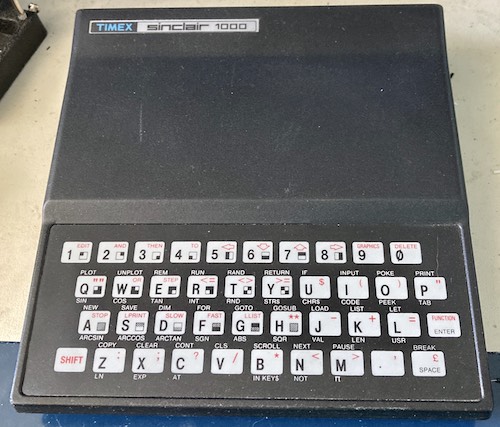
A Timex-Sinclair 1000 learns to love again
Tags: computer sinclair zx81 ts1000 repair
The fellow who sold me the Macintosh LC520 back in 2018 had another listing, a $10 Timex-Sinclair 1000 that needed some work. I decided I’d pop out and go grab it, and see if I can make the machine more reliable than Sir Clive did.
As you may already know, the TS-1000 is a North American rebadge/clone of the Sinclair ZX81. I’d never tried a ZX81 before, only a ZX Spectrum, at the delightful Bonami Home Computer Museum in the Netherlands. What interests me about these machines is the aggressive pursuit of getting them as cheap as humanly possible. Maybe I’d even learn some way to cost-reduce my own project computers!
While I was working on this computer, the 40th anniversary of the ZX81 came and went; the original model dates back to 1981. It’s amazing that things built this cheaply can survive for so long with relatively minor issues.
![]()
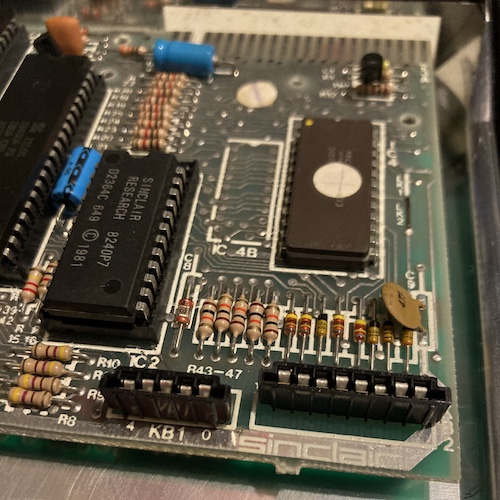
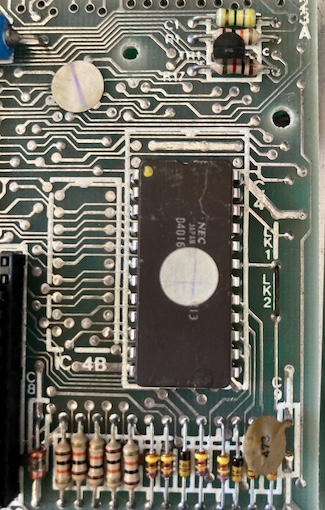
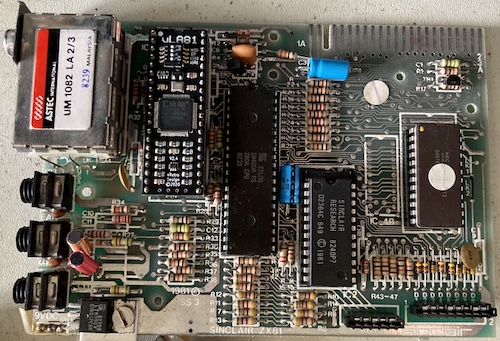
The motherboard seemed very small, and had only a handful of chips.
Never Google Your Symptoms
I spoke with the seller for a bit before I picked it up, in order to try and figure out what was going on with the computer. This way, sometimes you can skip a bit of the diagnosis.
He said that he had trimmed the keyboard membrane ribbon as the keyboard had started to act up, and he got it mostly working, but 3-4 keys were still broken. When asking on a forum, the forum denizens said that they suspected the ULA (the proprietary gate array chip that is one of the secrets to the cost-reduction of this machine) had failed.
A broken ULA would really suck - while I wasn’t about to abandon the machine if it was the case, replacing the ULA chip with a vLA81 or other aftermarket solution is a lot more expensive than a new keyboard membrane.
Included with the TS-1000 was an official 16K RAM pack, but the edge-connector pins that grab onto the computer’s expansion card edge were said to be bent, so the RAM pack wouldn’t work without some servicing either. I’ll fix that later, or (preferably) do an internal RAM modification.
Last, the computer didn’t come with a power supply. That’s unfortunate, because that supply uses a 3.5mm headphone-jack plug - something my bench supply didn’t feature.
Wild Testing
I got the TS-1000 home and looked into the polarity of the DC plug, as I wasn’t sure if it was the same as the ZX81.
To my delight, I found out that I could power the TS-1000 off the same +9VDC tip-positive Atari 2600 power supply that the Coleco Gemini used! It’s nice to have a little win like this once in awhile.
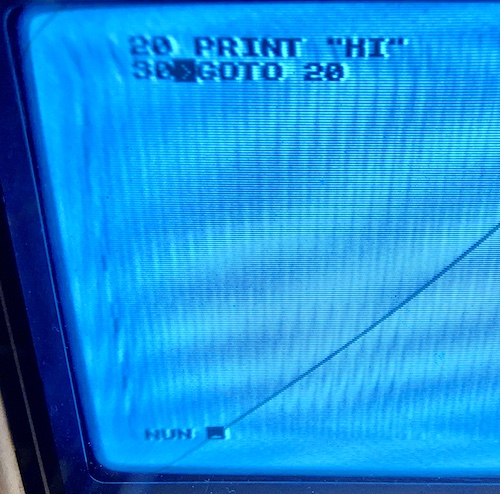
It sprung right to life and displayed some black-and-white video with the infamous “inverted K” prompt.
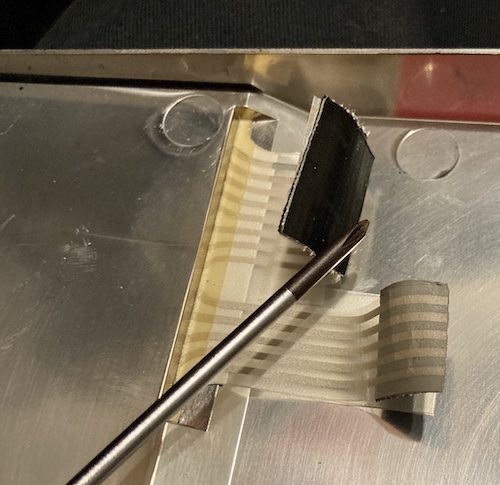
However, my joy was short-lived. None of the keys seemed to work, and when I opened it up, I saw why. The fragile membrane keyboard’s ribbons had begun to fall apart, and previous attempts to fix it by cutting the ribbon back and shimming it with tape left me with little room to work with.
One Sticky Keyboard
Once they were shipping again, I ordered a replacement keyboard membrane (and TS-1000 specific sticker for the top of it - no RUB OUT here) from Tynemouth Software’s Tindie page. It arrived super quickly, and shipping was remarkably cheap… probably because - being flat - everything fit into a regular letter-mail envelope. More of that Sinclair cost-reduction magic at work.

It was really tempting to remove the old keyboard and stick this one right in, but I decided it was more prudent to try and test it outside of the case before doing anything that would be hard to take back.
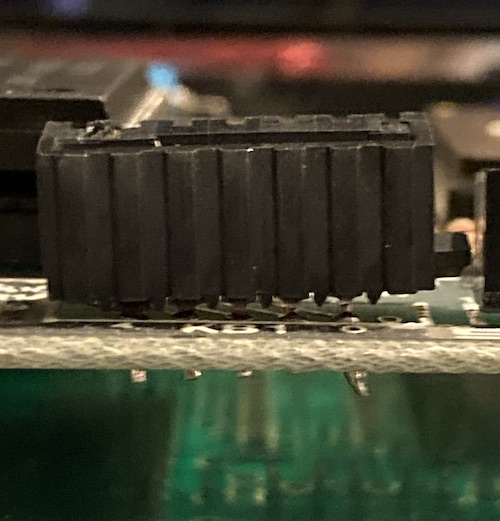
Unfortunately, the new keyboard membrane didn’t stick into the 8-pin KB1 port. It would just crinkle up a bit instead of “grabbing on,” like the smaller tail into the 5-pin KB2 connector did. Probably the pins have been tweaked to add tension, and now aren’t letting the tail go in without excessive force.
And speaking of KB2, it looked like it had been reflowed, and potentially damaged during it:
Some tape residue is stuck inside the connector as well, from the tape that was added to the old keyboard membrane tails:
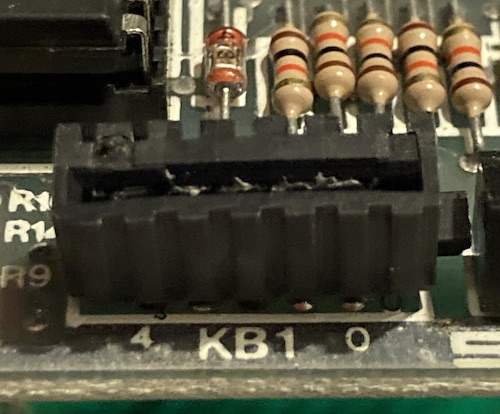
I was able to clean most of this out with tweezers, but you can see on the corner that the plastic of the port simply doesn’t look like it’s in great health. Between this and the finicky contact on KB1, I figured it would be a better idea to go looking for a pair of replacement flat-flex connectors.
At the advice of the absolutely fantastic Spectrum For Everyone parts-interchange page, it turns out that good replacements for the connectors in question are the TE AMP 5-520314-5 (5-pin; KB1) and 5-520315-8 (8-pin; KB2). I ordered them immediately, but Digi-Key sent me a completely wrong 32-pin connector instead of the 8-pin. To their credit, they made it right and sent me a replacement part after I contacted their support line.
The 5-pin connector has little plastic legs on it for bracing; I had to clip these back with my side cutters in order to get the pins to reach through the holes for soldering. Otherwise, they would just sort of hover inside the pin holes: not ideal at all.
The 5-pin “KB1” connector had also been reworked in the past, and had a lot of sticky flux and contaminated solder that made it difficult to clear the holes. After breaking out the desoldering gun and doing a few cycles of adding fresh solder and then sucking it out, the connector finally came out smoothly and was easily replaced. The KB2 connector gave me no trouble whatsoever, and the new one snapped right in.
Testing quickly to make sure I hadn’t killed the machine, I once again saw the reverse-video “K” prompt and I was ready to try plugging in the replacement membrane. Phew!
Now for the big test…
Wobbly Keyboard Syndrome
I decided to plug the membrane in for testing rather than jumping right to removing the old membrane and gluing it down to the top of the case. This is mostly because I didn’t want to deal with removing ancient glue at 9PM at night after a long day of shovelling snow, but let’s pretend that it was out of technical knowledge and caution instead.
When I went to slot in the membrane tails, they made a nice positive connection. Just the feel of them hooking in reassured me that I had done the right thing in replacing the connectors. Snick!
For testing, the keyboard membrane was just hung loosely over the edge of the case and I squeezed keys between thumb and forefinger to type. It felt just like I imagine entering a BASIC program on a Speak N’ Spell would!
And what’s more… when I typed, characters appeared! The keyboard was fixed! YES!
Because the old keyboard was glued to the plastic top case, I dreaded the removal process – and the install, too. I was never good at applying stickers to model kits without making them super crooked, and those stickers generally didn’t cost this much money.
To remove the old keyboard, I just pried with my thumbnail at a corner and most of it pulled right off. A lot of old, calcified, crusty glue remained around the edges. I tried busting that up with WD-40 and Goo Gone, but ultimately nothing worked to remove it chemically. In the end, I used a cheap plastic sticker scraper tool. After using up a lot of alcohol and paper towels, I was reasonably convinced the surface was clean.
I did a couple test fits with the keyboard before removing the backing paper, but ultimately I came in just a little bit too low and slightly off-kilter, which produced a tiny slope at the bottom of the keyboard. Not enough to affect the function of the bottom row of keys, but it will bother me for a little while to come.
I left the “TS-1000” keyboard overlay sticker off for now. One big sticker was enough for my nerves, and I could always giggle at “RUB OUT” to keep my motivation up for the rest of the project.
And I’d need it, because although the keyboard was working now, the computer was still not fixed.
Charred
Something very weird was going on. The first character I placed on every line was corrupt! 1 became ;, and 2 became ,… luckily, good ol’ space remained space, so I was able to enter a quick BASIC program by indenting the numbers. It seemed like this was just a display problem, as the code is still interpreted properly.
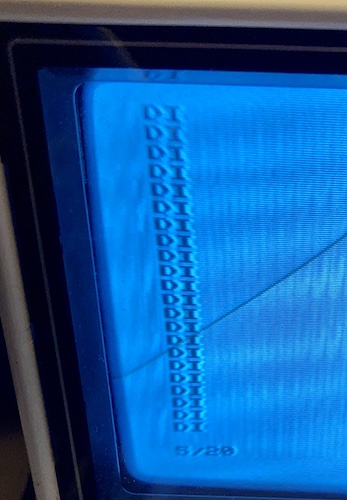
Even the auto-typing keywords were getting it… and the output from PRINT statements! You can see here that the “H” has become “D.” It’s weird that the inverted “K” was still correct, at least according to the JtyOne web-based ZX81 emulator.
At first, I couldn’t understand what had happened. It didn’t make sense in ASCII (where it would have too many bits flipping, and not consistently) but the ZX81 actually uses proprietary “display codes” for its character set, which are thankfully well documented on Wikipedia although the hex codes Wikipedia provides seem to be the Unicode codepoints, which aren’t really useful for debugging. Instead, I referred to this great table, which gave me all the details I needed.
| Expected Character | Observed Character | Expected Binary | Observed Binary |
|---|---|---|---|
| Space ($00) | Space ($00) | 00000000 | 00000000 |
| 1 ($1d) | ; ($19) | 00011101 | 00011001 |
| 2 ($1e) | , ($1a) | 00011110 | 00011010 |
| 5 ($21) | 5 ($21) | 00100001 | 00100001 |
| H ($2d) | D ($29) | 00101101 | 00101001 |
| R ($37) | N ($33) | 00110111 | 00110011 |
| Inverted K ($b0) | Inverted K ($b0) | 10110000 | 10110000 |
Yeah, that’s a pattern, alright. Bit 3 appears to be stuck low. But which part of the computer was to blame if it’s only wrong on the first column.. of every line? I was becoming a bit worried it really was a ULA problem, as there simply were not many other components in this machine at which to point the accusatory finger.
Video Fix
I didn’t understand the mechanism for how BASIC source turned into the characters I saw on the screen. Based on some stuff I read and misunderstood originally, I assumed the “DFILE” (display file, effectively the framebuffer) contained the program, because it stated that the size of DFILE “grows with the program.” It actually turns out that source code, post-parsing, is stored in tokenized format elsewhere in the memory map, and expanded into the DFILE, which works sort of like a linked-list, and is initially small until you start sticking text into it.
What this meant, I hoped, is that it was possible for the source code (and input line) to be working fine, but then look wrong when displayed on screen. The ZX81/TS-1000 is not really different from other 8-bit micros in this regard, despite the byte-shaving optimization of the growing/shrinking DFILE.
Maybe the RAM had a bad cell in it, that was manifesting as a stuck-high bit 3 of the first character of every line?
I took a quick look at the RAM on the board. It looks like they set up the motherboard so that you could install two 1kB chips or one 2kB chip during assembly – whatever was cheaper. The jumper on LK1/LK2 seems to route to either the A10 pin of a single 2k chip or (I assume) the output-enable of the second 1k chip.
Testing out the RAM should be a pretty simple first step to diagnose. It is certainly a cheaper part than the ULA to replace. I didn’t have any direct-replacement SRAM to just do a quick swap with. The broken 16k RAM pack that came with this machine was full of 4116 dynamic RAMs.
Using the amazing PCBJunkie cross-reference page, I got a list of chips that would interchange with the main working RAM. The 4016 appears to be part of the “6116” family, so I ordered some HM6116s before even removing the old chip for testing. Since the chips are only 2kB, they’re cheap, and I figured that if they didn’t get used here, maybe they’d see some use in a future clone, expansion card, or weirdo side project.
Luckily, the Windows software for my TL866 had a couple logic chip tests, and that test suite also apparently covered 6116-family SRAM chips, such as the 4016.
I desoldered the RAM, which took a little while. Not just because one of the pins was oddly bent on the solder-side of the board, but also because I kept losing track of where the chip was and desoldered the pull-ups on the keyboard connector instead. Twice.
I put the RAM into the TL866 for testing. The test feature is in a weird place in the TL866 software. Unlike logic ICs, which have a special menu item for testing them, for RAM you have to use the button that you would usually use to tell the programming software which EPROM/GAL/etc you are burning, and then it pops up a special dialogue box just for RAM testing.
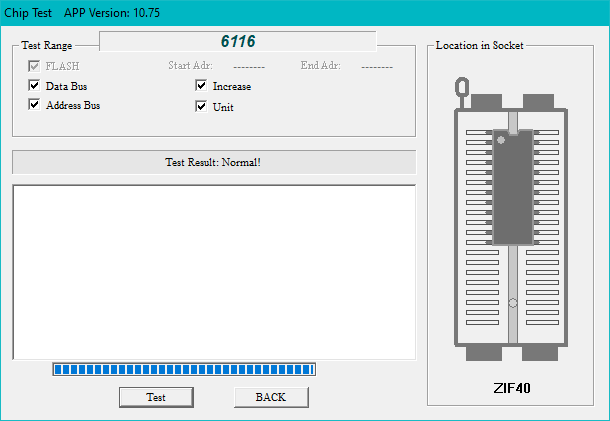
Anyway, the original RAM tested out fine, at least on this suspiciously quick test in the software. Boo! I didn’t have a lot of parts left on this board for potential faults…
Was It The ULA After All?
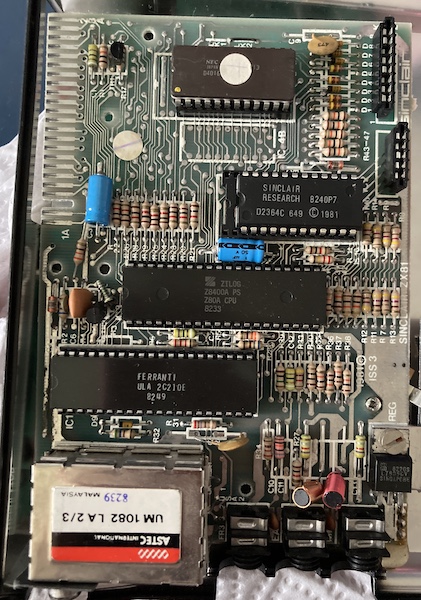
The TS-1000 motherboard after the previous services, including a socket for the D4016 SRAM.
With so few components left in the TS-1000 to suspect, the Ferranti 2c210e “ULA” was looking more and more suspicious. Wilf Rigter’s remarkably thorough walkthrough of the video logic indicates that the ULA is responsible for:
- Dereferencing the character codes from the display file into the ROM to get the actual visual character patterns to spray on the screen;
- Generating NOPs for the CPU1 and clearing the data bus during the cycles the ULA is busy;
- Loading each 8-pixel scanline of the character into a shift register that feeds the analogue video signal.
- Controlling the 6.5MHz internal oscillator and dividing it for horizontal sync and NMI (to time-slice the CPU to alternate it between “feeding the bus” for video and actually running the user’s program)
The ROM is good, because it returns valid characters for the other columns. And I now knew the RAM is good, so the display file isn’t providing faulty offsets or anything. And the shift register is working, because the characters all look good, and aren’t smeared or corrupted… just the wrong ones are being displayed. It must be the logic that fetches the character codes from the display file and looks them up in the ROM - some part of the address computation is wrong, but only for the first column. It then must reuse the “wrong” character for all eight scanlines, because it wouldn’t make sense to re-fetch the character in the middle of rendering just to get the next row of pixels. I didn’t understand why it was just the first column, but the fact that it is the first gives me some clues.
No matter what the specific failing step is, the faulty operation must be inside the ULA somewhere, and it’s not like I can get in there with a soldering iron to replace parts of the logic inside it (yet.) It almost doesn’t matter what specifically is broken, because the method of fixing it is the same anyway.
As stated earlier, the ULA is a cost-reduction method over the ZX80; it collapses about two dozen 74-series logic ICs into one big one. Obviously, that reduces both cost and waste heat, but it still runs super hot. There’s a lot of explanations for why they fail, ranging from being simply old to having too much logic in them for the design, but ultimately the ULA handles virtually everything in the machine in addition to the video generation.
The 2C210E is a more desirable ULA because its video output contains a proper “back porch,” which allows for easier composite-video mods. It’s a real shame to be considering its replacement for a minor (largely aesthetic) problem, but it’s still a problem that keeps the computer from being enjoyable, and where there’s one fault, there may be more.
I considered a bunch of options:
- A modern ULA replacement like the aforementioned vLA81; these use modern programmable-logic devices like CPLDs, run cooler/faster, and offer additional cool features that the original didn’t, making the computer more useful;
- Replicating the “missing” ZX80 logic in 74 series chips again, and then bolting it into the ULA socket somehow, turning the TS-1000 back into a ZX80. This didn’t seem to be really feasible, and actually felt more difficult than designing a whole new motherboard to me because of the additional physical-placement difficulties.
- A modern motherboard replacement, either by myself or someone else (e.g. the ZX81plus38) would have been a lot of fun, except that the only original part of the TS-1000 to survive would have been the case, which is not really a “repair.” Of course, there’s no stopping me from building one in the future.
I actually didn’t realize that the ZX81 and ZX80 were virtually identical in terms of design until I started going down this rabbit hole.
Veelay Outlay
There’s only one modern ULA replacement I could find still easily available for purchase: the vLA81. At first, it looked very expensive on Tindie, but I later found the author’s own storefront, which offered a much cheaper part and (hooray!) shipping.
It had some nice bonus features, too:
- Supports a RAM upgrade to 32K;
- Easy “hires” video;
- Presumably, cleaner video signal generation.
It seems to be based on the Xilinx XC9572XL, which seems to be a really popular CPLD with hobbyists.
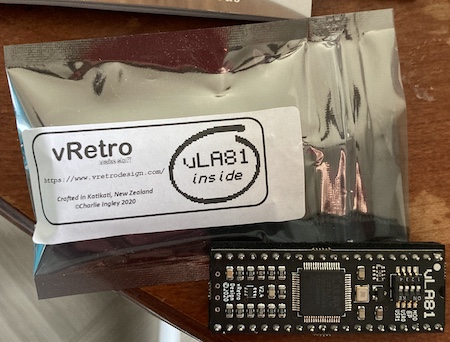
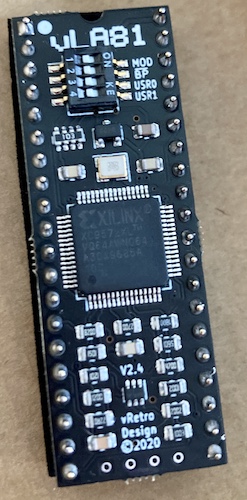
When it arrived, I took a moment to admire the tight routing. There’s a pile of components on here, and a tiny board. Even though the ZX80 parts are “known,” I would have spent months and lots of $ on respins trying to turn the schematics into a working board, so the small price asked for the vLA81 is absolutely worth it in my mind.
When the part arrived, I procrastinated for several months. What finally got me off my seat was hearing that Clive Sinclair himself had passed at the age of 81. The products he and his team worked on were huge inspirations to so many people, that I felt it was only appropriate to pull this off the shelf and finally get it working again as a sort of homage.
It took more force than I expected to stick the vLA81 into the old socket, but it did slide home eventually. Honestly, it looks quite good in there.
The vLA81 has four DIP-switches on top to configure various aspects of the machine’s function. I set only the “MOD” dip to “ON,” in order to make the vLA81 emulate the 2C210E ULA that was removed from the system.
Because the cables were already attached to it as part of another project, I decided to test the reassembled Sinclair with my Samsung 910MP. This TV is a little unreliable (the guy I bought it from claimed it sustained a lightning strike, of course after I handed over the cash) but it can almost always produce working video from any signal I can throw at it - PAL, NTSC, VGA, even SCART. One of these days, I’ll have to break it down and do a cap replacement and minor service.
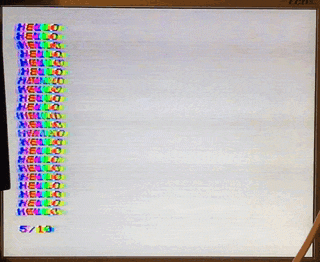
There’s good news and there’s bad news. The good news is that it’s clearly fixed. The “H” in “HELLO” hasn’t been turned into something else, and the new keyboard is surprisingly nice to use compared to the old one, feeling a bit thicker and more pillowy.
On the other hand, the 910MP, with its digital guts, is just too smart for us. It’s treating the monochrome video from the TS-1000 as colour burst, and artifacting up the whole mess. It also has trouble timing the lines, even with the fine-tuning adjustment. Bad TV, out-of-spec signal, or some combination of the two?
However, notice that the “H” in “HELLO” is correct! I got out my garage-sale Citizen black-and-white portable TV and dialed it in:
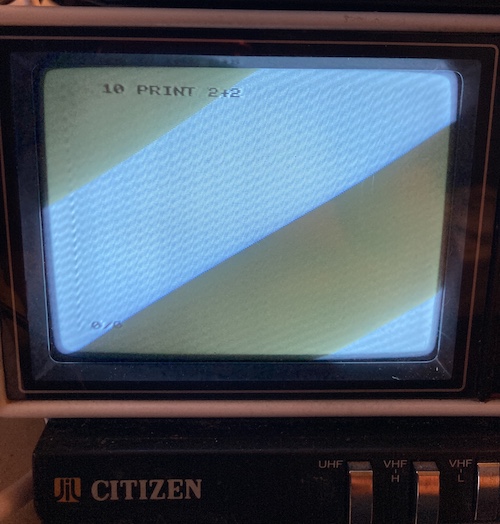
It’s fixed!
Conclusion
I would never suggest to anyone that they should spend this much money on a $10 computer, but after several years on the shelf, I’m convinced it was still worth saving. There’s nothing else like it in the collection, and it doesn’t take up much space to boot.
I’m very grateful to people like Charlie Ingley for making amazing hardware like this, and I’m looking forward to exploring the other features it offers.
Next time I open this up, I plan to do some small case repair. Most of the posts are cracked, and three out of four sticky feet are long gone. I’ll also add a 62256 for 32kB of RAM, and do a composite video output mod to improve TV compatibility.
Ideally, the combination of these things will make the TS-1000 a very useful little computer, perhaps even ready to accept some homemade hardware of my own.
Repair Summary
| Fault | Remedy | Caveats |
|---|---|---|
| Non-functional keyboard | Replace keyboard membrane. | |
| Keyboard membrane connectors broken | Replace with new parts | |
| First column of text output corrupted | Replace ULA with aftermarket vLA81 part |
-
The whole model seems very similar to the one described in The Cheap Video Cookbook, which I really have to finish reading one of these days. ↩