Tengen-trifying the Neighbourhood
Tags: console nintendo famicom nes homemade-hardware
Years ago, I was offered a copy of the Tengen version of Tetris for the NES, and passed it up because $60 was way too much for a boxed NES game. I regret that. Let’s make one.
This version of Tetris is, of course, the infamous “pulled from shelves” port that was released without the proper authorization from Nintendo.
Last year, after I finished messing around with Portopia, I decided that I would probably want to make some more Famicom cartridges, but without sacrificing existing games to do so. Chopping up Casino Kid made me feel icky.
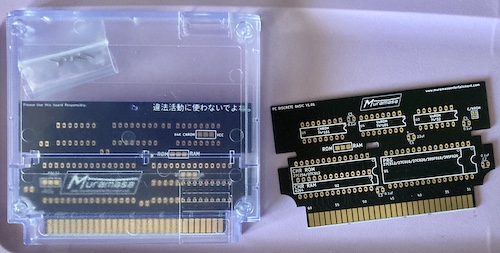
Muramasa Entertainment is a small webshop that offers a bunch of cartridge PCBs for various systems. They also sell some nice injection-moulded cartridge shells, which pushed me over the edge into making an order. I bought a whole pile because I figured that I would probably end up making a Famicom game and would then want to also make a cartridge for it, but that hasn’t happened yet.
The Motivator
After playing the official BPS Tetris on the Famicom, I was left unsatisfied. That version of Tetris uses some weird controls: press down on the d-pad to rotate? It was then that I realized I’d never played Tengen Tetris, and went about correcting that oversight.
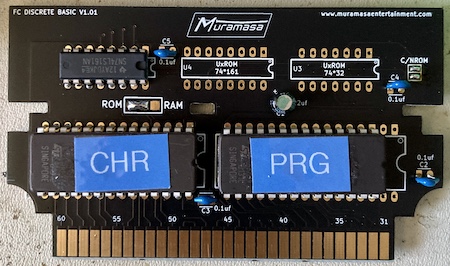
A quick trip to the NES cart database revealed that it was a Mapper 3 cartridge, which is the same thing as CNROM. Basically, cartridges with this mapper have paged program ROM, but use a CHR ROM instead of CHR RAM. Lots of logic, little graphics: sounds like a Tetris game to me. As luck would have it, the FC Discrete Basic boards that I had bought could both do UNROM and CNROM, so I went about setting the board up.
CNROM Countdown
One of the difficulties with the Muramasa board is that it didn’t have great documentation. In fact, the webshop page says this:
Build instructions/tutorials aren’t available at this time. If you are uncomfortable or new to building your own cartridges please wait for tutorials to become available.
Eek! Still, I figured that having built one (1) NES cartridge in the past disqualified me from being “new,” and uncomfortable is my middle name. Really, it is. I had hippie parents.
Assembly was pretty straightforward. I stuck a 74LS161 into the socket marked “CNROM” and populated all the bypass capacitors. After finding a copy of the ROM from a legitimate copy of Tengen Tetris that coincidentally fell off a truck right in front of me while stopped in traffic, I split that ROM into CHR and PRG components using the rom.solutions webapp and burned those two components each to their own 27C5121 UV EPROM.
The plating on the fingers is thin – I slightly damaged one by accidentally flicking a bit of solder onto it and then scraping it off. I would recommend taping up the edge connector with Kapton tape before you start flinging the iron around.
The longest part of this project was figuring out the jumpers. Eventually, I ended up with the following configuration:
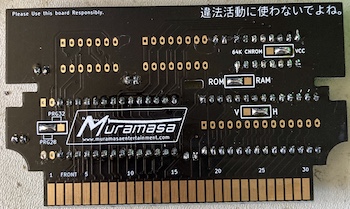
- “H” jumper set for horizontal scrolling (vertical mirroring, as per bootgod)
- Solder both jumpers in the “C/NROM” section
- Set “VCC” instead of “64K CNROM”
- Set CHR “ROM” jumpers on both front and back instead of “RAM”
- Set “PRG28” jumper for 28-pin 27C512
Putting everything into the shell was also a bit difficult. One of the bypass caps is 22µF polarized, which implied strongly to be an electrolytic capacitor. I had a couple of very short 22µFs on hand, but they just barely rubbed on the “lid” of the shell when it was closed. I think a better approach would have been to use a regular, cheaper 22µF and just bend it over to sit parallel to the board, or flip the cap onto the other side of the board, where it has a little more vertical clearance.
Additionally, only two of the holes on the cartridge shell seemed to be fully threaded. For the other two, I had to thread it myself rather than my usual trick of turning the screw counter-clockwise until it seats. Not a big deal.
I was a little bit surprised – but probably should not have been, as it is mentioned on the store page – that the included screws were Gamebit instead of Phillips head screws. Good thing I had a driver on hand!
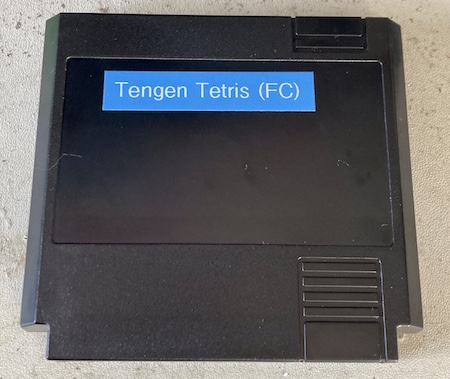
A rough measurement of the cartridge shell showed that a good size for the labels would be about 91mm wide by 54mm tall, leaving a bit of margin on each side.
The Avery website seems to indicate that “Presta 94238” is a close enough match, but my store didn’t carry it; the search engine suggested that I buy a Beanie Baby. If you try it and it works, please let me know in the comments. Instead, I slapped a label from my labelmaker on there, following in the tradition of the Portopia conversion.
Test Fire One
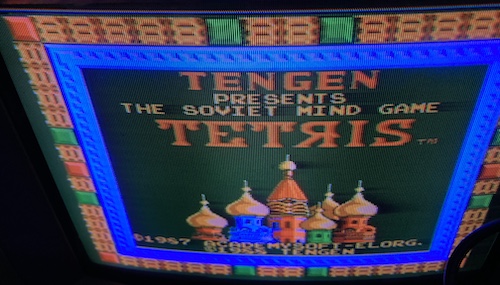
The Famicom booted right up with the game and sat on the title screen. I was not sure if I got all the jumpers correct, so I plumbed through the menus, played a few rounds, and tried a few different options to see if the PRG paging was working. Everything seemed to be working okay, or at least well enough that I was convinced the job was done.
Conclusion
This was a nice, quick project with a satisfying result. I really enjoyed the opportunity to do something that didn’t turn into a multi-week ordeal, or require waiting on parts with a half-finished board lying on my desk. Plus, I’ve got lots of boards left for when I do eventually get around to making a Famicom game of my own!
-
Yes, it is a little wasteful to use a 512kbit ROM to hold a 256kbit PRG and a 128kbit CHR, but it was what I had on hand. ↩