Bluer than velvet were her SCSIs
Tags: computer apple macintosh macintosh-lc storage mod bluescsi
If you need a SCSI hard drive for your old computer, there are a lot of great options becoming available for a solid-state substitute. A great one of those options is the BlueSCSI, and I’m not just saying that because I won a free one. It’s because I won a free kit, so I got to put it together myself.
I had known about BlueSCSI for awhile, and had even started building my own forked board of ArdSCSIno. The low cost, flexibility and potential of these designs are extremely appealing. However, I hadn’t actually taken the plunge to get one yet.
There’s two reasons for this: one, I don’t actually possess any dead SCSI hard drives, and two, the STM32 “Blue Pill” evaluation board that my fork ran on had basically ceased to exist from the pandemic-related shortages and STM32 demand.
Luckily, I was watching the Ron’s Computer Videos YouTube channel, and he had a big giveaway to celebrate getting a (well-deserved) subscriber count. If you haven’t checked out Ron’s stuff, it’s well worth doing – he is also a weird nerd, and is very supportive of the community at large.
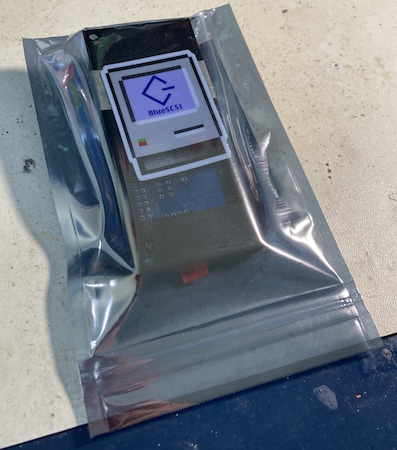
In any event, I ended up winning both a promotional button (which is nice) and a BlueSCSI (which is nicer, sorry Ron.) Eric Helgeson, the developer of the BlueSCSI firmware and hardware, asked if I wanted a complete unit or a kit for my prize.
Just send me a bag of parts, dude.
The Bag of Parts
A little while later, a blue(!) bubble-wrap envelope appeared in my mailbox. Inside it was an anti-static bag containing all the parts of the board.
The kit is pretty thorough. There’s even a 3D-printed bracket to safely hold the board inside a computer, and a sticker.
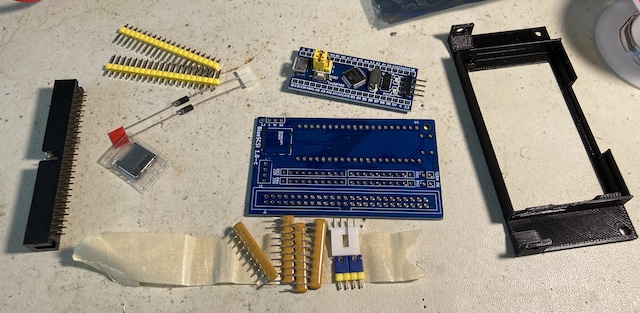
As you might expect from the name, the real brains of this setup is the STM32 “Blue Pill” evaluation board. These boards are based on the STM32F103 ARM microcontroller, and are absolute pocket rockets for a very cheap price. That is, until supply started to dry up and it became hard to tell if you were getting a genuine one or not. I still have a handful around here somewhere, but I’ve now become too scared to use them up lest I be unable to get more.
Bluessembly
Soldering the setup together was pretty straightforward. For this job, I started using blue poster putty1 to hold in through-hole components. This way, you can flip the board over and the parts don’t fall out. That technique works really well, but on occasion you’ll get a little bit of the poster putty stuck to a pin, and it will make an awful mess as it burns and melts from the heat of soldering. Still: I think this is a technique that’s here to stay.
This job also used up the last of my MG Chemicals 60/40 solder, a reel which I had bought when the blog first started. It felt like more of a milestone than it actually was.
I have to admit I got a little emotional about using it up, but that emotion was actually anger: the last little bit of solder on the reel had basically no flux core left, so it did not want to melt, flow, or make nice joints. I might as well have been soldering with a paperclip. The reel of Kester 63/37 that I replaced it with has been absolutely phenomenal by comparison.
Pretty much everything goes together just by looking at the silkscreen and jamming the parts in. I had to consult the install instructions to figure out the Blue Pill’s polarity and the jumper positions, but otherwise this was smooth sailing. A well-designed kit. Some more detailed silkscreen would make the install instructions totally unnecessary, though.
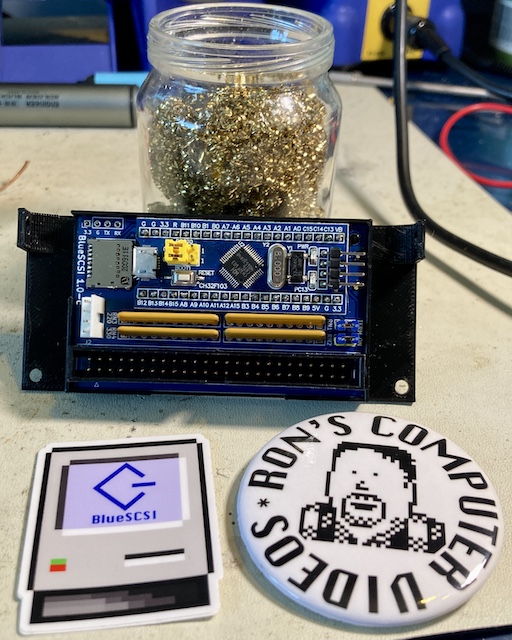
Once I’d completed the assembly, I went to stick in a micro-SD card. It wouldn’t go in! This is because the micro-SD holder has shield pins that are to be soldered to pads on the board, and I made a huge glob of solder on the front-right of the port. As a result, the card would ride up on it and get stuck.
A little solder wick action cleaned the excess solder up really well, and then I dunked the whole board in isopropyl alcohol for a bit, to dislodge any flux or gunk that would have gotten trapped inside the connector. To dry, I blasted the whole board with an “Xpower” electronic canned-air blower.
Blue Means Go
For the test subject, I selected the Bad ADB Mac LC. This poor machine has a factory-spec Connor 40MB hard drive with a very sick-sounding bearing, but it still starts up every time. Another good reason to use an LC: a tool-less chassis means that I can get the hard drive out with only some finger prying and swearing, instead of having to use a screwdriver.
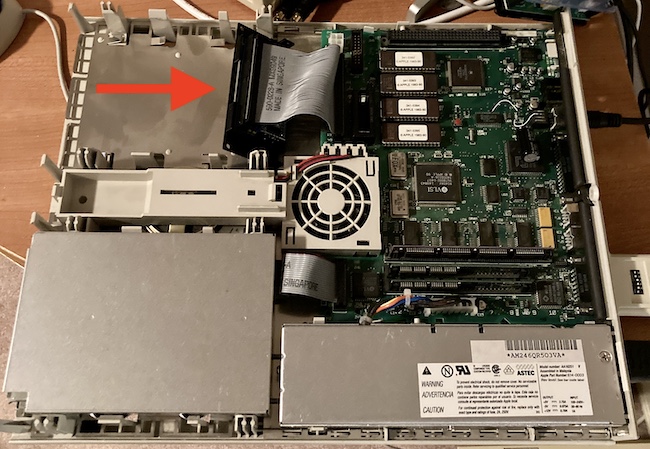
Because of the way the polarization tabs on the LC motherboard fit, and the very short cable, it’s kind of awkward to mount the BlueSCSI in there even with the 3D printed shield. I think if I were doing this “for reals” I would mount it to the bracket that the original hard drive was clipped to, but this was just a temporary install to see if it worked. I still haven’t decided which machine this will live in full-time: most likely the next one which will arrive with a dead hard drive.
Because the LC has internal SCSI termination power, there’s no need to run a dedicated power cable. Without a big beefy 12V hard-drive motor, the BlueSCSI is power-efficient enough to sip the 5V it needs directly off of this termination power. If you have a machine (such as a Plus) where this power is unavailable, you can always use a Molex-to-Berg adapter (like I used on the PC-8801mkII) to snipe power from a full-size hard drive supply cable.
Without the noise of the hard drive, it became really obvious that the cooling fan in this Mac also had some dry bearings. That’s a job for another day, I guess.
Picking a Disk Image
On the SD card, I placed the System 7.0.1 “full” image from the set of RaSCSI drive images that are floating around. You can actually specify multiple images and mount them at different SCSI IDs (and even LUNs,) which is a good fit if you want to have different OSes on an SD card, or even pair a fixed system drive and a data drive that you can easily write to with Basilisk II or hfsutils.
The Bad ADB Mac LC had System 7.5.5 loaded on it, which felt like overkill to me for a machine that didn’t appear to have any method or intent of getting on the internet and couldn’t make use of Open Transport anyway. Certainly it’s not a good use of its mere 10MB of RAM. One of the System 7.0 releases is a much better fit in my opinion, especially if you wanted to do AppleTalk networking over serial or PhoneNet.
After a long pause, the machine kicked up the Happy Mac screen and then went through a surprisingly rapid 7.0.1 boot sequence. And here we are on the desktop, thumbing through a fresh install.
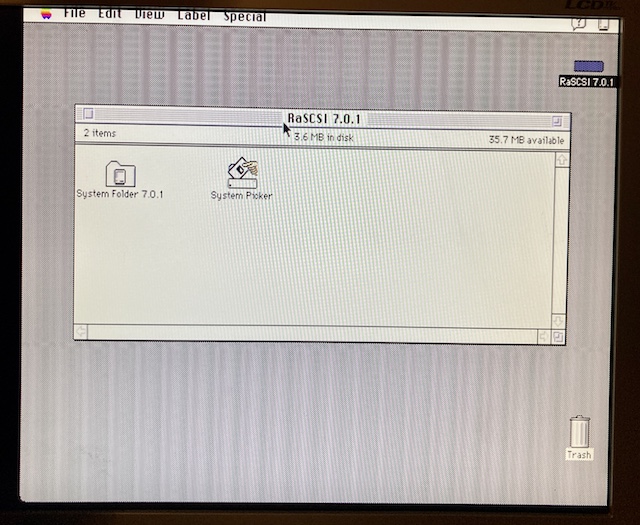
The pictured “System Picker” utility was new to me; it seems like a Startup Disk on steroids. System Picker is capable of choosing between multiple System Folders on the same volume without you having to do the “bless” dance, which is something I would have greatly appreciated back when I was using an LC full-time. Ah well…
Conclusion
So far, I’m extremely pleased with this setup. Obviously, I will be spending a lot of time setting up the perfect disk images before it can become a useful device for troubleshooting and file transfer, but that sort of thing is fun.
If you’re looking for a solid-state storage solution for an old Mac (or other retro SCSI system) the BlueSCSI is easy to build and relatively inexpensive. In the future, it seems like there are a lot of projects to get the board liberated from the less-available-every-week Blue Pill and move onto a microcontroller that you can actually buy, like a Raspberry Pi RP2040.
-
A la Mark Fixes Stuff. The brand I used was “LePage Fun-Tak,” which is a name that I refuse to believe actual humans came up with. ↩