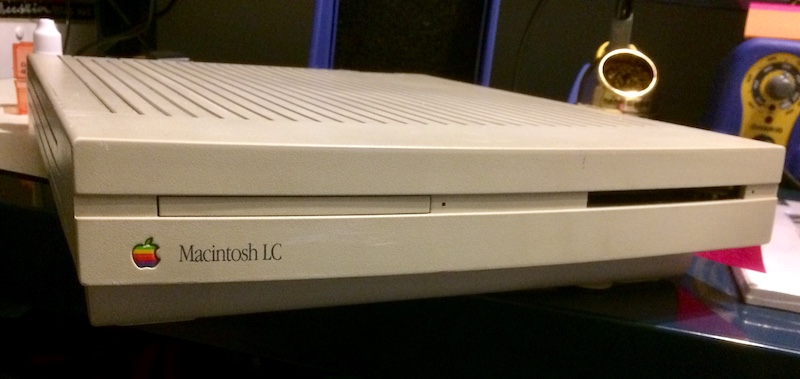
A "Practice" Mac LC
Tags: computer apple macintosh macintosh-lc pizzabox capacitors corrosion repair trace-repair
My first real computer was a Macintosh LC. They’re not held in especially high esteem, and they haven’t been redeemed by history, either. It’s not hard to see why: a pitifully low RAM limit (10MB) introduced alongside a more RAM-hungry System 7, generally poor performance across the board, and cheap components. I still have mine, but this isn’t it.
There’s an emotional defense of the entire Mac LC series that I can give if you get me riled up enough. The rational/logical argument, however, basically boils down to:
- It looks cool;
- It was really cheap to buy;
- It still has an expansion slot, unlike some Macs;
- They stack really well in storage.
Like Sophie Haskins, I am firmly in the “pizza box computer” enthusiast camp, and the LC is one of the purest examples of this genre.
This machine came to me when I got outbid on an LC II in basically the next town over. The same seller was offering an LC I that would boot, but had no ADB, so I put in a min bid and figured I’d use it for practice. Hey, they said this computer is great for education, right?
I’ve never done SMD capacitor replacement other than in onesy-twosies “hack” situations, and learning to do it properly on my childhood machine or some other Mac of great value probably isn’t the best recipe for a happy outcome. Where possible, I like to leave room for mistakes.
Which is good, because I tend to make them.
Diagnosis
I felt safe jumping to conclusions that the capacitors were faulty. For one thing, I’ve seen a lot of LCs with corroded motherboards from blown surface-mount electrolytics. For another thing, I could smell the fishy stench of cap goo before I even opened the case.
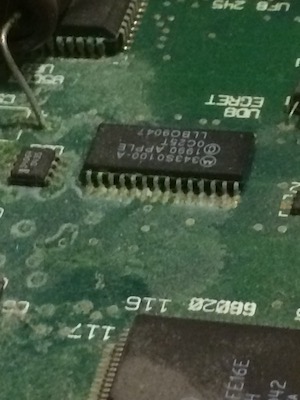
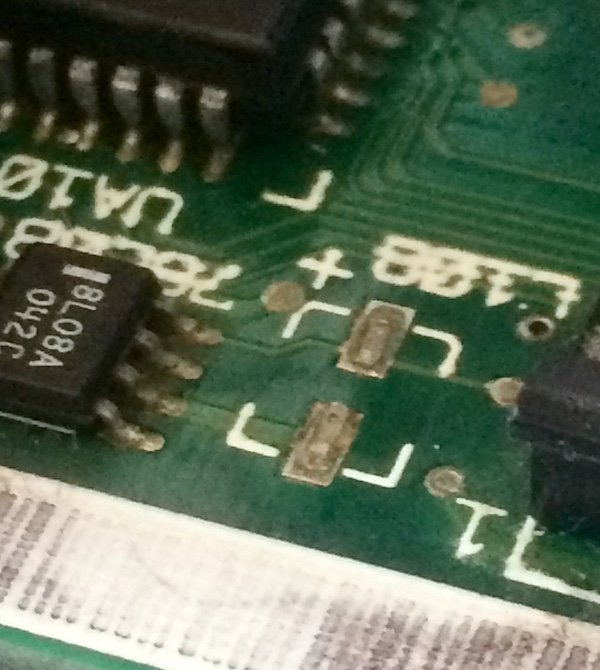
The Egret chip, which handles startup/PRAM among other things in a Mac of this era, has some pretty ugly looking legs. Most of the visible green stuff came off the legs with a dose of vinegar and some isopropyl alcohol, but I didn’t like how there seemed to be a bit of growth between the legs.
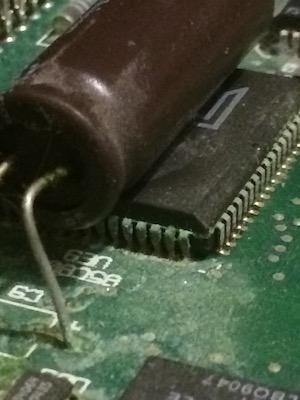
There’s also a bunch of goo on the UE9 chip, which has a big radial through-hole capacitor (also leaking) glued to the top of it, seemingly meant to replace the surface-mount cap that is supposed to be at C9 (my good machine has a tiny 47µF SMD cap in this position).
I scrubbed around it with a q-tip to try and remove some of the corrosion, but it is very difficult to get in there properly. This postage-stamp area of the board would later prove to be the origin of most of the problems in this computer.
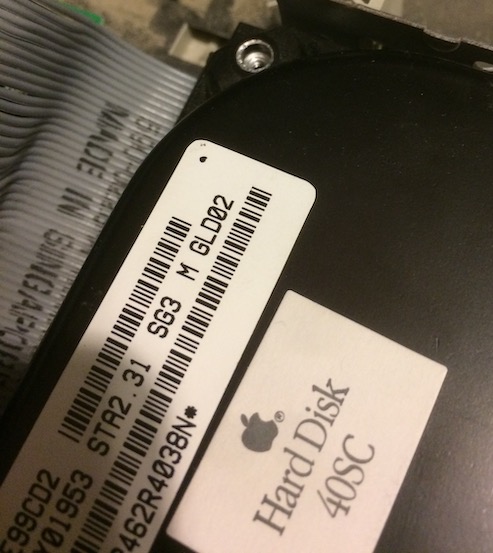
The internal 40MB Conner hard drive has had its screws removed by a previous technician. Like other Connors, the spindle o-ring probably melted and seized the drive, forcing a bit of surgery. It would have been nice if the seller had disclosed this, but it’s not like there aren’t any other options for extremely slow SCSI hard drives in my parts pile.
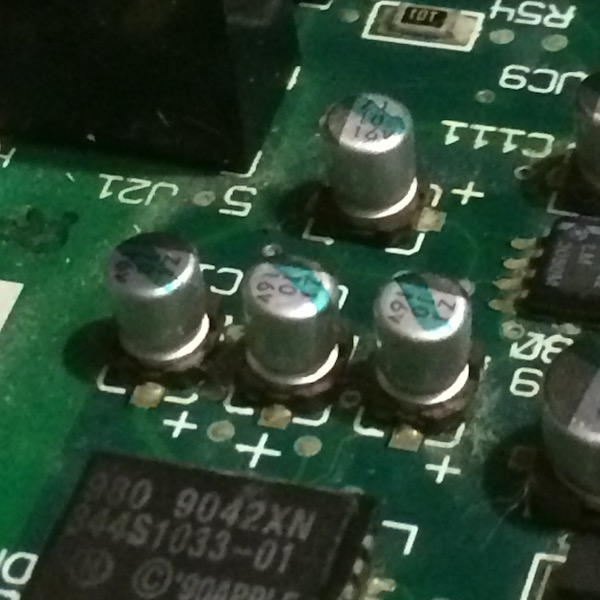
After scrubbing a bit around the cluster of tiny electrolytic surface mounts, it is obvious that their pads are pretty corroded. I’m not sure why the small ones are always the first to go (the 47µF/16Vs on the rest of the board weren’t leaking), but they’re definitely the source of all this bad juju.
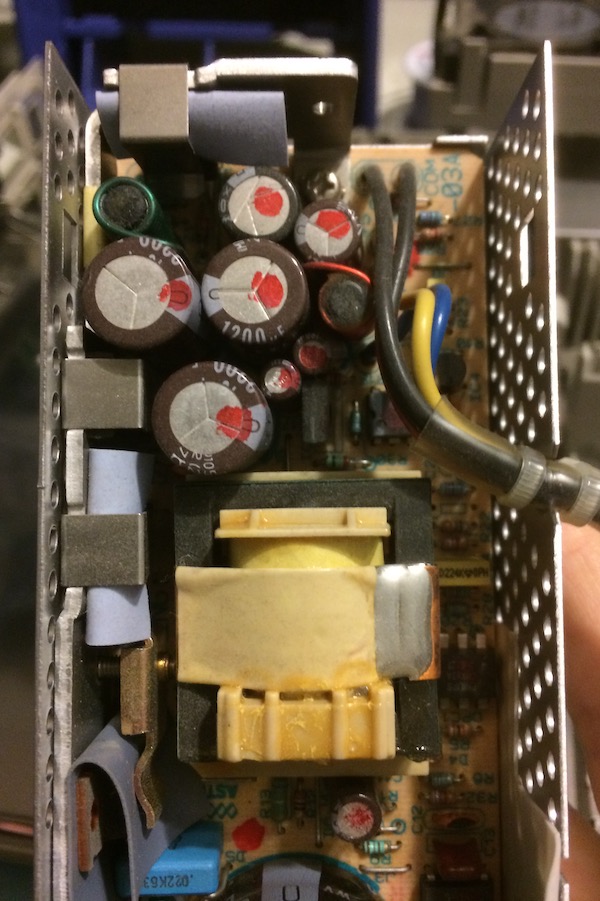
The Astec power supply, a common failure point on Mac LCs, doesn’t appear to have any venting or leaking caps. Still, if I’m already replacing all these surface-mount caps, I might as well take a break and pop some through-hole ‘lytics with my FR301. I haven’t been able to find any information on what the minimum load of this power supply is, either, so that only adds to the case for doing a little parts shotgunning.
Operation Capectomy
Here’s where things got a little creative. I’d heard of a few different techniques for removing these specific surface-mount caps that I could implement with my meagre skill level.
I bought some eBay-special hot tweezers for this task originally, but soon found they were completely useless.
The solder joints holding the caps on were so corroded that they just wouldn’t flow, even with a bit of flux or fresh solder added. All the tweezers were doing was melting the plastic around the rim of the cap. Hopefully, these tweezers will come in handy one day, but they sure were a disappointment on this project.
I decided to go with the “cut the caps off” method rather than twisting them off, which I suspected might damage the pads.
It was strongly recommended to me that when you cut the cap, you should align the blades in parallel with the direction of the pads. That means like this:
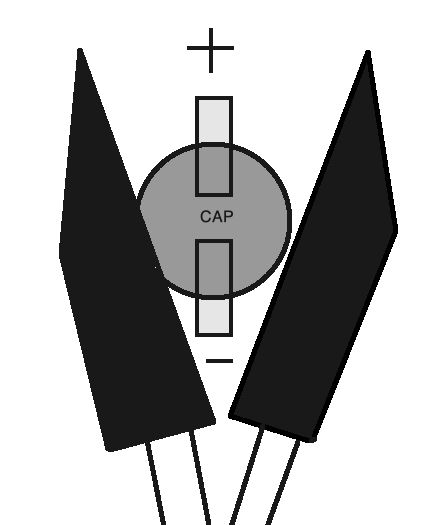
This keeps the cap from leaning too much inwards or outwards, which is often what can rip up pads. Ideally, you want to be as centered as possible to avoid twisting when the force of the blades is applied as well, and as flat as possible with the surface of the board.
I had some trouble initially getting adjusted to this technique. On the first few caps I did, I cut off too little, severing the can above the crimp, and then I had to try and re-cut closer to the base to free it up. Thankfully, I don’t think I destroyed any pads, though I did almost take a few errant caps in the eye as they went flying off to the moon. I started wearing better eye protection, and also covering the back of the cutter with my hand so the cap wouldn’t get quite so much distance.
The little caps seemed to be the leakiest. As I said earlier, the big ones leaked a lot only once I cut them open, so they were clearly tight up until then. No matter whether small or large, however, the pads were pretty gross-looking. A brush with the soldering iron and some fresh solder cleaned up the pad a little, but I still wasn’t happy. Some black stuff was getting left behind, and I wasn’t sure how clean the pads underneath the solder blobs really were.
A friend recommended that I just go to town with liquid flux and braid to clean the pads as well as possible, which makes sense. The flux definitely helped clean up the corrosion, which gives me some confidence that this repair will last into the future.
As an aside, this was the first time braid has actually worked as advertised. I guess soaking it in liquid flux was what it needed all along, even though the package itself claims the braid is full of powdered flux.
I also scrubbed the chip legs with a toothbrush where possible. This took care of the gunk that I couldn’t easily get with a q-tip. I considered desoldering the chunky through-hole 2200µF to get a better angle at the AMD AM85C80 SCSI controller chip (UE9) it was glued onto, but it seemed OK.
In With The New
I had to go back and tin/flux/braid the pads a few times, because where they were dull, solder wouldn’t stick to them. This meant that it was hard to actually put solder on the caps. It was especially bad for C15, the middle cap which I assume handles part of the power-rail, because I was just not satisfied with the minuscule amount of solder that was getting applied. I’m still not really happy with how bad it looks.
I managed to put everything in properly the first time, except for the one I put in backwards. That one got fixed quickly with some deft solder work. My lack of magnification was a real sore point when I went to inspect the joints later.
The Power To Crush The Other Kids
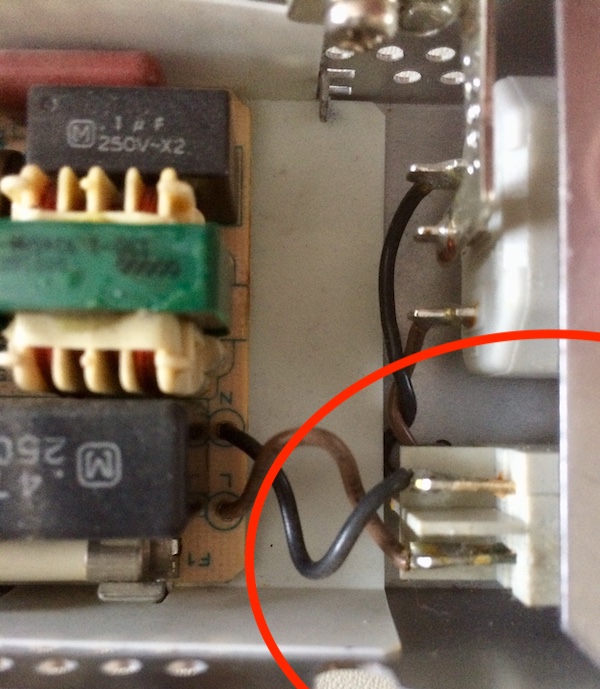
After a bunch of ugly joints, I decided I would also re-cap the power supply while I was inside the machine. This is where I made a pretty big mistake. When trying to desolder the wires from the power switch, I accidentally melted it by keeping the iron on the prongs for too long.
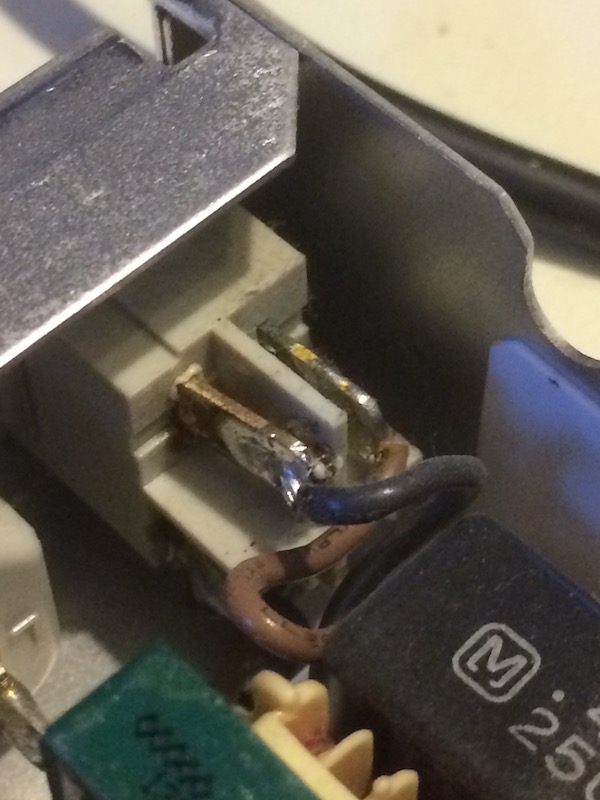
One of the prongs slipped really far inside the switch case plastic, and the switch itself didn’t seem to work anymore. There was no continuity on the black (L) line regardless of whether or not the switch was engaged.
There is probably an aftermarket switch that would fit, but I don’t have one on hand, and I really want to test this machine now. How am I going to do it?
This is not my first experience screwing up a Mac LC power supply switch. When I was a kid, I didn’t know the three-finger keyboard restart command, so when the Mac froze or bombed, I would flip the switch on the back.
Eventually, the switch completely wore out, and the computer was dead. I was distraught. My dad replaced the supply with a mid-90s-eBay one from a Quadra 605, and it’s the same supply that is in it today.

I grabbed the power supply from my childhood LC and was pleased that the caps seemed to be in much better shape than this practice machine! Sort of like how hikers practice for a day hike by climbing Mount Everest. That’s a thing, right?
The caps will still need replacement on my ‘good’ machine. At least it’s heartening to see that I don’t have a jungle of corrosion on the chips, like the one that probably hurt this machine’s ADB.
With the TDK power supply swapped into the “bad ADB” machine, it was time to flip the switch.
Bong!
I was rewarded with the sound of a hard drive spinning up loudly and then the classic LC “bong” sound, as well as the signature “pop” of the Sound Manager loading. I’ve got functioning sound (and it sounds good), and the computer started, so we’re at least halfway there!
However, I didn’t have any video. I wasn’t sure if this is because of my video adapter. This Mac should have supported 640x480 video, if only in 4-bit colour (you needed to upgrade the VRAM to get 640x480 with 256 colours). The adapter had options for both VGA/SVGA and 640x480, and up until now I’d been fine running it on 640x480. Had I killed the video in this LC by attempting a recap?
Things only got worse once I tried to reboot the machine from the keyboard. There was no response - and no caps lock light when I toggled that key - so probably the ADB issues had not been resolved by me giving it new caps and a firm toothbrushing.
The keyboard did flash on startup, so at least 5V and ground were working on the ADB port - ruling out a bad ADB fuse, which happens often when people unfamiliar with Macs attempt to hot swap a keyboard or mouse.
To review:
- The Mac works;
- It makes pretty okay-sounding sound;
- It boots some kind of OS off the hard drive;
- ADB still doesn’t work;
- Maybe the video isn’t working now.
It’s Tricky To Get Video Sync That’s Right On Time
To make myself feel better/worse, I decided I would try my ‘good’ LC with the same video adapter. If it also didn’t produce video, then I could assume to a reasonable level that the fault was in the adapter, and go hunt down an alternative one that sucked a little less.
It was pretty exciting/terrifying to power this thing back on after so many years of torpor. In its own trusty way, it leapt to life and bonged on its own. Good LC was - as you’d expect - good. Unfortunately - or fortunately? - the video still didn’t work. Something about my combination of Samsung high-sync monitor and early-00s Monoprice adapter just did not seem to pass muster with this machine.
The adapter also didn’t work on my works-with-freaking-everything slow-scan-tolerant NEC MultiSync 1970NX. Whatever signal was being sent out from the adapter wasn’t even enough to take the monitor out of sleep mode.
Even my monitor of last resort, a battered sync-on-green-capable IBM ThinkVision flat panel that I pulled out of a dumpster, didn’t want to give up the goods. This little trooper did, however, make several valiant efforts at achieving sync during boot before giving up and falling asleep. So I’m still sending some sync. We’re in the right ballpark, and just need to figure out what signal the LC produces and the monitor will tolerate.
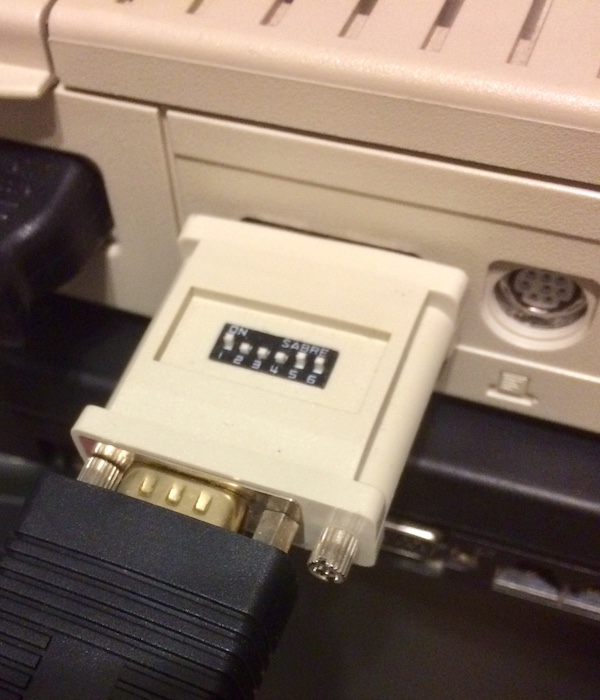
Rooting through my parts bin, I found another adapter, with the cryptic mark “SABRE” on the back. It was a Computer Accessories brand, proudly made in China, and the little pamphlet that it came with described many amazing DIP switch settings.
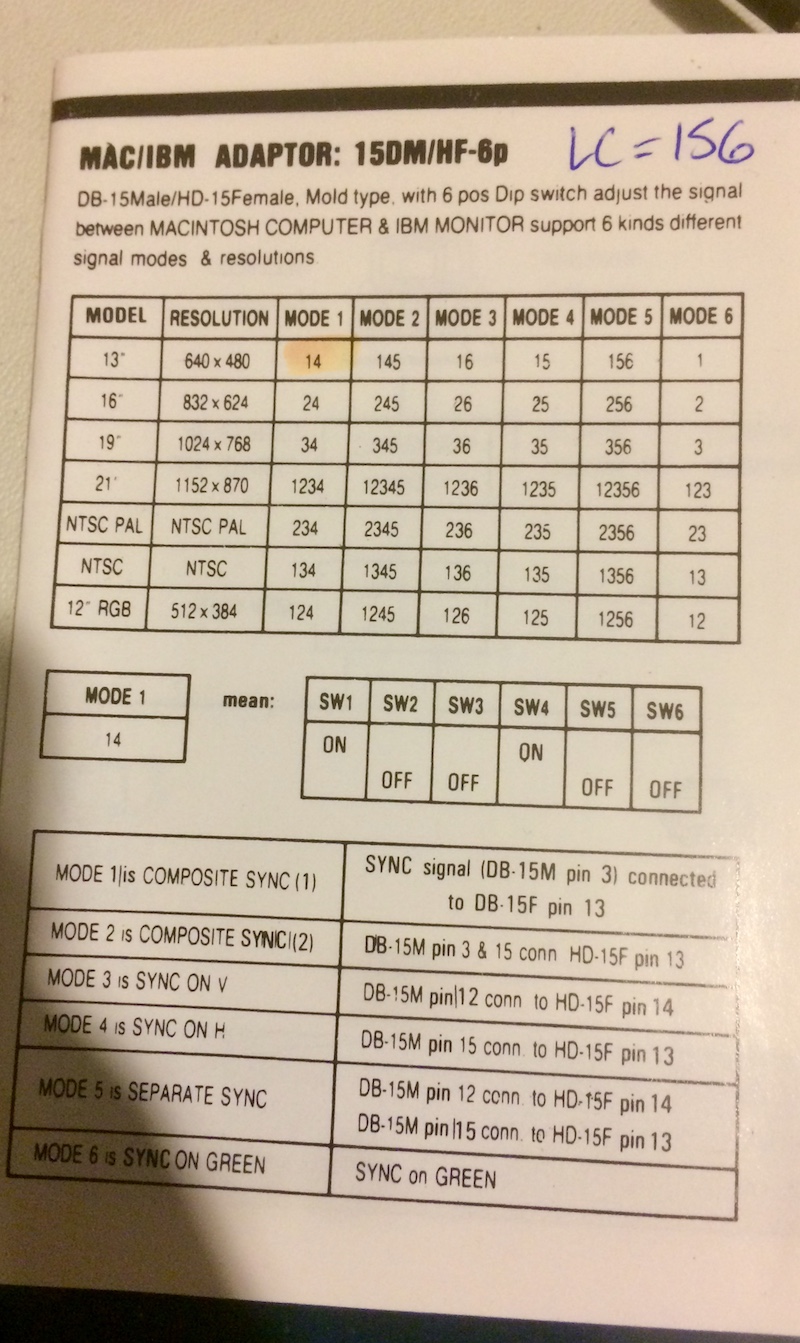
I don’t know who made the highlighter mark on this or for which computer, but that wasn’t the right setting (all “composite sync” settings generated only intermittent video). As you can see in my excited handwriting in the top-right corner, 156 (“Separate Sync”) was the “best” setting.
It didn’t produce really stable video, but you could actually use the machine for a few seconds in between the monitor dropping out to a black screen and coming back some time later. Perhaps this was related to the power supply, as it seemed to happen more frequently under heavy hard drive access.
This sync configuration didn’t work at all on my usual Mac monitor, a 4:3 Samsung. Instead of syncing in 156 mode, the monitor just instead rapidly flashed its “power” and “standby” LEDs and blinked the backlight. Analogue video is crazy. I’m sure there’s a mode that will work on that monitor, but I’ve had trouble getting more exotic computers to work on it before.
Pro-tip: Old 4:3 LCDs are cheap and easy to store. Get all the ones your loved ones can tolerate.
Still though, I got video, of a sort. Now I can test these machines.
First, my known good LC:
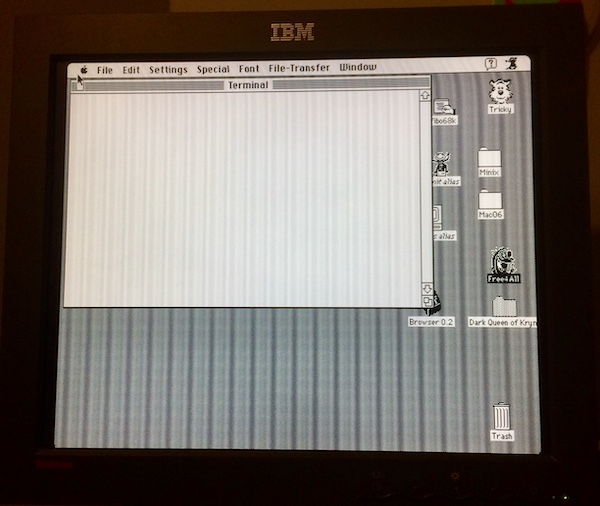
Too bad it looks really ugly from all the moire, but that can always be fixed later.
I seem to remember hearing something about the LC having funky video before, but I didn’t realize it was this funky. Has it really been so long since I’ve fired this computer up? Based on the name of the first partition on the hard drive, I must have stopped using it around 2001-02.
That was a fun trip down memory lane; a fun trip that we’ll revisit later when I recap that machine. So now that we know that we have a reliable way to get video out of a Mac LC, let’s try it again with the “bad ADB” machine - i.e. the whole reason we’re here.
So what was loaded on the “bad ADB” Mac LC? There was no way of telling, without a keyboard or mouse. It appeared to be a Mac OS 7.6 install (not really optimal for this machine), but it didn’t look like anything special.
Back to Square (or should I say ADB Frame) One
So now we’ve disturbed several junk bins, moved monitors around, jiggled cables, and - oh yeah - recapped a Macintosh LC. What did we get from this? Absolutely nothing; as sold, the bad Mac worked, booted, and had no functioning ADB. Other than being slightly cleaner inside and with newer components now, that’s what we still have.
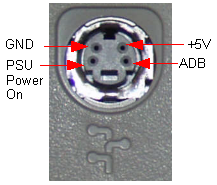
Not being particularly familiar with the implementation details of ADB, I decided to take a gander at the port to see if I could figure out what must have gone wrong. With only four pins, the pinout on ADB is not extremely difficult to understand, and only three of those are actually used on the Mac LC since it doesn’t support soft power (hence, the worn-out power switch of my youth).
Since the ADB port only appears to have one pin that isn’t working - which is to say, the serial line that provides the actual Apple Desktop Bus - we can probably finger the controller chip as a suspect. Another reason we can point to the chip is that it was recently marinating in extremely corrosive capacitor juice internals.
I just gave it a scrub with a toothbrush and some alcohol, but was that really enough?
After thinking about it and asking around, it was suggested to me that I just buzz out the damn thing to see if a capacitor leaked into and ate a trace. And so I did…
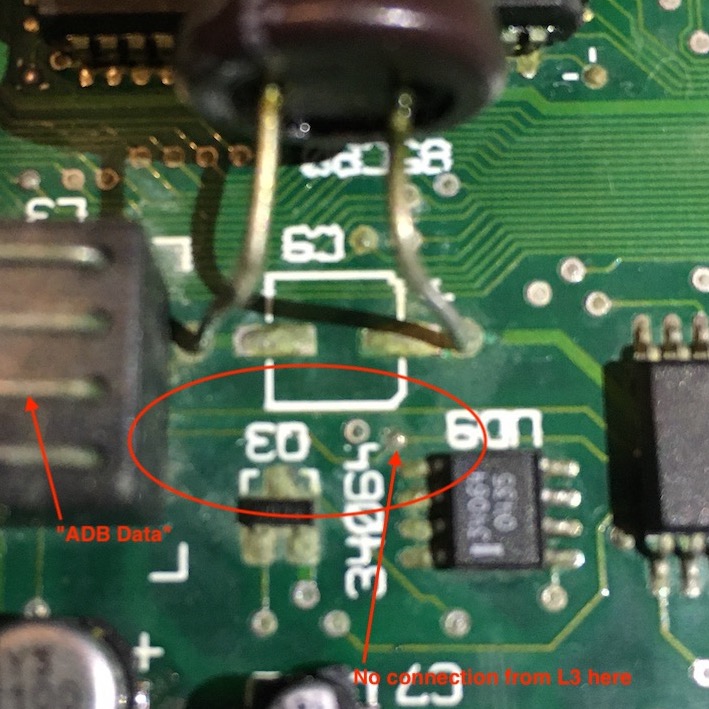
The data pin from the ADB port goes into the L3 choke block and then should go through a line directly to the EGRET chip and to a filled test pad. That test pad is not continuous with the L3 block, but is continuous with the EGRET chip, indicating there is a broken trace between the L3 block and the test pad.
Ironically, the corrosion probably crept into that test pad, and ate the trace at the thin bit where it starts to round the corner. I tested my ‘good’ LC again (man is it ever handy having a working example!) and my theory was confirmed.
Notice the corrosion around the huge filter cap (C9) glued to the SCSI chip. It might have been the one primarily responsible for all this damage. At first, I thought this 2200µF, 16V cap might be used for the SCSI system somehow, but it appears to also be part of ADB. Perhaps it’s the power filtering cap. Whatever it is, it fought me the entire way out, and left a hell of a calling card behind.
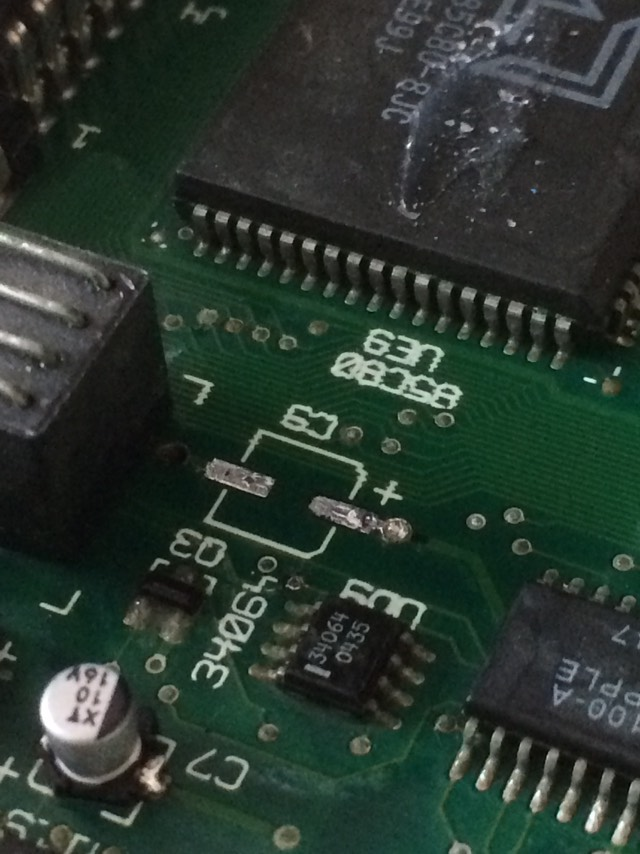
After an hour of scraping corrosion off the C9 pads (which aren’t even being used - Apple left their options open re: SMD vs. through-hole vs. neither) with a knife and using flux and braid as soon as I saw some workable copper, it eventually cleaned up. I think that I am more proud of this than anything else on the computer.
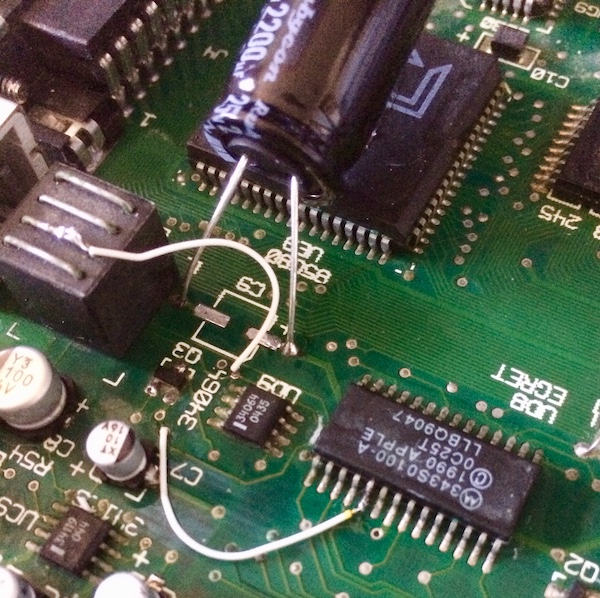
Now that that’s clean, I could put in a new C9 cap and clean the area. I did a quick test patch of the ADB trace with a tinned length of Kynar wire:

It’s ugly, but it worked. I was now connected from the DATA pin of the ADB connector all the way to pin 20 of the EGRET chip, like you’re supposed to.
Firing it up, ADB still didn’t work. Power and ground seemed fine, but the keyboard and mouse didn’t appear to ever get woken up or interrogated by the Mac. I did some more chasing around the area, but ultimately came up with no obvious suspects.
Working on a clue from the 68KMLA forums, I decided to reflow the Q3 transistor. This somehow is involved in the “open collector” aspect of the “open collector” ADB bus, which I don’t quite understand yet.
Just when I was about to pull out the scope, I decided to check all the other vias in the area around that one. There’s a little one that’s hanging out near the other corroded trace, and it goes under the EGRET chip. What pin is it supposed to go to?
When checking my “good” LC, it turns out it’s supposed to go to pin 19. What does pin 19 on the EGRET do?

Oh hey, it’s related to the ADB DATA pin that I just patched. And there’s a transistor on the line (not explicitly called out as Q3, but that’s a pretty strong coincidence). Let’s patch this, too!
When I booted, I was sad at first. The caps lock light didn’t seem to make the LED flash. However, it must get loaded later on in the OS, because I accidentally pressed it when reaching over to shut the machine down in defeat. And look!
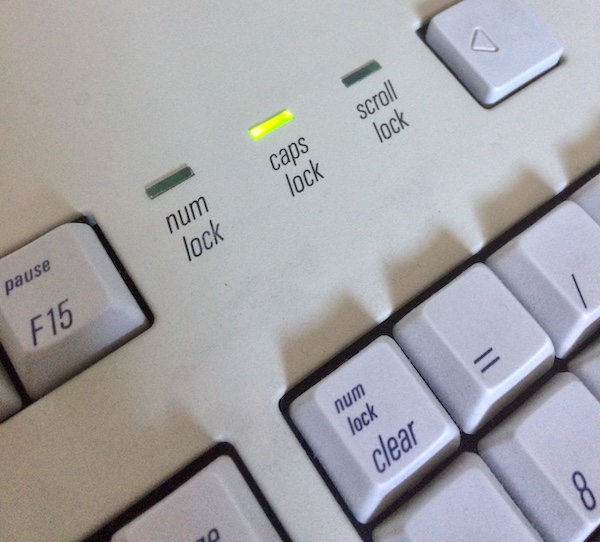
ADB is working! I immediately went rooting around the filesystem to find a copy of ClarisWorks 4 licensed to a school. There was also a game called “Number Maze” which I didn’t try out yet.
Let’s test out the keyboard some more:
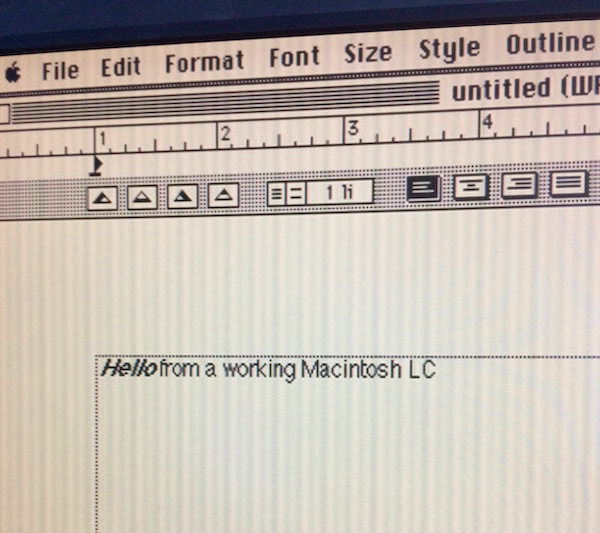
ADB is fixed! This is now a usable computer again.
What’s next?
Obviously, the power supply is the next thing to be serviced. Even before I melted the power switch with my incompetence, the cap leakage was so dramatic that it was asking for replacement.
Also, I’ve been using the “good” LC power supply to test this, but it’s just as old (if not older) and could do with a service of its own. I don’t know if this TDK supply is the cause of the erratic video sync on both LCs, but judging from the age of the Astec supply, it can’t be far behind in terms of leakage.
Things left to do:
- Re-cap the original Astec supply from this “bad ADB” LC;
- Re-cap the TDK supply from my childhood LC;
- Re-cap my childhood LC;
- Figure out why the video is funky (Bad adapter settings? Does the monitor need a recap?)
This was a fun trip down memory lane, I learned a lot, and I also managed to save a motherboard from a machine that nobody else would have bothered to put this much effort into. That’s a victory, right?
Repair Summary
| Fault | Remedy | Caveats |
|---|---|---|
| Leaky logic board caps. | Replace caps. | |
| ADB doesn’t work. | Repair ADB data and power traces to EGRET. | Trace repair is ugly. |