Call In The PROs When You Can't Flop (X68000 PRO Part 3)
Tags: computer sharp x68000 x68000-pro repair floppy
With a new power supply and the entire insect population of Honshu removed from its case, the swamp-bogged X68000 PRO can finally start up, but can it boot floppy disks? In this exciting conclusion to the series, we’ll jump through a frankly ridiculous number of hoops – many of them ultimately proving to be unnecessary – in order to make some disks and find out.
Ejecting the Takeru Disk
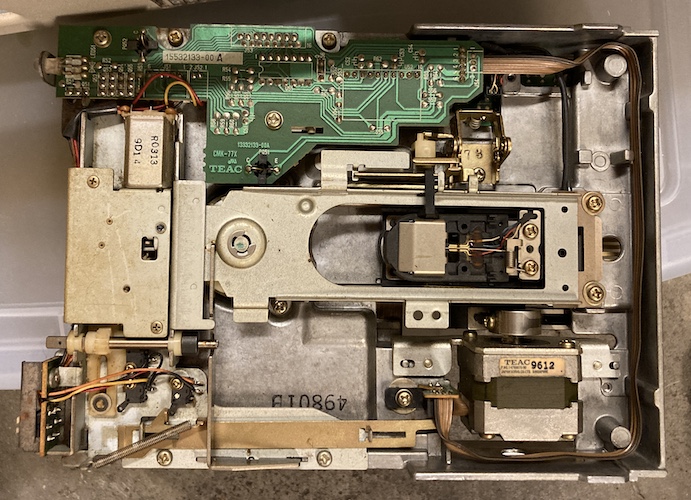
If I wanted to boot the X68000 PRO, then I’d have to clean the filthy floppy drives and get that stuck disk out. I stuck the drive holder bracket in the dishwasher after scraping off both of its stained and reeking stickers (Sharp part number and Teac part number.) While the wash was running, I turned my attention to the drives themselves, first vacuuming out the usual pocket fluff, larvae, and egg sacs that accumulates inside floppy drives.
And the first floppy drive, with what we now assume to be 2136 Nihon Gokei still stuck inside:

There does not appear to be any easy/safe way to mechanically release the floppy disk from the drive without power: the assembly on the front has a dedicated electric motor and sort of a rack-and-pinion mechanism to release the disk carriage. The substrate of the disk looked okay at first, with only a few small mould spots near where it had been exposed to air, and the drive spindle seemed to turn smoothly.
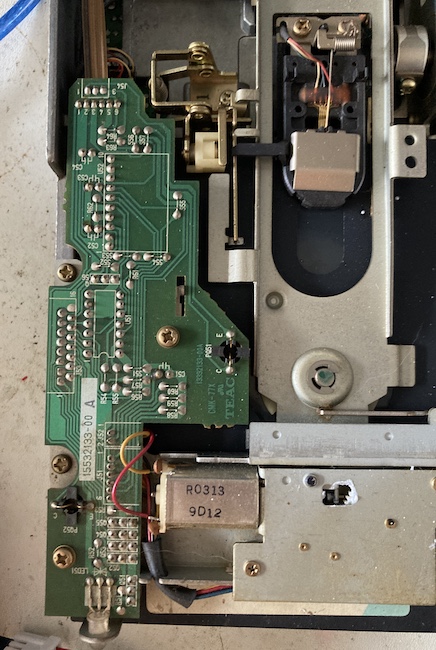
After I got the drive on my bench, I realized that there was a half-moon shaft sticking out the front, similar to the ones that regular “dumb eject” floppy drives use for their eject lever. It connected to a worm gear that itself connected to the eject motor. This seemed like a good bet, but it wouldn’t budge, and I was afraid of breaking some parts if I were to force it.

After unscrewing the control board and eject motor, the eject mechanism’s lever was no longer under load from the motor gears, and I could rotate it freely clockwise with a pair of pliers, which raised the carriage and ejected the disk.
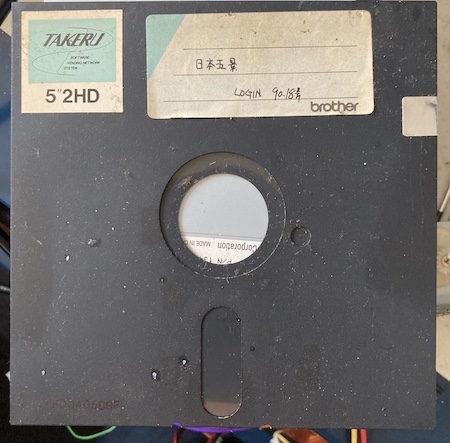
I am still not sure what all that “login number” business is about. Now that the disk was out of the drive, I could see that unfortunately the top side had a significant amount of mould, including an area that looked bare of magnetic material. I tried to clean it up as well as I could with isopropyl alcohol and a q-tip, but I don’t think I made much of a difference.
After greasing and cleaning the Teac drive (including vacuuming up another little hitch-hiker,) I hooked it up to my Greaseweazle and attempted to dump the disk. Nothing happened, and in fact I couldn’t even insert the disk at first. It would just bump up against the back wall of the drive, and the carriage wouldn’t lower to lock it in.
The fancy auto-eject features must be responsible for more than I thought: most of the sensors were on this “extra” board, including disk presence and index, and without the signals on the flex cable, I reasoned that the Greaseweazle was unlikely to have any luck driving this drive.
To make sure, I got strategic and took the eject motor geartrain apart again in order to insert the disk and clamp the carriage down by hand, and this time it would just sit there and run the spindle motor but not move the head. Obstinate little thing, aren’t you?
A Valiant Attempt
Going for broke, I hooked the drive up to the X68000 to attempt a boot. To my delight, it woke up, pulled the disk in, read a few tracks and then booted. Of course, then it crashed. The error message is generic enough that it could just mean the computer was unable to load the boot sector or the boot executable or something and gave up.

One cool thing is that you can hit the X68K’s front-panel interrupt button at this screen and it will pop up a dialogue box with the program counter, sort of similar to the mini-debugger on old Macs. Neat, although it’s almost certainly inside an “oh no, time to crash” routine in the ROM. This was also some reassuring evidence that the computer is working reasonably well, outside of whatever was going on with the floppy drive.
This non-booting behaviour was not a huge surprise considering what condition this diskette was in, but still disappointing. The second drive did the same thing, albeit only after some head cleaning of its own. Originally, it would just spit the disk back out and complain about Human.sys being at the wrong address.
To Err Is Human68k, So Forgive Some Grime
To get a known-good boot disk written, I went to the Internet Archive and got a copy of the Human68k v3.02 operating system. When I unpacked the zip, I was surprised to find the disk image was in the *.dim format.
I hadn’t encountered this before, so I went searching on the internet, and eventually found this great pc98.org page about the DIM format, which explained it was basically a raw cylinders-head-sectors disk image with a pair of 128-byte headers on the front of it.
I wrote a quick nim program to trim the first 256 bytes off, and then checked the resulting size against the X68000 disk format documented on Wikipedia.
77 tracks * 2 heads * 8 sectors/track * 1024 bytes/sector = 1,251,568 bytes
# stat -f'%z' Human68k-Trimmed.raw
1251568
Seems to check out. It also diffed out identically to a friend’s conversion of the same image using the Japanese VFIC tool.
I set up a custom “raw format” definition in the HxC tool in order to import it:
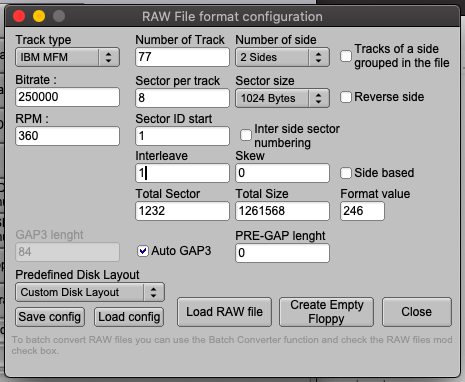
Using that definition, I loaded the image into the HxC tool, and converted that image into HFE so it could be written by the Greaseweazle.
This turned into a whole ordeal, which we’ll not go into here1, but suffice it to say, the Greaseweazle didn’t help me out very much here.
For a second attempt, I decided I would try to write the disk using my PC-8801MH’s high-density floppy drives, using the xdisk utility. Unfortunately, xdisk only knows how to handle D88 disk images, so I had to write a tool to convert from the aforementioned DIM format to the D88 format.
That’s when I found out the PC-8801MH motherboard was damaged, and the floppy drives weren’t working. Aaargh! Old computers are so frustrating sometimes.
For a third attempt, I just asked blog superfriend Sampson to send along a working X68000 Master Disk boot floppy2.
X68000 Master Disk
Unfortunately, this brand-new, tested disk worked exactly the same as the manky one that came with the system. When inserted, the disk would be read and then the computer threw a “the system could not be started” error, but this time in English.
I was very confused, and went around looking. In a little snippet of an nfggames post, I found out that you do indeed have to have both drives installed when booting up an X68000 PRO or you might get this error. I immediately (after four weeks) racked the second drive into the system, which is not a particularly easy task, and booted up like before.
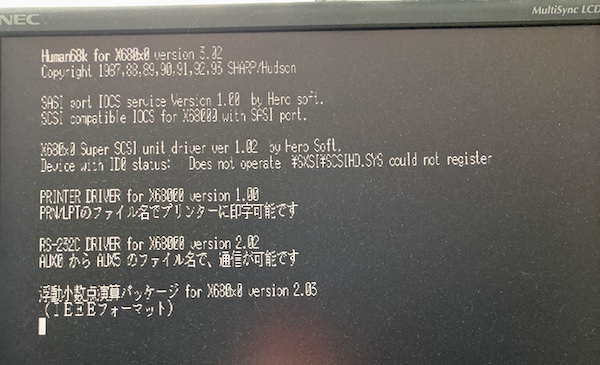
Holy crap. It worked. My heroic NEC monitor had finally met its match with this machine, though, and wouldn’t scale vertically high enough to display both the first and last line of the display at the same time. I’ll have to figure that out later.
Even soft shutdown worked, with a cool fade-out animation. And the keyboard worked! It was a little laggy/unresponsive in the BASIC interpreter, however, which I’m a little confused by. Another to-do item for the future.
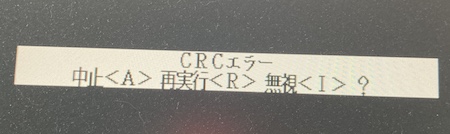
The Takeru disk (as expected) booted but did not run, as it was missing whole chunks of the substrate and threw bad-sector (mismatched CRC) errors. I chose not to keep pushing my luck on this one – we’ll try a recovery using something like ddrescue to a new diskette in the future.
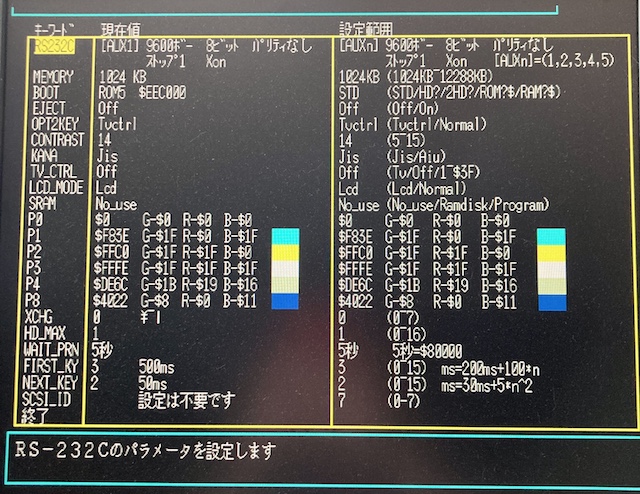
I loaded SWITCH.X, the soft-DIP/BIOS configuration program, and saw pretty much what I expected. Although the battery was no doubt drained, I then saved the default configuration to the SRAM just to make sure it worked. Note that I only have 1MB of RAM listed here because the expansion card wasn’t yet reinstalled.
Getting Around to It
On my last trip to Japan, in summer 2019, I picked up a little game from the Suruga-ya in Shibuya. This was not necessarily because I love the game, despite my reputation on the internet, but because I was in love with the idea of buying a 1980s game on 5.25” floppy disks from a downtown Tokyo department store.
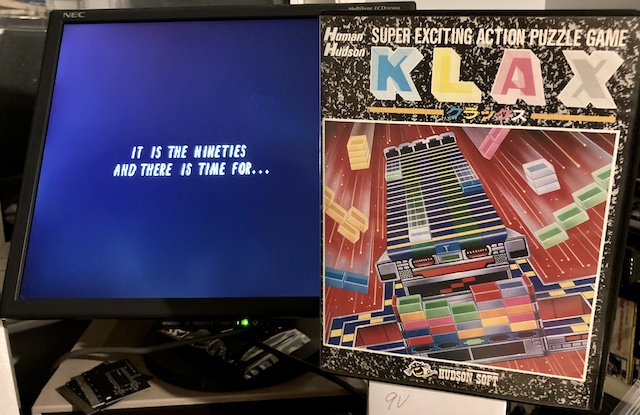
This shockbox travelled with me all the way through the rest of the often boiling-hot trip, and then it came home to sit on my shelf for years until I could assemble a working X68000. Now the disk is happily spinning once more.
Does it play any differently from the Sega Genesis version of Klax? Well, some of the help text is in Japanese. And it’s super squished and getting cut off by my monitor. But it boots and runs, and it looks pretty good doing it!
Conclusion
I’d never suggest to anyone that the way to get a working X68000 is to go find one that was in a flood, but it seems that flood damage and a bug infestation is a lot less dangerous to a computer than even a mild battery leak.
Keep in mind that this computer is nowhere near “done,” as barely anything has been tested. There will need to be a lot more testing and cleaning before it can be considered trustworthy. Naturally I’m not going to be playing Bonanza Bros or Geograph Seal into the wee hours of the night until the computer is back together. The monitor situation throws another wrench into the gears, as my trusty 1970NX has finally failed me, but there may be some scan converters that will work out.
And there’s still the matter of all that case damage from the first entry. I have a lot of options there for repairing and repainting the outer case, but I don’t have much experience with silkscreening or metal-flake paint.
All this isn’t saying that I’ve given up on the X68000 ACE, either, as now I have a reference machine to use to help diagnose it. And I haven’t given up on that Takeru disk, either. Maybe it just needs some more elbow grease and a copy of ddrescue.
There’s so much more to come from this ridiculous series of beautiful-but-fragile computers.
Repair Summary
| Fault | Remedy | Caveats |
|---|---|---|
| Disk drive would not eject disks without power. | Dismantle front of drive to free up worm gear and use lever like normal. | I couldn’t find an easy way to do this without dismantling and reassembling it every time I wanted to eject/remove a disk. |
| DIM disk image format needs conversion to D88 to write with PC-8801MH. | Write a converter to convert to D88. | It’s still untested. |
| PC-8801MH floppy drives don’t work anymore. | Repair PC-8801MH. | In the meantime, asked Sampson to mail me a diskette, like it is still 1991. |
| “An error has occurred, please reset.” errors on startup | Make sure both floppy disk drives are plugged in. |