Another try at fixing the Magic Smoke SE
Tags: computer apple macintosh-se macintosh repair
A few years ago, I got the “Magic Smoke” Macintosh SE. It was a pretty rusty machine, but otherwise looked okay inside. However, when I plugged it in after a (very) cursory inspection, it made ugly noises, failed to start, and then spat out a little bit of magic smoke – hence the name. Ever since then, it’s been a really small piece of furniture. I’m going to rip it apart and fix it.
Hypothesis Tetris
Before opening the machine, my guess was that the smoke came from a line-filter capacitor like the infamous Rifas, and that somewhere inside the power supply I would find a couple bad components unrelated to the Rifa smoke, which would be the source of the computer not starting. Of course, there’s always the common Achilles heel on early compact Macs: bad solder joints on the connector for the main power cable from the analogue board to the logic board. I didn’t notice a burned pin in that main connector when I last had the computer open, but I don’t remember looking at it very closely. Anecdotally, it seems the problem occurs more often with Pluses and earlier, but that doesn’t mean it’s impossible.
I’d also noticed recently that when getting compact Macs shipped, the yoke board sometimes pops off the CRT just a little bit and needs to be re-seated. I didn’t think to check this when I had the SE open the first time, so that would also have to get squinted at.
Reopen Sesame
I popped the machine open and looked for obvious damage. Everything was still gross from the last time, but there were no exploded components on the logic board, and the neck board was connected to the CRT just fine.
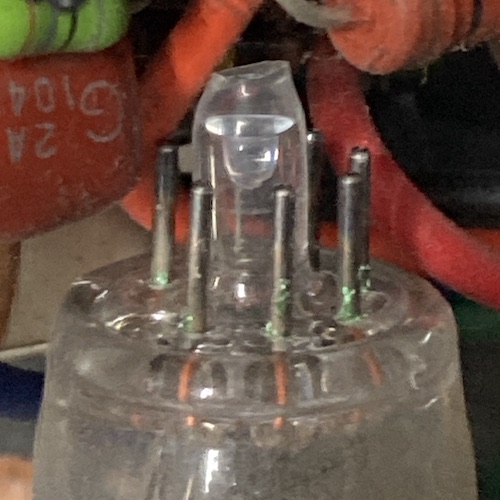
I pulled off the neck board, and saw that there was some green corrosion and grey-black heat oxidation on the pins on the CRT. This cleaned up a bit with a pink pencil eraser, although I’m not extremely happy with how dull it still looks.
Even though I was scared of it back in 2018, discharging a CRT is not nearly as terrifying to me today. Whether that’s a good thing is up for debate. The anode cap suction cup was really stuck to the side of the tube, such that it took me a little bit of one-handed wiggling to get the screwdriver under it and safely discharge the CRT. Eventually I triumphed, and sadly didn’t get a cool “click” sound. I would have been really surprised if this thing still held a charge after four years, much less several kV of cool noise.
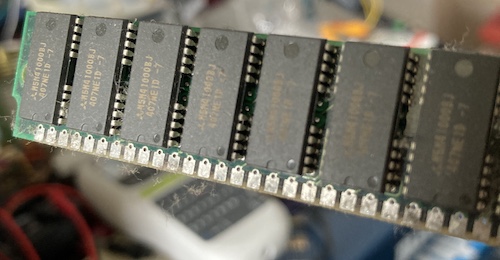
This time, I pulled out all the RAM SIMMs, noting that some of the logic board connectors had blue-green corrosion on them. A lot of the cheap tin fingers on the SIMMs themselves were also badly oxidized, so they also got a date with that same pencil eraser. Once the logic board was free from its rusty tomb, I washed it thoroughly. That means it ended up in the sink, got scrubbed with a boar hair brush and dish soap, and then blown dry with my “XPower” air duster.
Getting the analogue board out of the chassis was a genuine effort. Not only did the super-rusty screws want to cam out, but once it was unscrewed, the little holding clip was rusted into place. And once that was removed, the entire board was rusted into place in the metal frame near the back corner. It’s a little frustrating, trying to get the big board out while having to keep an eye on the contrast pot and front of the power supply at the same time to make sure nothing gets broken off.
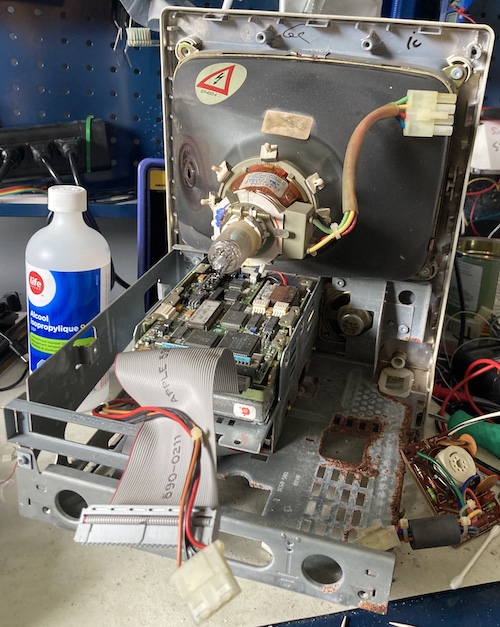
I thought really hard about pulling the entire thing apart at this point in order to subject the shell to electrolytic or abrasive rust removal, but I had already made enough of a mess. The state of my workbench was particularly rough because of a string of projects awaiting parts, divine insight into the origin of broken-ness, or both. I stuffed some of the loose parts back into the case and set it gingerly aside, where the CRT’s fragile neck wouldn’t get hurt. Now for the power supply.
Power Supply
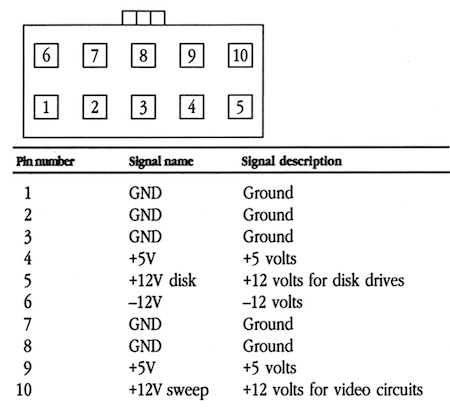
Voltages provided by the power supply aren’t uncommon in the world of old computers: -12V, +12V, and +5V. Their current capacities are pretty beefy, as I learned from reading the label on the outside. The “SWEEP” 12V was mysterious to me, until I read this great blog entry about replacing the Mac SE power supply and I realized that the rail is involved somehow in the horizontal sweep of the CRT. It’s actually a whole separate isolated 12V rail from the main one, presumably so that hard drives with noisy power won’t make the video go wobbly.
Now that the analogue board had been removed from the computer, removing the power supply from the analogue board was just a matter of unplugging it. And then removing four incredibly corroded screws, each with the structural integrity of spray cheese.
Out came the Engineer screw pliers…
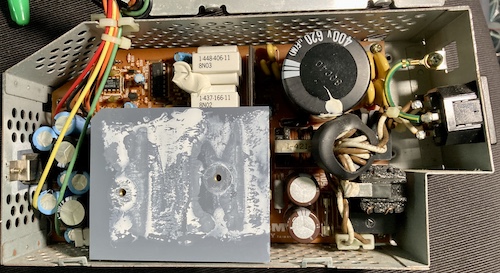
…and the supply was removed and opened. Unfortunately, I didn’t see anything obvious that could be keeping the computer from coming up. Sure, there were some tarnished tangs on the big diodes and switching transistors, but I didn’t see any smoking gun. I didn’t even see one of those infamous RIFA-branded X2 capacitors.
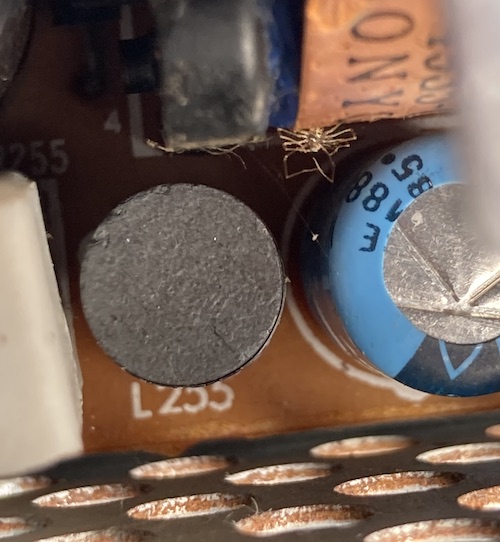
Other than a dead spider, and the usual dirt and dust, I saw way less damage than I expected for something that put so much rust on the case.

Once I got everything out of the case, I saw a lot of powdery rust on the backside of the power supply board. There weren’t any broken solder joints or obvious burn marks. I guess this rust is conductive and could have bridged pins, but I decided it was unlikely to be the smoking gun. Some toothbrush action removed it.
I continuity-checked the power switch to make sure that was all good (it seems to be a common failure) but I knew that if the machine had powered up enough to make smoke, the switch was probably fine. And so it was.
This was really annoying me – something definitely made that burning smell and little plume of smoke the last time I fired this computer up, but what?
After giving the supply a thorough cleaning, I grabbed a cap list from JDW’s YouTube video about recapping the CR-44. Owing to the current era of slow-motion horror in which we live, there were a handful of shortages on caps. Still, I got the majority of the BOM and made substitutes as needed.
Lots of caps on this PSU board had leaked. It wasn’t a dramatic fish stench, but there was gunk to clean off the board on every single pull. Surprisingly, despite having puked their guts up, almost all of them checked out OK on my el-cheapo ESR meter, and the ones that failed were just barely out of spec.
Everything else went well, but the little tiny 22µF caps on the secondary side were a fishy struggle. They had bent and corroded leads that were difficult to get all the solder out from under, and a few of them ripped their pads in the process. They’re also in a cramped area where it’s easy to accidentally bridge solder or reflow the adjacent parts’ joints if you’re not really precise.
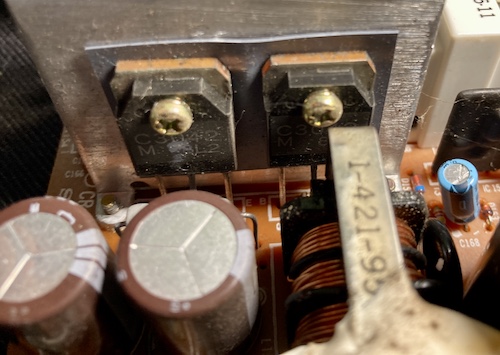
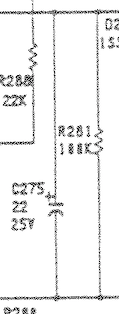
C275 was especially bad as its pad got very damaged indeed. I looked at the schematic and also at the board, and jumped to R281, which was adjacent to it and connected in parallel across it.
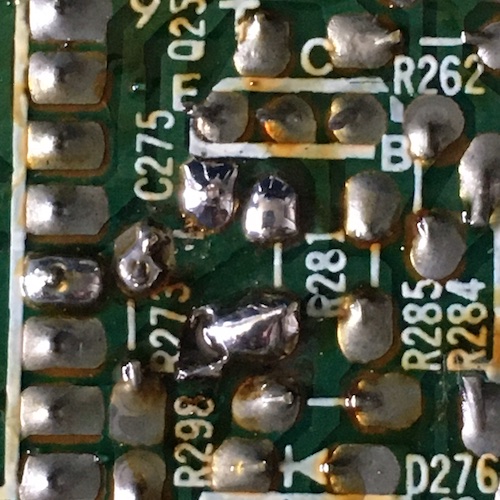
It was not a pleasant day at Power Supply Beach by any means. Those 22µF caps’ bodies also got hot instantly when their leads were touched with even the slightest bit of soldering heat, which makes me think they might be drained of electrolyte. Again, though, excellent ESR.
As always, the gun jammed just before the very last capacitor – once everything was taken apart and cleaned, though, that capacitor came out with no trouble whatsoever. Maybe I should clean this thing more often.
After putting the re-capped PSU back in the case, I turned my attention to the analogue board. I did consider bench-testing the supply, but I wasn’t sure of the minimum load, and in either event, didn’t want to fish my electronic loads out of the closet.
That’s right: I didn’t bench test the PSU when it was convenient to do so. I was in a rush, and to be honest a bit of a bad mood, and didn’t take the time to do it right. We’ll see why this was stupid later.
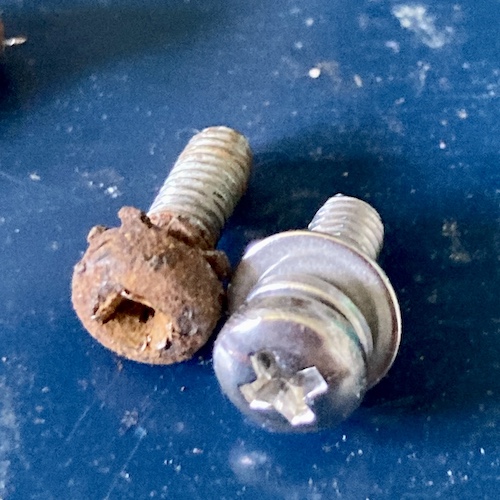
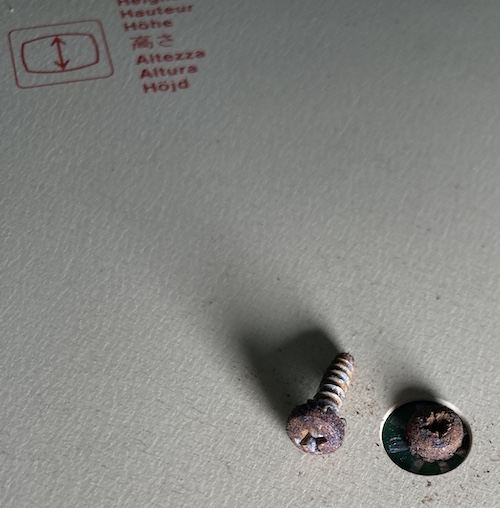
Because the original heads were ruined beyond use, I replaced the rusted-out screws which mounted the power supply to the analogue board. By doing a quick caliper measurement on the shaft, I determined them to be M3x8 screws with a toothed lock washer. All I had on hand were these cheap ones from a screw-assortment set with “conventional” lock washers. A dab of loctite set my mind at ease.
The Analogue Board
Larry Pina’s The Dead Mac Scrolls didn’t have an exact match to the situation I experienced originally. However, it did mention that the huge-ass diode at CR3 can go short, so I checked that first, in-circuit. It was open in one direction, but not the other. That’s what diodes are supposed to do, so it seemed fine to me.
Then, because I’d had some experience with Mac Pluses in the past, I started checking all the solder joints on the big Molex connectors. While they weren’t totally broken, I found cracks on the yoke connector at P1 and the hard-drive power connector under magnification. Those joints were reflowed: although they had good continuity, there is no sense in getting all the way here and not doing it. Same goes for the yoke board, which had the beginnings of a crack on one pin.
Because I had already gone to all the trouble of discharging the CRT and recapping the power supply, I decided it would be a good idea to recap the analogue board, too. Again using a BOM provided by YouTuber JDW, I was able to find most of the parts. For those caps that were unavailable (Panasonic seemed especially unlikely to be in stock,) I again tried to swap them for some good substitutes, rather than wait six to eight months for delivery.
Because the analogue board sees so much vibration from the fan, I treated myself to an actually decent hot glue gun in order to help keep the new capacitors from vibrating apart. My former Canadian Tire $6 special, which mostly just makes stringy crap everywhere and doesn’t actually do much to put hot glue where I want it, went right in the bin.
The new gun – a no-name Amazon special – has interchangeable brass nozzles, including a very nice long one that’s perfect for putting hot snot under the caps to help keep them from vibrating. A lot of my friends just stick a slice of hot glue in the vague vicinity of the part and then hit it with an SMD hot air station, but this strikes me as scary for some reason. Call me traditional, which is another word for “long strands of hot glue left everywhere when I let go of the trigger.”
The Logic Board
After washing the logic board in the sink and blowing it dry, I decided to check for damage. If the battery venting caused that much damage to the chassis, I’m sure it hurt something on the board when the aspirated goop fell back down. I noticed that some of the traces looked a little funky. Primarily, this one that runs under the SCC was very bright compared to its neighbours:

However, it buzzed out just fine, had firmly attached solder mask, and didn’t appear to have any significant resistance. I was beginning to get desperate in my hunt for the source of the problem.
When I was about to close the computer up, I noticed this RAM jumper was hanging off the edge. It’s not gonna do anything way over there! I set it to bridge the leftmost and centre positions, but it later turned out what this does is set the computer to 2MB instead of 4MB. It was in the right position in the first place, and in either event, certainly wasn’t responsible for the computer not booting.
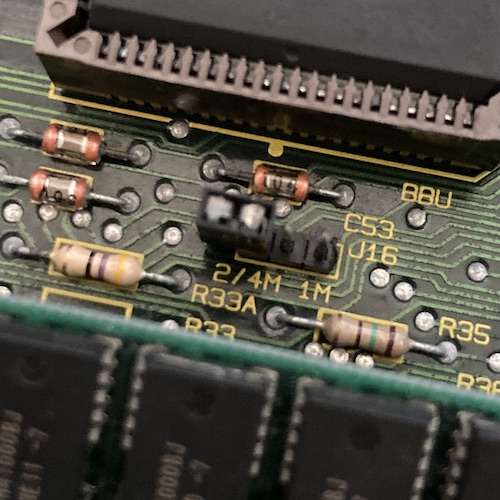
Because of the way the computer is oriented, I’ll have to remove the motherboard to reset this jumper back to the 4MB position. We can take care of that later. Let’s move on and flip the switch!
Test Fire One Two
I put the SE back together, plugged it in, and flipped the power switch. Nothing happened. I flicked the power switch a few more times, and was rewarded with my old friend from last time, the flup.
This flup sound was accompanied with a bad smell, which I immediately sucked up using my solder fume extractor. See? I do occasionally learn from my mistakes.
So we still have something major wrong with the SE. After asking around, Kai Robinson (of SE Reloaded repro board project fame) suggested it is likely to be an internal short in the power supply. Aaargh! I knew I should have bench-tested the PSU in isolation while it was out of the machine.
Something didn’t add up, though. Where was that bad smell – and it wasn’t ozone, and it wasn’t woodsy, and it wasn’t semiconductors – coming from? I opened up the case and stuck my nose inside. Sniffing around, I found that the power supply smelled normal. The monitor smelled normal.
Something on the left lower corner of the machine smelled really bad. I sniffed the logic board. Again, normal. The floppy drive? Getting grosser. The old Miniscribe hard drive? Very gross.
That’s when I noticed that the big old stepper motor on the Miniscribe was extremely rusty. Was it possible that the dense slab of a hard drive was trying to seek or spin up, and the massive current draw was hiccupping the power supply as it tried to rip through its own built-up corrosion? Maybe?
I unplugged the hard drive from power and SCSI. Just for good measure, I unplugged the floppy drive too. Then, I put the back of the case back on, plugged the computer in, and flicked the power switch.
vrrrrrrrr BONG
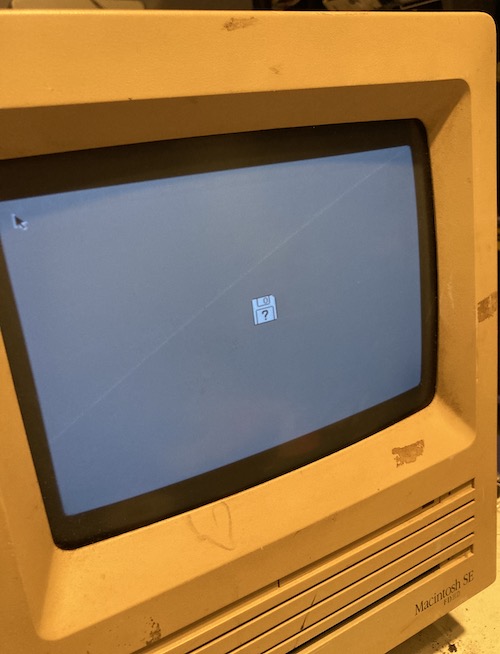
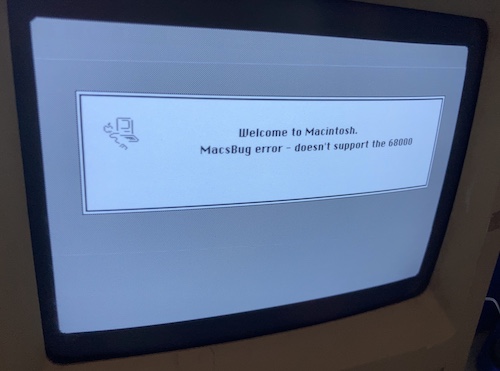
After a worrying amount of time, the raster stabilized and showed me a very blurry “missing startup disk” screen. That’s great news – the logic board is working well enough to check the RAM, check the SCSI chain, and boot up. And the question mark even blinks!
Of course, it’s not all roses. The dry bearings in the fan made an incredible amount of racket, and the computer isn’t too useful without a floppy drive or hard drive.
Bring It To The Disko
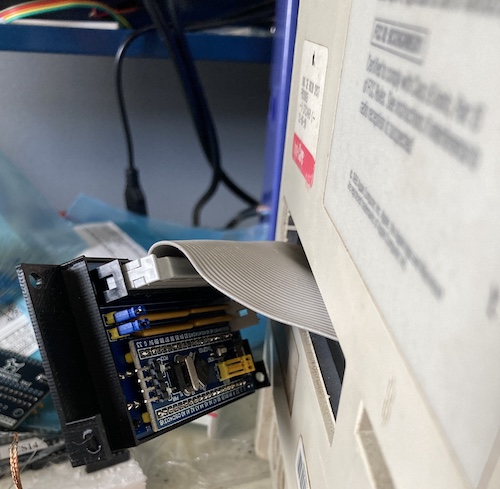
I “installed” the BlueSCSI SCSI hard drive emulator from the previous article on that subject. It was already equipped with a System 7.0.1 image, which should be bootable on this machine. If you look closely, you’ll see an external BlueSCSI in the background, slowly being built up as I wait for parts that are currently in shortage. Boy, that would have been easier than doing it this way.
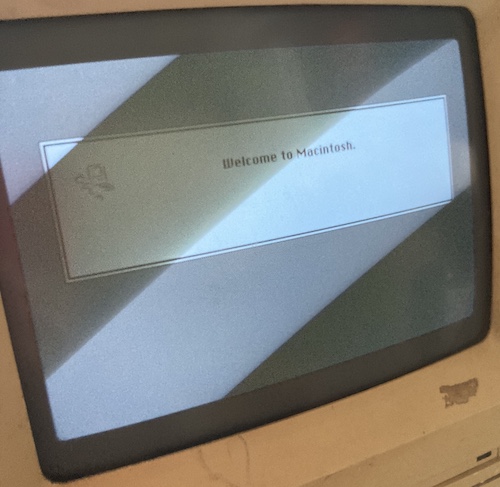
Woohoo!
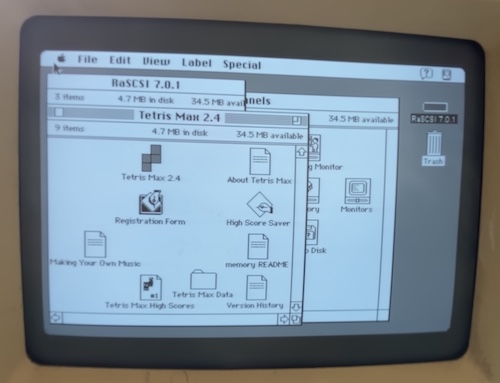
Yes! It’s a Mac again.
The Second 90%
The left side of the screen looked quite blurry, which was unfortunate. At first, I thought this was a focus or an analogue video problem… but it was actually that the monitor was caked in a thick layer of dust, rust, and grime. It became at least twice as bright – and clear – after cleaning it. Yuck!
The floppy drive was a mixed bag. It appeared to be able to detect and read floppies, but not eject or format them. If I stick a garbage disk in and boot the machine, it will read it a few times and then boot off the SCSI disk without even making an eject noise. Sometimes it would get confused, and imagine it had a disk inserted that needed to be formatted. Hopefully the battery didn’t hurt the floppy drive… I did plug it into the “lower drive” connector, but I’m not sure that actually matters when you only have one drive. I decided to put this off until later because I’d had more than my fill of floppy drive repairs at the time.
As well, the power switch on the power supply is best described as “glitchy.” It doesn’t always work to switch on the machine, which makes me think it has become internally corroded. My own continuity tests when the supply was apart showed that it was a little funky, but I decided to roll with it. Maybe I should’ve soaked it in deoxit or something?
I got out an ADB mouse and keyboard, but the mouse button was stuck down and the little slidey plastic pad on the bottom of the mouse was falling off. After taking a detour to fix both of those problems, I was now ready to test the ADB system.
Everything seemed to work okay, although the “power” button on the keyboard wasn’t triggering. I seem to remember one of my keyboards had this problem (bad switch) but not which one it is, and the rest are in storage… so we’ll leave that test for the next article.

I made sure to copy some important test utilities to the disk image on the SD card.

Very important utilities.
Oh, we don’t need that one. It can go to make room for Bolo.
Here’s where I made a big mistake: I went ahead and removed the grody asset tag from the front of the machine using a plastic razor blade. That sticker came off surprisingly easily, but now I know exactly how yellowed this poor SE’s front end really is. Great job, idiot.
The Third 90%
So, the “Magic Smoke” SE is finally booting and resembles a working computer, but we’re not out of the woods. There’s a lot of things left to fix:
- The floppy drive, in general;
- The stuck internal hard drive needs to be either un-stuck, or entirely removed;
- Stickers and tape residue need to be removed;
- The inner case needs to be washed;
- Those rusty ports on the back should be polished;
- The RAM jumper is set to 2MB;
- The fan is noisy;
- And the power switch is very finicky.
Still, all these things can wait. A working computer is better than a dead one, and I’ve defeated my four-year nemesis… by unplugging something. I’ll take the wins I can get.
Repair Summary
| Fault | Remedy | Caveats |
|---|---|---|
| Computer doesn’t start and makes scary noise and bad smell. | Old hard drive is rusted stuck; unplug. | |
| I had too much money and time. | Do a full re-cap of analogue board and power supply. | |
| Screen is kinda blurry. | Wipe off all the dirt with a damp rag. |