A Supergun for All Seasons
Tags: arcade supergun homemade-hardware
Playing arcade games at home. That’s the dream, isn’t it? Maybe get a little Columns action on the desk you usually use to do taxes? Perhaps you can even make a little test bench, get a bit of board fixing going? Yeah, that’d be really cool. Too bad nothing like that exists, and especially not well-tested and open-source. Wait, it does? And it is? Well, then, we’re just gonna have to build one.
A What-Gun?
The Minigun is an open-source supergun. What’s a supergun, then? The best way to explain it is by taking a look at the JAMMA standard.
In the earlier years of arcade video games, it was rare for a cabinet to ever hold more than one game during its lifetime. You’d order your game from Bally or whoever, it would appear on your distributor’s loading dock, and then be delivered to your roller rink. Then, when the game was no longer “hot” and stopped earning, you’d sell it off to some other sucker, or throw it in the dumpster.
You could do a conversion to a new PCB, of course, but the monitors, coin boxes, wiring, and controls were all different between the different manufacturers. Often, even the same manufacturer would have different harnesses or standards between different games, and you’d end up having to pay some guy to come down and figure out a conversion if no official kit existed.
This state of affairs wasn’t great for the operator, who had to pay to build and ship a new pile of wood and a monitor for each game, and it wasn’t great for the manufacturer, who had to make games that would last long enough to justify that additional cost each time. A few companies tried to make “multi-game” boards, most notably Sega with the Convert-A-Game system.
Ultimately, the Japanese game industry got together and agreed on a bunch of common electrical and wiring standards for arcade cabinets. They formed the JAMMA trade organization, and in ‘86 the JAMMA standard was released. The theory was that if every game board from now on followed the standard, it would be easy to swap boards out and retain the same expensive, heavy cabinet.
Games would be cheaper, as they could consist of only PCB sets and marquee/side art, so operators would buy more and riskier games. Changing out a game would be easier, so operators didn’t have to hire someone with a specialized skill set to do the conversion. And the games took up less room, so they’d be less likely to be sent to the junkyard before they could end up in the hands of some weirdo with a blog.
Of course, like any standard, JAMMA is not a panacea – for instance, it specifies a measly four buttons (including start,) only a few years before Street Fighter II came out. There’s a lot of special-case wiring harnesses and video antics to deal with, and each game still needs a little bit of special monitor calibration. But, overall, this is a boon for everybody.
A “supergun,” then, is an adapter that lets you play a JAMMA-compatible arcade board on home equipment such as an RGB-capable computer monitor. I’m not entirely sure what the origin of this name is1, but I’m guessing it was a brand name for the first board to serve this purpose, and has since become the Kleenex tissue of arcade videogames at home.
Update: Reader DanAdamKOF has informed me that the origin of the Supergun name is likely this product, named the Super Gun II. It was sold in the back of magazines under that name, hence the “Kleenex-ification” of the brand since then. The MAS superguns were actually named MAS Supernovas.
There are lots of different superguns out there – ranging from incredibly expensive, fancy models to game-specific ones. Some of them have cool features like input remapping or auto-fire, but the Minigun seems to just be happy with doing a competent job and being inexpensive, and those are goals I appreciate.
Why?
Although I own a long-suffering Dynamo arcade cabinet, a supergun has a lot of appeal. Mostly because I keep buying broken garbage.
The biggest reason is that, as you have no doubt guessed, it’s a lot easier to put an oscilloscope on an arcade board when it’s running on a desk, than when that board is inside a wooden arcade cabinet. All the parts are exposed to inspection, and I can easily reach any part to see if it’s getting super hot or flexing off the board.
On top of that, the Dynamo’s Zenith monitor and K7000 chassis only supports 15kHz games, whereas a supergun-and-upscaler combo could run 24kHz or even 31kHz games. This will come in handy later, when I try to diagnose a stack of Sega System-24 boards, with their 24kHz output.
Assembling the Minigun PCB
Initially, I picked the 8-pin mini-DIN version of the Minigun to build. This is mostly because I expected to have a Sega Genesis/Mega Drive 2 RGB cable on hand. That’s because I ordered one shortly after completing the Jaguar-to-Genesis Model 2 AV adapter. Unfortunately, as you’ll soon see, I did not actually have a Genesis Model 2 AV RGB cable on hand.
For the surface-mount THS7374 version of the board, you’ll want a loupe or microscope in order to check for bridges. I sheepishly admit that I had a few bridges. 1206 resistors are super-easy to solder once you’re used to 0805, which I still feel is pretty big.
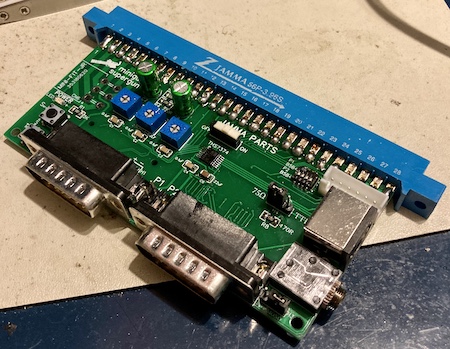
Basic assembly of the Minigun is unremarkable, and pretty easy, except I ran into a couple annoyances, which I will document in exacting detail below.
BOM BOM BOM
Although this might be fixed by the time you read this, the ZIP file containing the Gerbers for the 8-pin mini-DIN did not include the BOM. I had to download the other variant of the Minigun in order to get the BOM (and pinouts!) from that one.
NBA JAMMA: Fingers On Fire Edition
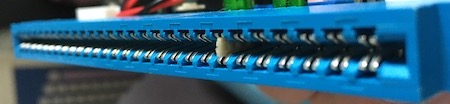
I was frustrated by trying to bend the pins on the JAMMA connector so that they would reach the surface mount pads. To make things worse, it seemed like the connector I was using was salvaged, and the connector’s PCB-side pins were full of gunk that needed to burn off before solder would flow, even with flux.
I basically ended up holding the pins down to the board with ceramic tweezers and globbing a ton of solder into them to hold them down. As a result, a lot of the solder joints look super globby and nasty, the physical connection is only as strong as the solder, and the board is not quite centered vertically on the connector.
In the future, I want to build some kind of a jig to pre-bend the pins, so that they have tension against the PCB even before soldering. After doing some research, I think it might be a cool idea to make an adorable miniature version of the tool that HVAC techs use to fold ducts. More on this in the future, I hope.
In order to polarize the connector so I didn’t accidentally plug in any JAMMA boards backwards and blow their brains out, I bought a baggie of EDAC 306-240-318 polarizing keys and stuck them right in the connector.
These don’t fit into 34/50-pin floppy edge connectors, from what I can tell, but they slide right into a big fat 3.96mm connector such as a JAMMA edge. At first, I doubted these would actually work, but once they’re installed they can’t be removed by anything short of a pair of pliers. EDAC is fast becoming my favourite connector company.
Power Shortage
The 6-pin power connector (0353180620) recommended in the BOM was backordered for months, but doing some catalogue scouring let me find a version of the exact same connector, just with plastic mounting pins (0039301062.) I used the side cutter to snip those pins off, and it fit great.
Don’t be a DIP
The DIP-switch for configuring the kick harness is a little tiny surface-mount soldered job. It wouldn’t be too bad to drag-solder, but by the time I had added it, the JAMMA connector was already on. As a result, I had to go pin by agonizing pin at an uncomfortable angle to avoid melting the JAMMA connector’s plastic shroud, while double- and triple- checking for shorts with a loupe.
Instrument Error
There’s a spot on the board for placing a voltmeter. A voltmeter is very important, as often you’ll need to tweak the +5V regulation on the power supply in order to satisfy a given board’s needs. Some games are really power-thirsty and need a lot of jam at the wiring connector to compensate for board losses, whereas some bootlegs will warn that you must never go above 4.8V.
Unfortunately, I had no luck getting the voltmeter to play nice with the board in its designated mounting position. That voltmeter takes surprisingly small M2 screws, and my collection of risers did not include those. I ended up shortening the wiring harness, crimping it for a DuPont connector, and then sticking the voltmeter onto the player-two controller port using two-sided tape.
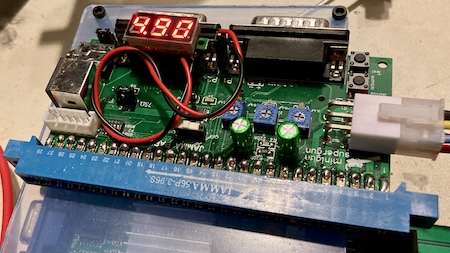
Only after doing the initial test did I realize I stuck the voltmeter on upside-down. I’ll live with it, or maybe I’ll change it when I go back in to shorten the harness even further. That excess squid of wiring is ugly.
I also stuck some test hooks into the other voltmeter connector (there are two provided.) This will give me a good +5V and ground point to hook up a logic probe to, so that I can quickly debug problem boards without having to break out the full oscilloscope.
Assembled!
Now that the minigun was assembled, it was time to hunt down all the ancillary parts that plug into it.
The Power Supply
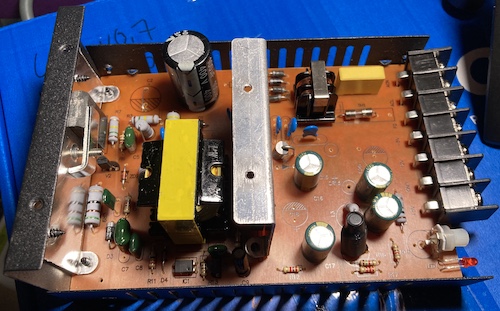
Because the $53 Meanwell RT-125A that I wanted to use was temporarily out of stock, I had to choose another. I decided to cheap out a little on the power supply, which was probably a bad idea. There’s a lot of budget options out there, and I chose this eBay “0372A” power supply based on the recommendation of a friend.

Naturally, it has a bad reputation and some ugly board shots, but I figured it would work well enough for limited test-bench use until the Meanwell came back in stock. It seems like even the commonly-used Suzo Happ units also have some pretty cheap budget caps in them nowadays, which is very sad.
For the power cord, I got another six-foot garburetor cord like the one I used on the X68000 ACE. Of course, due to shortages, the price has gone up substantially for such a beautiful and rare relic. I’m not sure how I feel about paying almost half the price of the power supply just for the cord that feeds power into it.
Of course, a three-prong cord is polarized, and the two-prong cord that the supply originally came with was clearly meant for the Chinese market. Which pin was live and which was neutral – AC1 or AC2?
I tore down the supply and went to buzz out the fuse with the pins and found that it was continuous with AC1.
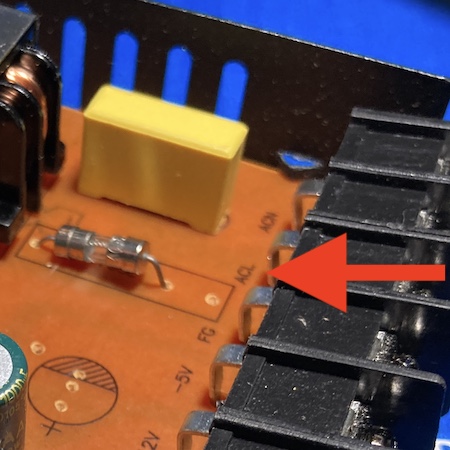
As I was closing the supply up, I realized I didn’t need to even break out the multimeter - “ACL” is silkscreened on the board right behind the AC1 connector. D’oh.
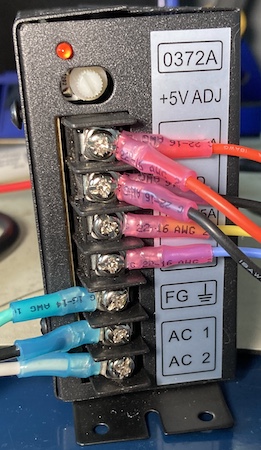
Crimping ring terminals onto the end of the power cord was cake itself, but I wanted to make sure that I didn’t accidentally touch the live screws on the front of the case while the supply was running. After all, I need to be able to reach the +5V adjuster while it’s on, the supply’s safety qualifications are maybe not up to Canadian snuff, and I do tend to be an idiot who works with an excessively crowded desk and a bunch of very conductive/expensive tools lying nearby.
There are some 3D-printed shields out there for Meanwells and other more expensive supplies, but none for this one. That’s disappointing, because I would have expected that it would be more popular. Maybe nobody else who owns an 0372A has cats?
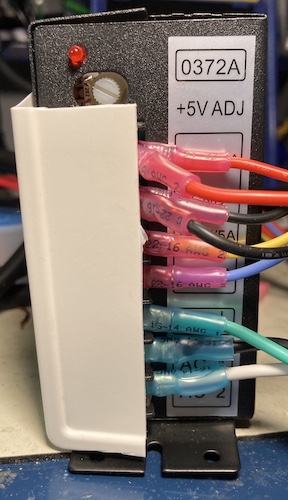
For now, I ended up cutting up a piece of plasticky cardboard I found in the recycle bin. I think it came from a USB charger. Then, I screwed it down using the self-tappers that were already holding the case shut. It doesn’t look great, but neither does the supply.
Because the supply is very lightweight, it would be easy to knock it over or pull it off the desk when I’m changing games around. To appease myself, I pulled a scrap piece of wood out of my garage, and then decided I should paint it. Using some red paint the previous owners of my house left behind, and the last of a pack of chip brushes I bought to touch up my fence, I did an okay job painting this piece of wood without priming it first. Then I left it out to dry, and it got snowed on.
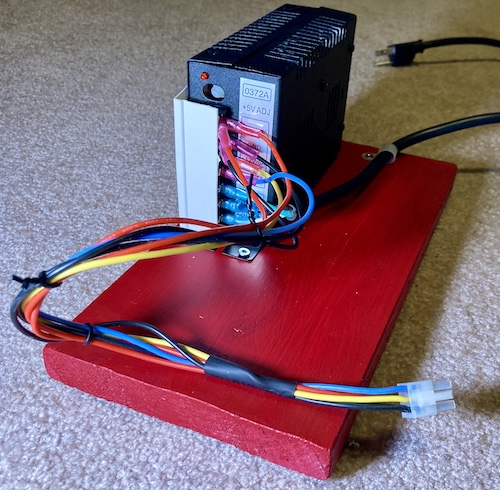
As a result, I now have a super-ugly piece of warped 2x4, with an equally-warped eBay arcade power supply wood-screwed to it. I did put some stick-on furniture feet on the underside to help keep it from sliding around, which I feel is pretty sharp. I did buy some P-clips to hold the power cord down and avoid straining it, though, which should qualify this atrocity as actual engineering.
Right, let’s all move on from this.
Video
As you’ve previously seen on the blog, I modified a GBS8220 upscaler with the GBS-Control firmware. Although I’m still missing an external clock generator, it seemed like this would be a good platform to use for the final conversion of the video output.
Of course, I’d need some pieces of copper stretched out into a wire in order to actually get the video from the Minigun all the way to the GBS upscaler, and this is where the project got much longer.
The Video Cable
Arcade PCBs of the era I’m interested in usually hand out TTL-level RGB signals. The Minigun buffers and amplifies those signals for consumer equipment consumption by using a THS7374, a close relative of the THS7314/THS7316 from my composite mods.
Since it’s the closest thing to a standard that exists, the Minigun that I initially chose to build uses a 9-pin mini-DIN connector and a Sega Genesis Model 2 cable pinout. These cables are (supposed to be) widely available, relatively inexpensive, and – most importantly – already built, so I don’t have to use a potato again.
Of course, since the arcade board produces RGB output, this means that I’ll have to use a Model 2 SCART cable to carry the signals rather than my usual composite cables. That’s right, it’s finally time for me to take the RGB plunge, albeit by just using my lightning-struck Samsung 910MP2 at first.
Good thing that when I was working on the Jaguar-to-Genesis-Model-2 video converter PCB, I ordered a Mega Drive SCART cable from AliExpress. It arrived a month after the article was published, so I never tested it until now.
Now just to plug it in and test it, and…
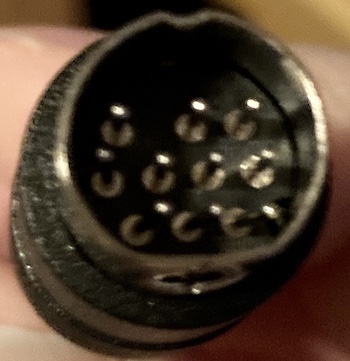
…oh. It’s a 10-pin Sega Saturn SCART cable. And to make matters worse, the seller had been banned from AliExpress in the time since I received my order, so I couldn’t even ask for a re-ship or refund. This took me an embarassingly long time to figure out.
I ordered three more from two different sellers just to make sure, but it delayed the project even more. We’ll get to that in a bit.
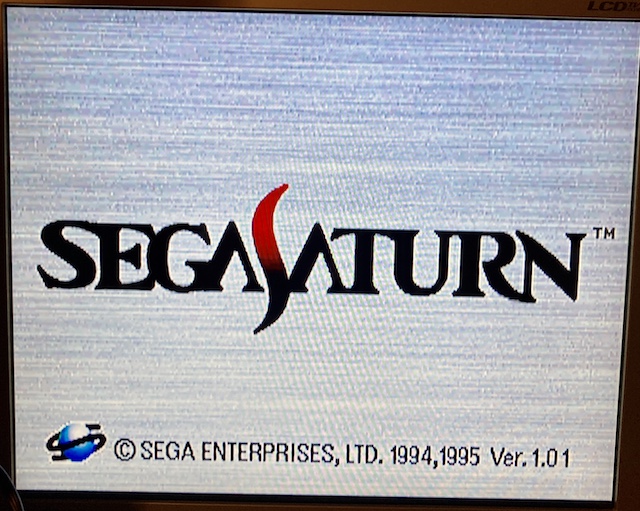
On the plus side, the Saturn SCART cable worked “ok” with the Saturn, albeit with a ton of ghosting and noise. Not how I expected to join the RGB-haver’s guild, but beggars can’t be choosers.
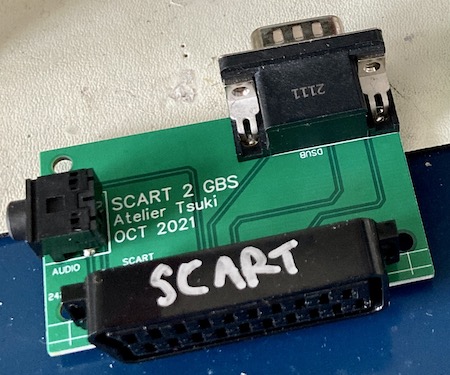
SCART to VGA
Someone at some point set me a set of gerbers for “Atelier Tsuki’s” SCART2GBS board. I dutifully held onto them for a long time, and then submitted them for fabrication. Unfortunately, the SCART connectors I had on hand didn’t fit the board, and needed to be clipped a bit. Don’t worry, they’re in there pretty good, thanks to a handsome dollop of black RTV.
I couldn’t match the height of the assembled GBS-Control exactly with the nylon spacers I had - it seemed like I had to use a 10.5mm spacer, but all I had on hand was 10mm and 11mm spacers. Finally, I ended up adding a screw to the bottom of the 10mm spacer; this lifted up the front corner of the GBS ever so slightly when connected, but I don’t think it will do any damage.
The board came together very quickly. I did notice as I was constructing it that there is no sync separation circuit such as an LM1881 - the board expects a composite video feed to provide the composite sync signal, which it then passes to the GBS upscaler on the “horizontal sync” pin of the VGA connector. This is apparently the de-facto way to handle “RGBS” video on the GBS.
This meant that I needed to check if the Minigun supergun actually produced a signal on the composite pin, or if it was doing something weird like sync-on-green instead. Luckily, it was. At least something with video was going right, for once.
Input
The Minigun supergun uses the Neo-Geo AES (home system) pinout for joysticks. Back in the 90s and early 00s, it was a safe bet that anyone who was a big enough freak to run bare arcade games in their home also had several Neo-Geo joysticks.
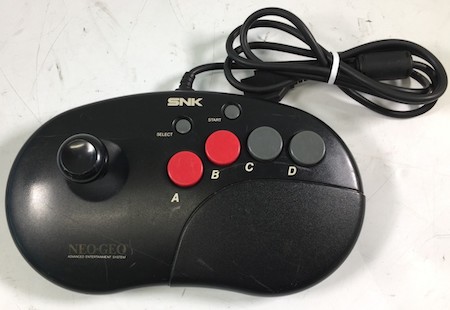
I, however, did not – and prices were on the rise. Luckily, I managed to find this Neo-Geo Pro “kidney bean” joystick. It seems to have been shipped with the CD and maybe later models of the AES. I paid ¥2200 on Yahoo! Auctions Japan for it, which felt like a ridiculous amount for such a reviled joystick with mushy buttons. It will do for now.
SCART finally arrives
I waited several months for a replacement Mega Drive 2 SCART cable to arrive – any cable – and I got pretty frustrated. Eventually, though, the fourth order I made arrived. What happened to the other two in between? Only heaven knows.
After quickly testing it on my VA2 Genesis, I noticed that it had a ton of audio noise and a lot of jailbars, which is to be expected with that little machine when unmodified. The important thing: it worked.
Now to finally assemble the entire stack, and for that, I’d need a bigger desk. There’s a lot of parts in here. Let’s look at a diagram first:
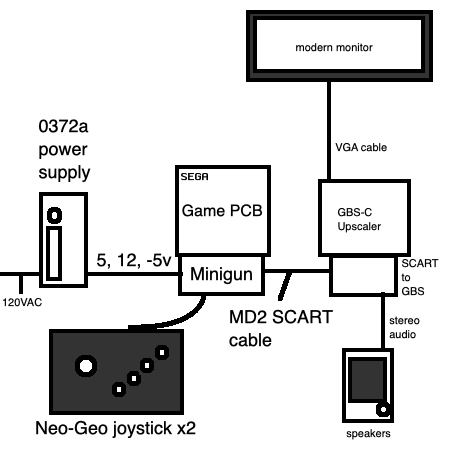
That’s a ridiculous number of parts. Let’s review them, in no particular order:
- Minigun PCB
- Game PCB(s)
- 0372A power supply
- GBS upscaler with GBS-C firmware
- SCART-to-GBS adapter board
- VGA-compatible computer monitor
- Stereo speakers
- Genesis MD2 to SCART video cable
- 3.5mm audio cable
- VGA cable
- Power harness from 0372A to Minigun
- Power harness from wall to 0372A
- DC power adapter for the GBS
- Neo-Geo joystick
Phew. It is sort of crazy that I got all of this done at all. Now let’s try it.
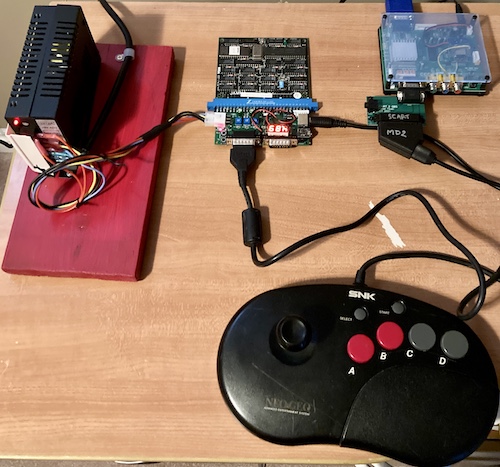
Final Assembly
Obviously, this snake’s nest of wiring and boards takes up the majority of the room on any given desk. And with exposed boards everywhere, and cats and little hands around, this is not likely to be anything that will be left out full-time. We’ll worry about storage later – Nicole has told me she likes to use scrapbooking boxes for game PCB storage, which has worked out really well for the games themselves.
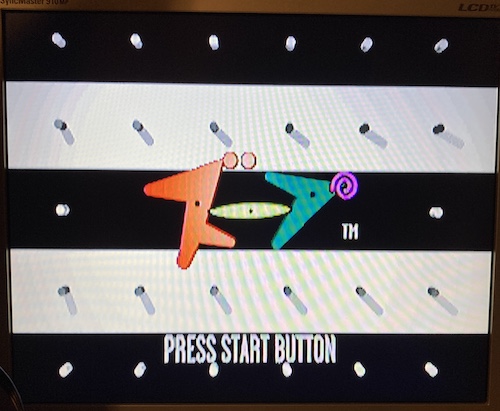
For my inaugural flight, I decided to use my Dottori-Kun PCB. Although Nicole had a problem with using hers on a supergun, it seems like we have different board revisions. For instance, my game is black-on-white.
Unfortunately, that first test flight was only half of a success. While I could see “Press Start” from the Dottori board, it was in the middle of a blurry mess of sync problems. Neither the GBS-C nor the 910MP’s native SCART input could make a solid image of it, and for some reason pressing START on the joystick didn’t work. Pressing “B” made the game toggle “PAUSE” and “Press Start” though, so I knew that some inputs were working.
To make matters worse, the GBS-C was repeatedly locking up and resetting, as well as refusing to switch into certain resolutions. I decided to forego it and use the straight SCART input for now, as that seemed to make the Dottori video slightly more legible.
Next, I tried a Sega ST-V board that I had lying around, and again was met with no success. I would see a sync flash, and then a black screen. Whether this was because of a lack of voltage, or because the board was shipped from Italy in the middle of a too-big box wrapped only in a sports betting newspaper, I don’t know. We’ll check in with this board again in the near future.
Out of ideas, I tried the old standby: my 1-slot Neo Geo board. It had been enjoying a vacation from its cabinet due to an ongoing – and quite vicious, if I’m honest – Sega Columns high score contest in my household.
Naturally, being an SNK product, it had no problem starting up in this extremely sketchy environment full of questionable characters.
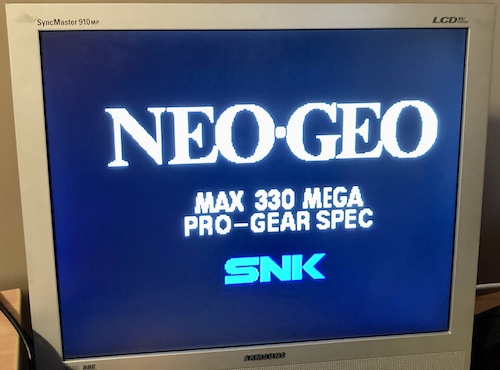
The sync wasn’t perfect (the image kept jittering left and right) and the initial settings for colours were way off, but I had a working game and sound through the Genesis SCART cable.
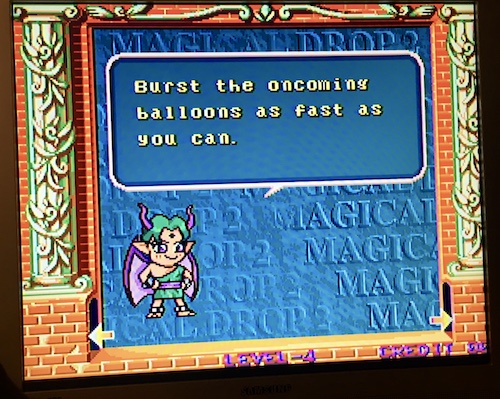
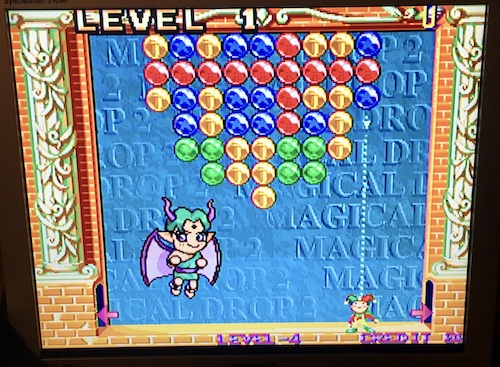
I played a celebratory round of Magical Drop 2, and then called it quits for the day. And by “quits,” I mean I went into the service menu (the D button didn’t work for some reason, so I did it with TEST.)
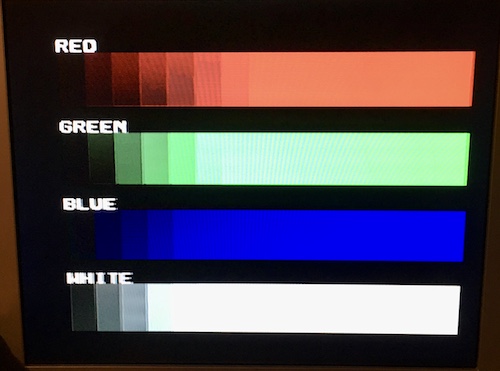
Way too bright. I turned the pots to adjust the R, G, B levels and I was surprised to find that I had to do it clockwise. I guess I shouldn’t be surprised: right for “more resistance,” left for less…
That’s better. There is still a weird ringing on the green channel, but it might be the 910MP (which needs a recap and service) or the Neo-Geo board (which also needs a recap and service.)
Because I didn’t put a power switch on the supply, I had to plug and unplug the supply from the wall every time I wanted to reset the game, which made it difficult to hold the test and service buttons on startup, even with the help of the Universe BIOS. That’s something I’ll definitely have to do, or at least use a power strip.
I would also like to figure out if the missing “D” button is something I failed to wire up or DIP-switch properly, or if it’s a problem with the joystick.
More study is required, but at least now I can play Neo-Geo at home… like I already was.
Conclusion
Phew. That was a lot of work, and even more words, to talk about the new testing setup for repairing arcade boards. There’s no question that there’s a lot of moving parts involved in such a niche of the hobby, but that just makes it more fun.
If it wasn’t for all the various component and connector shortages, this would have been a much shorter project. Unfortunately, I was staring at the baggies of parts for nearly a year before I was able to get the first light out of this contraption.
I expect to be making a lot of improvements to this setup as time goes on – mostly around making it more reliable, easier to store, and hopefully involving fewer twist-ties from the supermarket produce aisle.
-
I dimly remember hearing about MAS superguns in the early 90s from the older fighting-game kids at the local store.
Maybe this was the origin of the name – please leave a comment if you know for sure.It was hugely sad to hear about the accidental death of the amazing couple behind the MAS joysticks and other products. ↩ -
For whatever reason, the 910MP disables the SCART source (“Ext.”) unless it’s running in regions that commonly have SCART. As such, my 910MP now thinks that it lives in Egypt. Japan should have worked, but the Samsung thought differently, maybe out of fear of the notorious JP21. ↩