The Floppy Flops (Travelling to Tokio, Part 2)
Tags: computer nec pc98 pc9801 pc9801ra2 capacitors floppy 3d-printing repair artdink
In the previous part of my adventure with the 386-based NEC PC-9801RA2, we covered the existence of Artdink’s game Tokio, talked briefly about clone PC-98s, bought two computers, and built a replacement power supply PCB for one of them. That was a lot of work! So now we finally get to play the game, right? Right?!
Now that I knew the computer was working, the next step was to test it with some disks. Of course I wasn’t going to use my pristine copy of Tokio to test a drive that was described as “bad,” so I grabbed my Greaseweazle and a high-density Chinon 5.25” drive, and wrote out an MS-DOS 3.3 disk to a new high-density diskette.
That disk didn’t boot. The NEC’s drive made a haunting clunk-clunk-clunk sound as it repeatedly engaged the head solenoid, and after about a minute it would give one final clunk and cough up the message “I/O error.” Ethylene suggested that this might be a stuck head shuttle, and I kicked myself for not cleaning and greasing the drives when it was easy to do.
Basic Maintenance Fest 2022 2023
Out came the entire back of the machine along with the power supply once again, and the drives were removed. Indeed, both drives’ head shuttles were jammed in position, and needed a good shove with my fingers to free them.

It seemed like the shredded foam that was holding on the head protectors had migrated into the stepper track, where it absorbed all the grease, expanded, and wedged the stepper or the slider bushings in place. There was also a lot of hair. I cleaned this up as well as I could, put in a generous dollop of lithium grease, and tested each drive’s head seeking using the Greaseweazle in order to help distribute the grease evenly across the track. They both stepped quickly and smoothly now, so I put the machine back together.
Although the heads now moved, the computer still refused to load a disk, and also I broke the 3D printed drive lever trying to pull it out of the front of the case. Just remember, drive: you chose this.
Takin’ The Drives Apart
Unfortunately for me, I would soon find out that the NEC FD1155s had a well-deserved reputation for being a finicky little floppy drive. Despite my grousing about any differences from my beloved TEACs, they’re not especially unusual drives, except for the onboard clock-data separator (“VFO” in the PC-98 community) and some truly strange engineering.
There was no obvious damage to the sacrificial MS-DOS 3.3 disk, confirmed by the fact that I was able to read it back just fine using the same Chinon FZ-506 drive that wrote it. A blank disk inserted into the PC-98 produced a “no system files” error and constant beep instead of an I/O error, so we know that the PC-98 was able to pick something up on the first couple sectors of the disk, and just couldn’t follow through with loading the rest of it.
As expected, the head shuttle was also sticky, and full of hair and foam detritus from the head protector falling off. I cleaned it as well as I could, cleaned both heads, and added more lubrication where appropriate.
I decided I would test the half-assedly cleaned FD1155 using the Greaseweazle. Unfortunately, this was difficult. When I would run the drive to read the disk back in, Greaseweazle would proceed through stepping the head all the way to the end of the disk and report that there were zero flux transitions seen.
I suspected that, like on the PC-8801, the floppy drive needed an extra “head load” signal in order to drop the read/write head close enough to the disk that it could read the magnetic flux. This is so that the spindle motor can keep spinning all the time without worrying about wearing out the head, likely a holdover from the days of 8” drives.
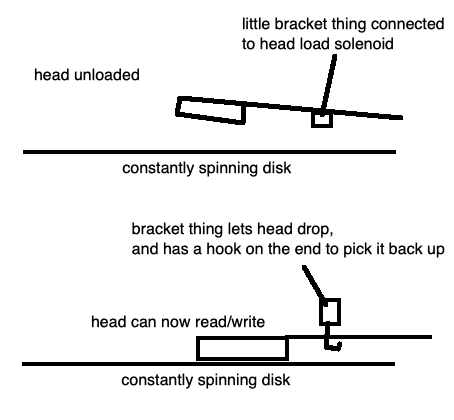
The PC-98 knows enough to issue this head load signal when it wants to read or write from the disk, but the Greaseweazle doesn’t. As a result, it just ends up trying to read garbage from mid-air, instead of flux from the disk.
I checked the NEC FD1155’s manual on Bitsavers, which eventually clued me in that moving the “USE” jumper into the leftmost position let the head drop whenever the motor was running, without having to be told explicitly. Now I was able to read in a disk, which looked fine! I cleaned the heads again, anyway.
So: the Greaseweazle could read the disk, but the PC98’s floppy disk controller was getting mad. I tried to run the FD1155 using an external power supply – maybe my Meanwell was too weak? – and changed the floppy cable out for the one that I was using with the Greaseweazle, to no avail. That I/O error continued to dog me. The best I could get is to partially load the System disk of Tokio before it failed silently and kicked me out into an AD-DOS command interpreter that didn’t actually work.
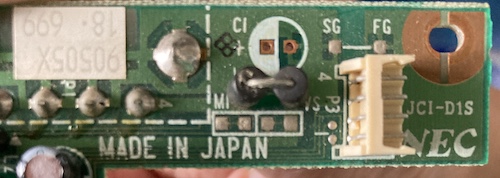
Rather than flail around in frustration and potentially cause more damage, I made myself some coffee, and thought about what else the Greaseweazle was ignoring that the PC-98 wasn’t. Clock-data separation or VFO seemed like a likely candidate, and the VFO IC had a small handful of electrolytic capacitors clustered around it.
Recap the Drives
On the first drive, I desoldered a 47µF/16V electrolytic capacitor from next to the VFO IC. Using my ESR tester, this capacitor showed that it had an equivalent-series-resistance of 11Ω, which is way out of spec. It should have been more like 1.2Ω, according to the tester’s own “worst-case” reference sticker. That capacitor also got hot instantly when desoldered, stank of fish, and left a little poop behind on the board. Gotcha!
Because I had found one bad cap, I decided to rip and tear all the rest of the caps out. Note that you need special low-profile caps (≤ 6mm tall) to fit under the dust/RF shield on the top. I am finding through recent experience that awkwardly-shaped caps are more likely to be worn out than others, as the engineers likely chose these caps for physical size constraints rather than electrical performance. See also the nuked Nichicon caps in the mini5SX’s teeny-tiny power supply.
Here is the cap list for my FD1155s. As previously stated, shorter caps are better, so they can clear the shield. The old ones are about 6mm tall. There’s quite a bit of height under the shield, but if you order a bulk set of the smallest ones you can get, chances are some other project in the future will go easier because you already have very tiny ones on hand:
| Position | Capacitance (µF) | Voltage (V) | Remarks |
|---|---|---|---|
| C1 | 47µF | 16V | |
| C2 | 33µF | 25V | |
| C3 | 33µF | 25V | |
| C4 | 47µF | 16V | |
| C35 | 47µF | 16V |
Also be sure to watch out for the silkscreen – the “dark” side of the circle on the capacitors points to the positive side, unlike most boards. I took a picture before I started, and I’m glad I did. There is a “positive” symbol right next to that end, but of course I wasn’t paying attention to it – that’s what the stripe is for, right?
I noticed that when recapping the second drive (which used to be the first drive, before I swapped them in the previous article) that those caps were ever-so-slightly better on ESR. This backs up my theory that more frequent use makes electrolytic capacitors last longer, and letting them sit is what eventually leads to their decline. That theory isn’t exactly solid, though – one of the 33µF capacitors had a very bad ESR of 14Ω on this second drive. Yikes!
After recapping both drives, I was certain that I had cracked the mystery. As everyone knows, recaps always solve everything.
Recapping Didn’t Solve Everything
…But cleaning the heads again did.
Now the retail Tokio system disk loaded, but not the homemade MS-DOS 3.3 disk. Looking at the MS-DOS disk again, I found that it was actually scratched on one track, likely because I didn’t clean the head well enough that first time – I’m so lucky that didn’t happen to my original Tokio disks!
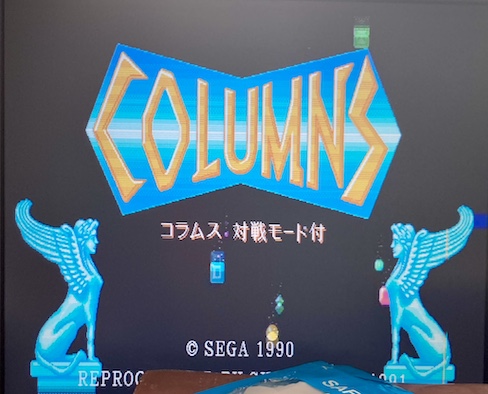
On top of the physical damage, I suspected that the process of converting the MS-DOS 3.3 image from “raw” to “HFE” did not necessarily set the gap3 the way that the PC-98 liked it. As an experiment, I upgraded my copy of the Greaseweazle software so I could use the new pc98.hd output format1, which would set the gaps properly, and chose to write a copy of Columns to a new, fresh disk.
It worked!
To celebrate, I wrote another copy of MS-DOS 3.3, using this command:
gw write --drive a --format pc98.hd MS-DOS\ 3_30D\ \(installed\)\ \(Working\ disk\ \#1\)_hdm.hfe --tracks=h=0-1
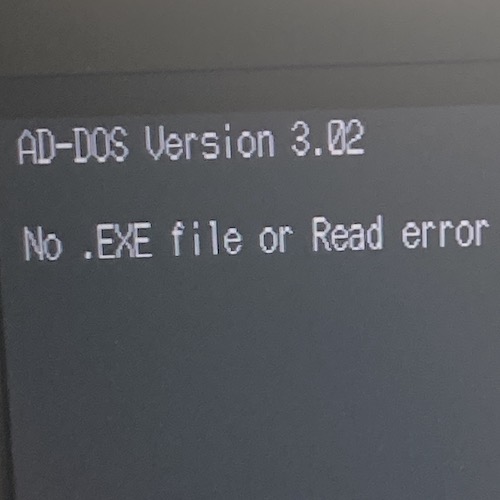
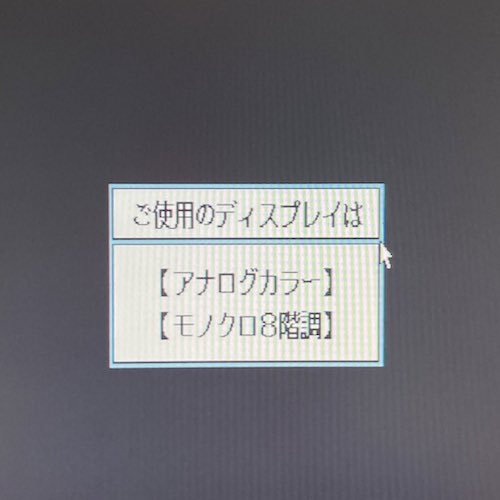
I found that the cleaned and recapped FD1155 drives were still a little hinky. After sitting idle for a long time, they would again fail to boot. I would scrub the heads again with alcohol, and they’d work for a few days. For instance, here’s the Tokio System Disk failing once again:
I tried a cleaning disk that I had gotten off of eBay. They’re hand-made by an Italian hobbyist, baffo71, and have worked great for all my other machines. Unfortunately, it didn’t seem to do much for this PC-9801, but I still wholeheartedly recommend them.
Eventually, I managed to clean this with foam swabs (the wide, flat ones) and 70% isopropyl alcohol. And a really firm scrub against the heads.
A big chunk of crap came off of the heads with the additional force, and so far – so far – it has been more reliable.
Okay, so Tokio is booting. Now all I need to do is click on one of the choices on this screen. Yep. Just gotta… wait, I don’t have a mouse? I didn’t order one with the computer that I bought to play this game?
The game that needs a mouse to play it?
Repair Summary
| Fault | Remedy | Caveats |
|---|---|---|
| Neither disk drive boots and eventually claims “I/O Error.” | Free up stuck head shuttle, grease rollers and tracks, clean heads, recap digital boards, clean heads again, upgrade Greaseweazle, write disks using the correct format, and use a different, non-scratched diskette. Clean heads again. |
-
I encountered a bug here where the pc98.hd format option only wrote to one side of the disk. To work around it, I manually described the
--tracksparameter, as you’re about to see. I’m told that this bug should be fixed by now, but I haven’t actually confirmed it. ↩