BlueSCSI Goes Outside
Tags: computer apple storage mod bluescsi
While the BlueSCSI is great inside an old Mac, what if they were also great outside of one? The external DB25 form factor of the BlueSCSI v1 intrigued me, so I built one – the hard way.
The previous BlueSCSI that I built was meant to go inside the computer. It connects through a ribbon cable and replaces/supplants one of the internal hard drives. Of course, this means that I need to open the computer up whenever I want to change an SD card out, or upgrade the firmware on the BlueSCSI for more performance.
Because I own so many sick old Macs, it’s likely that I’ll need to eventually boot one with some diagnostic software, as well. Having a BlueSCSI that’s portable makes it much easier to carry between computers and use to rescue files from a failing hard drive.
It may also be easier to use with the Japanese PCs, whose SCSI cards often use the 50-pin “Micro Centronics” connector. I’ll still need a cable with an adapter, but many of those machines do not have an internal SCSI header at all, so external SCSI is the best way short of internal modification of the computer.
I actually started building this BlueSCSI way back in 2022, and have been using it ever since, but didn’t actually finish editing and publishing this article until now. For most people, the refreshed BlueSCSI v2 device, which uses the Raspberry Pi Pico as a microcontroller, will be a much better choice for their external hard drive.
Assembling the Parts
I downloaded the BOM and Gerber files from the GitHub repo for the project, and tacked the board onto an order that was already going to JLCPCB.
Blue Pills
As with the internal BlueSCSI, the external version uses the “STM32 Blue Pill” development board. The STM32 family is a bunch of ARM-based microcontrollers, and the Blue Pill development board used to be a very popular option for hobbyist projects.
Since you have to have a minimum order of five boards, I decided to get five boards’ worth of parts, and started by ordering a couple Blue Pill microcontrollers off of AliExpress. Although they cost much more than the last time I ordered them, I was just grateful to be able to get some with the ongoing shortages of everything.
When they arrived, I dutifully flashed the Blue Pill Diagnostics firmware onto them and ran the tests.
All of the Blue Pills passed most of the tests, except for the flash size. This marked them as knock-offs, but good knock-offs. And, according to the BlueSCSI wiki, the BlueSCSI firmware has no reported problems working on knock-off Blue Pills. So that’s good.
After I finished installing the firmware, I realized that I didn’t really need to run the diagnostics to tell if they were fake. All the Blue Pills I had bought had a crooked BOOT header, indicating that someone had hand-soldered the board, and did so in a hurry. One of them even had a solder blob shorting two pins that made it get super hot and not work.
Definitely not up to STMicro standards!
Flash ‘Em, Danno
Programming the Blue Pills with the BlueSCSI firmware was not as straightforward as I had expected, compared to the ease of flashing the diagnostics.
The BlueSCSI wiki recommends that you use the “STM32 Cube Programmer” utility from ST Micro, but I couldn’t get the installer to run on my Mac. It would start up and then die without leaving any logs behind. Eventually, I managed to trick it by going into the app bundle using the Terminal and running the executable inside, which let me finally install it. Of course, even though the app is, the installer isn’t notarized, so I also had to tell the Security control panel to let me run it.
Once I finally got into the STM32 Cube Programmer utility, I had to update the firmware on my pirate STLink programmer, which is the USB-to-serial dongle used to program and debug STM32 microcontrollers (among others.) Updating the STLink’s brains was pretty simple, although I had to unplug and re-plug in the STLink before the update would start for some mysterious reason.
And then it came time to download BlueSCSI. There were a lot of versions of the firmware available. I didn’t initially know which one to run. The BlueSCSI releases page at the time of writing has a STM32F1-USB-96MHz, STM32F1-USB-128MHz, STM32F1-USB and STM32F1 version. I tried the STM32F1-USB version first, because I wanted to use the USB bootloader instead of STLink to update the firmware in the future.
It did upload, but the STM32 tool then complained “the core is kept under reset” and wouldn’t start the firmware. The STM32F1 version worked fine, so I moved on. If I needed to update the firmware again in the future, I’d just have to get out the STLink again. But surely that wouldn’t happen, right?
Putting it Together
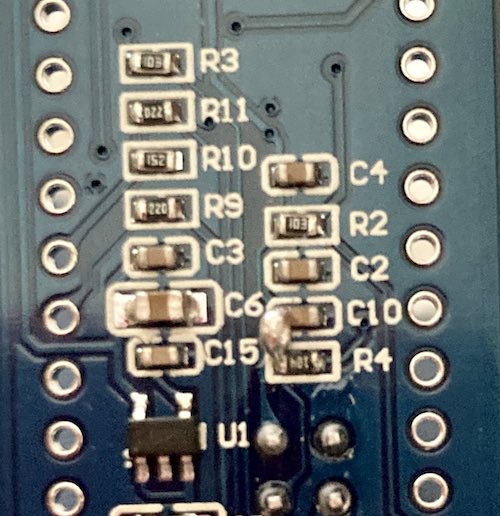
Soldering the pin headers into the Blue Pill should be done before you solder the pin headers onto the BlueSCSI board. Even with sticky tack, it’s a lot easier to hold a big microcontroller in place with your finger than it is to hold two pin headers.
I used a solderless breadboard to hold the pin headers in place while I soldered them to the Blue Pill, and then soldered the assembled Blue Pill onto the BlueSCSI board, keeping it from falling out with sticky tack. There’s not much overhang on the tight BlueSCSI board, so I sort of wrapped the poster putty around the edge of the board. I suspect tape would have worked better.
I ran into some other shortages on the BOM, of course. Here’s what was back-ordered and for how long:
- 330Ω bussed resistor network, 9-way (two weeks, four days)
- Micro SD card slot (four weeks, five days)
As I was waiting the longest for the SD slot, I ended up soldering that on near the end. In what is an impressive amount of foresight and restraint for yours truly, I didn’t rush ahead and solder the Blue Pills on first, as the SD slot is tucked underneath it in version of the BlueSCSI.
I had to tilt the termination resistor packs way far over in order to clear room for the relatively wide PCB of the Blue Pill. It’s a good thing that I left myself a little bit of leg to flex them with, instead of shoving them directly flush against the board.
That SD card slot got packed full of flux from my drag soldering adventures, so I ended up dipping in alcohol for awhile, swirling it around, and using a garbage microSD card to push the gunk out. Even so, it tacked up a day later and had to be cleaned again.
Everything else was straightforward, although due to the cramped confines of the board, you need to take your time soldering the through-hole parts so that you don’t accidentally melt anything nearby.
Soldering the shield for the DB25 also puts a lot of heat into the board, so make sure not to immediately pick it up with your bare hands after. Ouch!
Testing the BlueSCSI
Once assembled, this is a beautiful little board. As I mentioned before, it’s very tightly packed. That makes the whole thing short enough that I’m not worried about strain relief on the Mac’s SCSI connector. Not very much leverage when the board is shallower than the connector is wide…
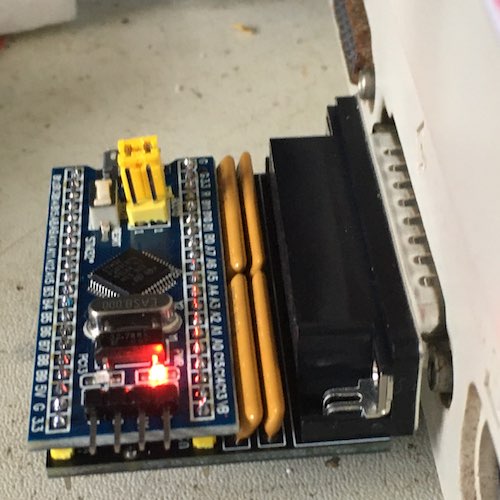
I used the Magic Smoke SE for testing, because it was still on my desk.
Since it’s been revived, this humble little machine has stuck around on my desk, even as other, faster Macs haven’t. Mostly because it acts in a very confusing way and runs oddly slow, even for a Mac SE. I keep hoping that with extended use, it will let some of its secrets slip, so I can write a really good entry about diagnosing spurious interrupts, or custom ASIC failure, or something.
This time, it loaded up fine, and let me play some games. Fine. Have it your way, then.
System Software
One of the big reasons I wanted to have an external BlueSCSI is to be able to use it as a diagnostic for sickly beige Macs. By loading it up with a bootable system and various diagnostic tools, I could interrogate any new Mac that comes into my junk pile, and figure out if something is funky with it.
Plus, it makes extracting backups from the internal hard drive (if any) much easier.
At present (this list may update in the future) my “Test” partition is as follows:
- System 7.0.1 (I thought about 6.0.8 but too many things need System 7 APIs);
- Stuffit Expander 5.5 (doesn’t work on 68000) and 4.51;
- Snooper and MacTest diagnostic tools;
- DarkSide of the Mac screensaver (don’t want to burn-in any CRTs unnecessarily - plus it’s got a couple pretty colour ‘savers;)
- ResEdit;
- BBEdit Lite;
- MacsBug (usually not installed;)
- Disk Copy 6.3.3 and 4.2;
- A modified Apple HD SC Setup;
- Bolo, of course. Hey, you gotta test networking.
- An uninstalled copy of PRAM Auto-Restore, so mouse speeds don’t go back to “slowest” when I reboot a Mac without a battery installed. Unfortunately, this one also needs Colour QuickDraw and doesn’t work on a 68000. I’ve been working on something to fix this exact problem.
Toolbox, and USB
After a couple years of using the external BlueSCSI for various diagnostics and shenanigans on my fleet of constantly-sick Macintoshes, I wanted to take advantage of BlueSCSI Toolbox. This suite of tools lets you do things like copy files directly off the SD card into a Mac partition, without having to open the hard drive images in an emulator first. It does so using a bunch of new sideband commands that the BlueSCSI’s microcontroller handles directly.
Unfortunately, when I ran the BlueSCSI SD copier utility on the Mac SE, I got the error that no supported BlueSCSIs were found on the bus. I dimly remembered that the firmware had been updated to support this – of course it had, I’d be surprised if they pulled this off without modifying the firmware – and set about trying to fix the USB bootloader problem once and for all.
I got the BlueSCSI-Updater scripts, which are obsolete for USB flashing, but your best hope if you’re doing ST-Link flashing. It was time for me to finally add the USB bootloader to this sucker.
After running the Mac script and waiting about ten minutes for openocd and its friends to be installed on my cool then-new ARM Mac, I was able to plug in the ST-Link and try flashing the BlueSCSI again. That went pretty smoothly, and the BlueSCSI log now assured me I was rocking version v1.1-20230708-USB.
Unfortunately, I again got the “no compatible BlueSCSIs” error. I valiantly checked the Toolbox README, which told me that I had to make a folder called shared on the SD card for it to work. I had not done that. However, changing that didn’t fix anything.
Visiting the GitHub releases page for BlueSCSI v1, I noticed that the latest release was v1.1-20231116 – which claimed to add BlueSCSI Toolbox support. After all that work, I had flashed a four-month-older version of the firmware.

After checking the script, I found out why: the BlueSCSI-Updater repo came with an old version of the firmware, which didn’t have Toolbox. Yeah, that’d do it.
I modified the source code to BlueSCSI-Updater so that it would look for and apply the 2023-11-16 version, and flashed again. Of course, I submitted a pull request, so if you’re one of the people still using BlueSCSI-Updater to keep your BlueSCSI v1s in line, you’ve got a couple new goodies waiting for you.
After all that, I was now able to run the Toolbox…
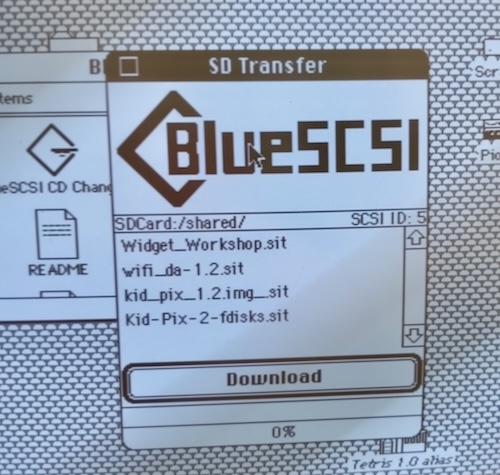
Although this feature is definitely convenient, it’s not very quick. Transferring the files to the Mac is not super rapid, and decompressing these archives with StuffIt on the SE’s super-slow 68000 took many minutes.
Regardless, the external BlueSCSI has become even easier to work with!
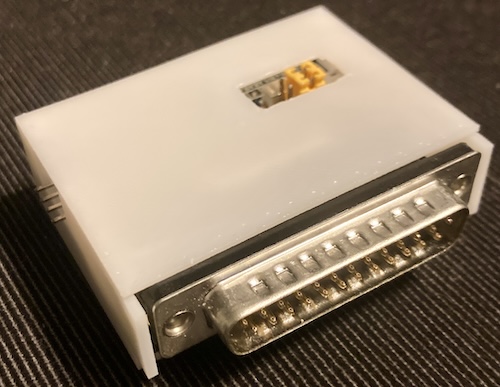
Casing the Joints
Now that I knew it worked, it was time to make it prettier. A 3D-printed case is just what the doctor ordered. Putting an enclosure on the BlueSCSI would both protect it and keep my fingers from getting poked by sharp solder joints every time I went to remove or install it.
The BlueSCSI repository includes a case, so I picked up those files and sent them off to JLCPCB. Because I wasn’t sure how well it would come out, I had them made in “X-Resin,” which is basically JLCPCB language for “we’ll print it with whatever is loaded into the printer.” You sand and paint it yourself, but in exchange it’s extremely cheap and fast.
In this case, it came out as a thin white resin. It’s more flexible than I would like it to be, and the little window for the boot jumpers isn’t actually cut out.
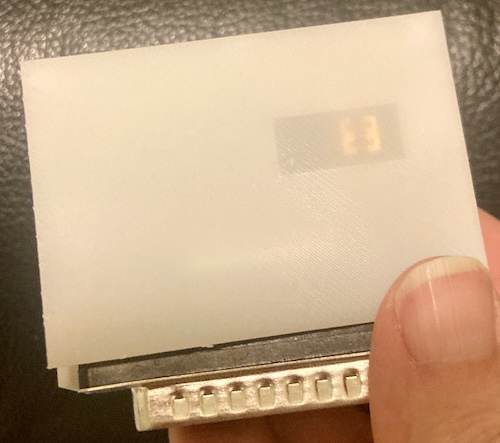
I fixed that with a craft knife, and then snapped the case together. This is a little harder than I think it should be, because the case is so thin, but the mechanical tolerances of the snaps are dead on. Also, I had to trim the legs of the Blue Pill sticking out from the solder joints in order to have it all snap together. That wasn’t fun, but it got done in the end. After that, I now had what I considered to be a complete BlueSCSI external unit.
I’d like to paint it, but that will have to wait for warmer temperatures.
Conclusion
Since I’ve built it, this little external BlueSCSI has become an indispensable part of my “saving old Macs” routine. It’s small, so it fits easily into my pocket if I’m visiting someone with old Macs, and the SD card has tons of room to store all of my favourite “what’s wrong with this old Mac?” utilities.
Like I said early on, I’m aware that the version-two BlueSCSI has widely obsoleted this thing, and rightfully so. This is good enough for its purpose, and was really easy to build. On top of that, I’m happy that I could provide at least one little commit to a project that has made it easier for so many other folks to enjoy beige Macs.