Let's Make A Space Shooter With Nintendo Family BASIC
Tags: nintendo famicom family-basic homemade-software
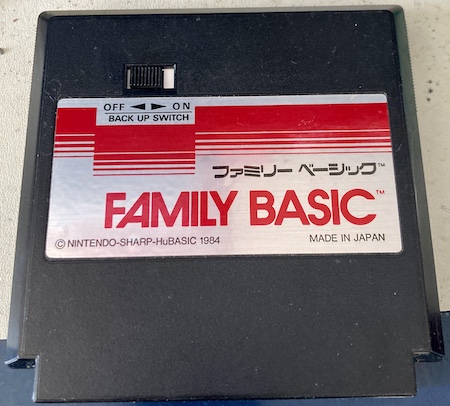
I picked up a complete Nintendo Family BASIC package for my freshly composite-modded Famicom. Let’s see if I can remember enough BASIC to take advantage of this package and build a horizontally-scrolling space shooter game. Oh, and fix the cartridge first, of course.
Unboxing
Although the box is pretty ragged from years of rough storage and thrift-store shelves, it appears that the contents are mostly complete. I’ve got a Family BASIC cartridge and a keyboard, as well as a bunch of brochures and manuals. None of them are particularly thick, in contrast to the NEC BASIC documentation, which could probably be wielded to knock an assailant unconscious in a pinch.
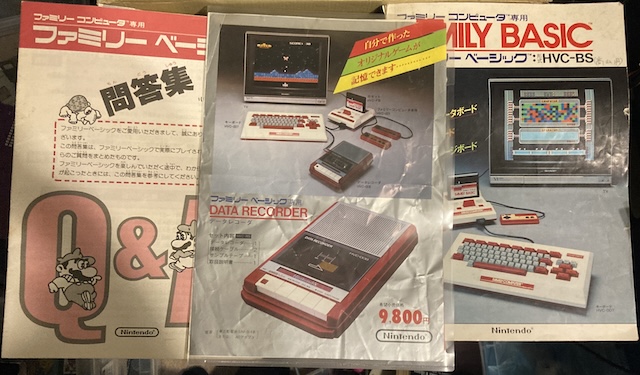
Notice the ad leaflet in the middle: Nintendo really wants me to buy their fancy tape player. For just ¥9800, I can leave the problems of volume control when saving a game behind me forever.
The manual is pretty decent, and has lots of fun cartoons in it as well as full-colour photographs. You can find a high-rez scan of it here on the Internet Archive. Don’t worry if you can’t read Japanese; there’s a translation floating around. More on that later.
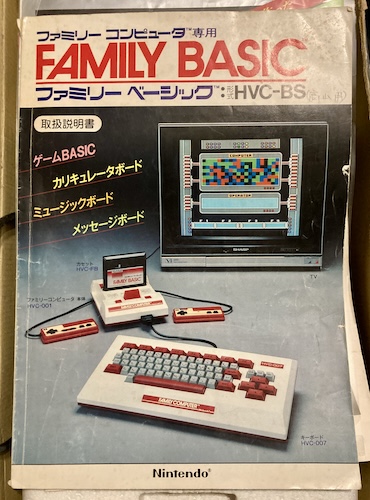
Please note the prominently-branded Sharp TV here. Yep, they had something to do with this.
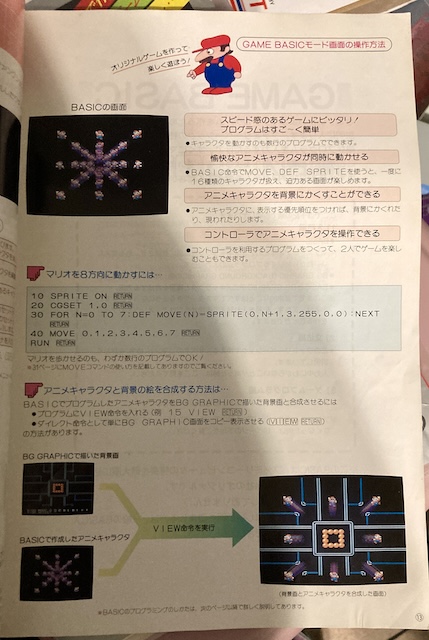
Here’s a page on how to make an animated Mario using DEF MOVE, which we’ll also be using for something very different in just a little while.
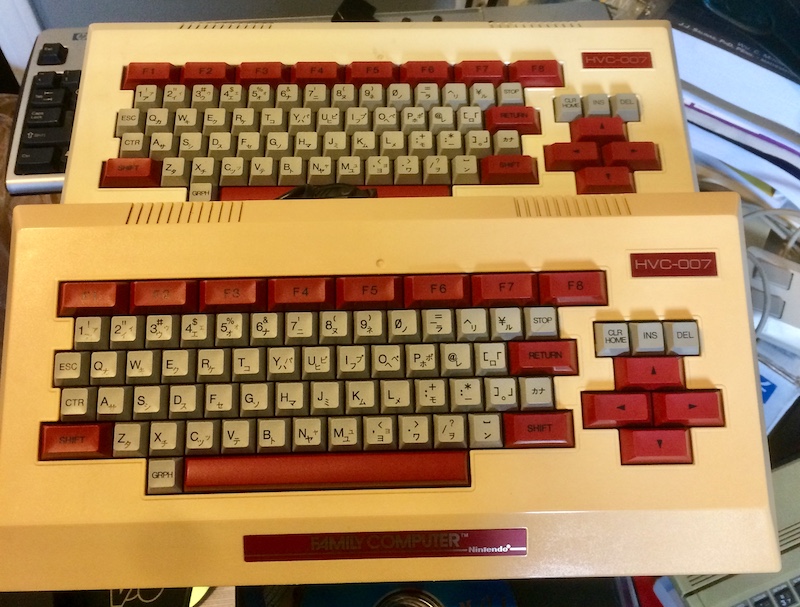
At the bottom of the box is the keyboard. I actually bought a second loose keyboard for a different project, so that’s why there’s two here. The keys are unusually small compared to other keyboards, which makes it feel a bit toylike.
Investigating the Cartridge
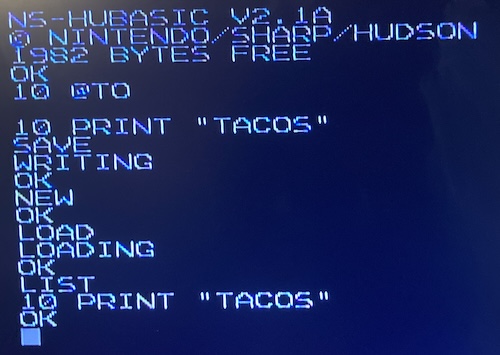
It’s interesting to me that the cartridge copyright says “Nintendo-Sharp-HuBASIC.”
Had Hudson spun off HuBASIC into its own company or something in the 80s? It was also offered on the Samsung SPC, Sharp X1, and MZ machines, but not the X68000 for some reason. I found out from reading the Japanese Wikipedia page on HuBASIC that you could buy a software interpreter for it for the PC-88. Maybe I’ll try that out sometime, if I’m not sick of BASIC by the end of this experiment.
One thing I was surprised to see when I received the package is that the Family BASIC cartridge has a battery backup. That’s right, unlike every other poor sucker in the 8-bit era, all your amazing games are backed up without having to use a tape recorder!
Unfortunately, the battery backup is reliant on AA batteries, and when I discovered that fact, I had a sinking feeling in my gut that they might have leaked. Luckily, removing them isn’t too hard - flip over the cartridge and open the door on the back.
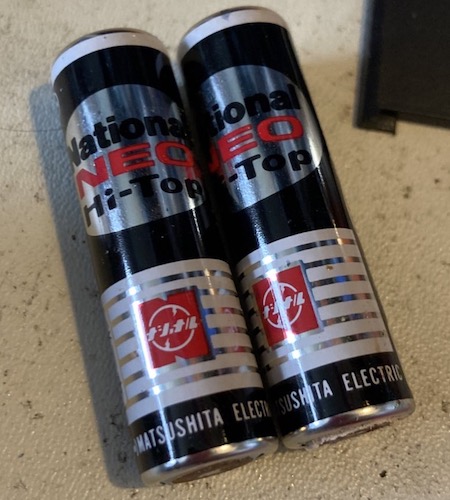
These are Panasonic Hi-Tops from the 80s! Here they are in a frankly bad-ass TV ad from the period:
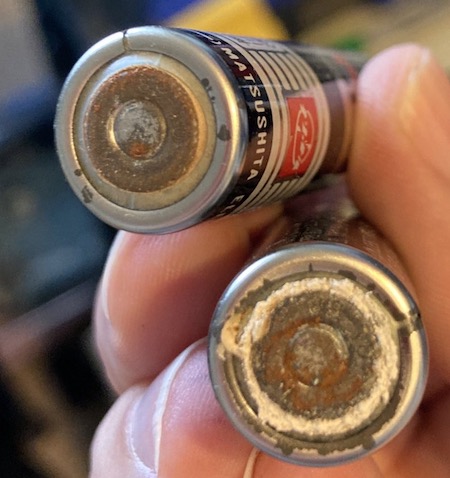
They have leaked a little bit, but the leaked electrolyte was a solid dusting that brushed away and didn’t seem to have tarnished the battery springs. Phew! These are probably old-school zinc-carbons, like the ones I used to buy from Radio Shack when I was a kid.
You know what? Let’s open up the cartridge. To make sure everything inside is okay. Yeah, that’s it.
Deep Unboxing
The first thing I noticed is that the screws on the cartridge are this kind of odd security screw. Or it might be for limiting the screw torque (by “camming-out”) when the cartridges are being put together by robots. I don’t have a proper screwdriver for this (it appears to be some variant of a spanner bit,) but it came off with a narrow flathead screwdriver no problem. I’m not gonna go around Dremeling into the case to remove screws!
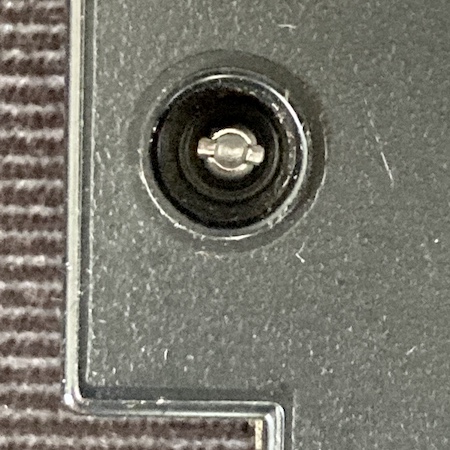
Sorry, sometimes I get excited about screws. I don’t actually know why.
Getting the clips on the top to release the case halves is kind of annoying. It’s not nearly as bad as with regular Famicom cartridges, but I had to put more force on it than I would have liked to separate the halves.
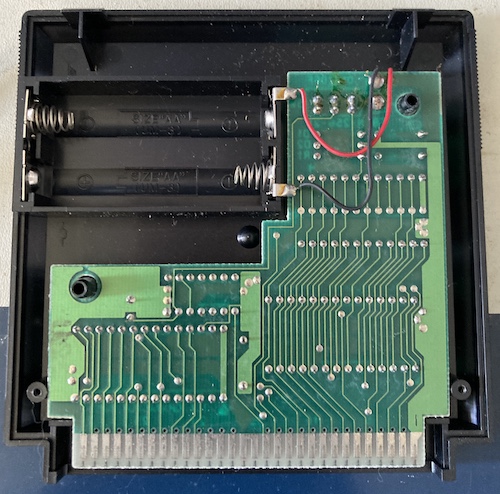
Eventually the back comes off, and then the battery terminals can be unclipped and removed. Or desoldered, if that’s what you’d prefer, but the PCB will interfere with the terminals when you try to take it out.
I’m not sure why they looped the wire around the PCB like that, instead of just soldering it into the through-holes. It seems like it just adds additional strain.
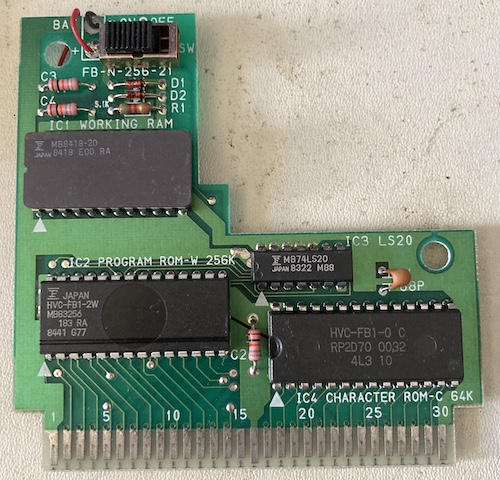
The PCB is pretty normal and boring. No exotic mappers that I can see - just a 74LS20 NAND gate to switch between the PRG (“Program”) ROM that makes up the BASIC interpreter, and the Work RAM that would hold the user’s BASIC program. This would make it an “NROM” cartridge, with no mapper, as I described earlier when I made a Portopia reproduction cart.
The PCB is surprisingly well-labelled for a Nintendo product. I guess they had some extra board space to play with.
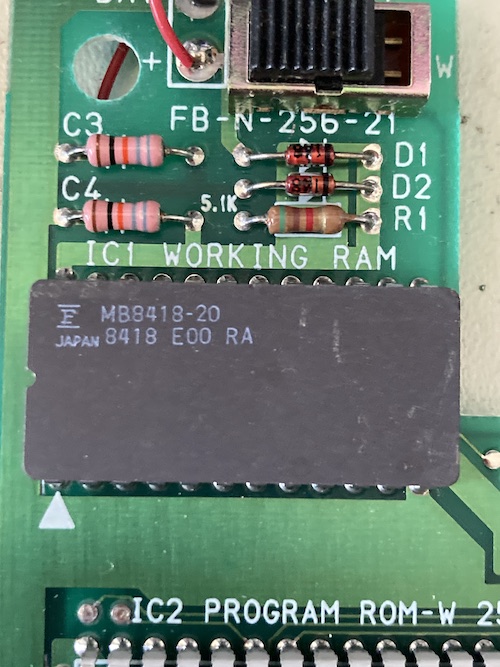
Let’s take a look at that work RAM chip, because I’m curious if in the future it could easily be replaced by FRAM or something else that doesn’t need a battery to retain its contents. It’s a Fujitsu MB8418-20 (200ns) 16Kbit SRAM chip. At only 2kB, you are definitely not going to be able to store a big program.
Putting the case back together was a little tricky - there’s a sliding plastic white gasket around the switch that you have to get aligned properly or it won’t let the PCB lie flat. I accidentally bent the case plastic trying to force it back together… oops! Luckily it’s not really noticeable unless you’re looking specifically for it.
Test Fire
I plugged the cartridge into my test Famicom and got nothing but a solid grey screen. Just to make sure, I scrubbed the cartridge edge - and got quite a bit of gunk back out - but there was no change. I wondered for a bit what the problem was, and then did a quick Google search. Here, I found a pretty obvious answer on a very cool blog named etabeta’s playground where the author was adding cassette support to the MESS emulator:
EDIT: I recall that if you launch BASIC V3.0 and you get an error message displayed, or if you launch BASIC V2.0/V2.0A and you get a grey screen, it means that you haven’t connected the Famicom Keyboard! [..]
Yeah, that’d do it. Let’s clear some crap off the test bench and try again. This time, with the keyboard plugged in, the game sprung to life, showing me a confusing pair of windows and interrogating me about my intentions in Japanese. It looked a little bit like this:
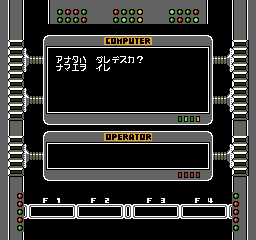
From what I can tell (thanks to a GameFAQs writeup, of all things) you have to do the following to get to the “GAME BASIC” interpreter:
- Eventually you will be asked to type your name; this is your “login” to the rest of the system as it was apparently intended that you would share the Family BASIC cartridge with your, well, family. The message board and some other features seem to take advantage of this.
- The “computer” will start cycling the various modes you can enter; “GAME BASIC” is the first one so just whack F1 for “Yes” and then push enter.
- At the new menu that appears, type “1” to go into the BASIC interpreter.
Now I was in the BASIC interpreter. I found out later that you can also hold the “T” key on the keyboard and push RESET on the console to skip right to the interpreter. Why T? Your guess is as good as mine.
At this point, I wanted to look up some kind of reference. There’s a lot of keywords that you wouldn’t find on a “standard” Microsoft BASIC. Luckily, some kind soul has already translated most of the Nintendo Family BASIC instruction leaflet here as a PDF1. Thank you! There’s even some listings for sample games.
Using the keyboard is a little frustrating at first until you get used to it. The keys are much smaller than on most other keyboards, the return key is up in the QWERTY row, and it’s easy to hit the up arrow when you mean to hit the left arrow to correct a typing mistake.
It also has an annoying (and loud) background noise, so I muted my TV. I’m not sure where this noise is coming from, as it isn’t present on MAME, and it sounds too analogue-y to simply be something like an uninitialized sound chip. When I searched, others had also complained about it. Maybe it’s ground loop hum from the composite mod?
Un-Thanks for the Un-Memories
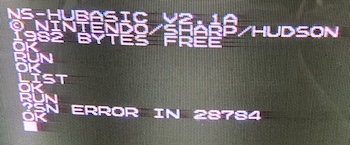
After a few minutes of aggravation, I was soon banging out the traditional “hello world” infinite loop. Something weird happened on my way to writing the next great 1980s space shooter, however, friends. When I went to RUN the program, the interpreter complained about bad syntax on line 28784.
I surely didn’t write a program with line numbers that high, so what’s going on? I did a quick LIST and got screen after screen of nonsensical garbage. Once in awhile it would hit a control character and blank the screen or beep.
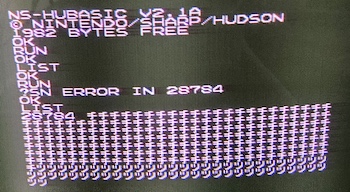
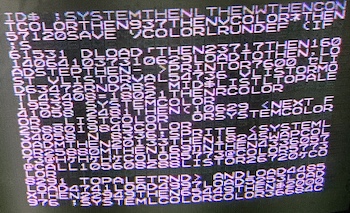
At first, I figured it was just gunk left in the RAM, and so I decided to overwrite the stored program and save a fresh one. NEW didn’t clear this program listing, no matter how many times I tried. Every restart of the system ended up with an error on the same line and a similar spew of garbage. Turning the “Battery Backup” switch on the cartridge to “OFF” made LIST empty again as it apparently unmapped the program-storage RAM from the cartridge, but I figured it would be nice to be able to save a game. Did I break something when I took it apart earlier?
Checking quickly with my multimeter, I didn’t see any voltage between the positive and negative battery terminals when batteries were inserted, with the switch in either position. We’ve got a broken circuit.
I took the board out, probed around a bit to get a general idea of the circuit, and then put some batteries back in to measure it again. Now I saw 2.88V in both switch configurations. Suspicious that the battery corrosion had eaten up the tasty-looking wiring on these terminals and they had become broken enough to only work in a certain combination of pinching and twisting, I removed the old wires and installed fresh new ones. Wire’s cheap, and easy to desolder.
Unfortunately, this made no difference, but at least I felt better.
Who’s On First?
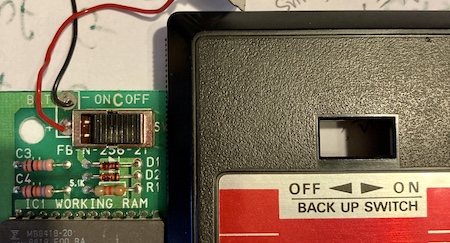
One interesting thing here is that the PCB silkscreen and the cartridge sticker disagree on which direction is “off.” Most likely, the shell is talking about battery power, and the PCB is talking about the Famicom’s VCC connection.
However, when I traced it out, I found that the E2 (output enable) pin on the work RAM was connected to the 74LS20 in what the cartridge sticker called “OFF,” and pulled high when the cartridge sticker said “ON.” That explained the garbage I was getting with the switch set to “ON,” so the PCB was correct. How does that happen?
Without any other leads, I decided to go looking through the translated manual. After a bit of squinting, re-reading, and testing, I determined the procedure to save your program is something like this:
- Get into Game BASIC.
- Make sure that the battery backup switch is set to OFF.
- Write your program like you would normally, filling up the listing.
- When you’re done, flip the battery backup switch to ON.
- Power off the console. Never turn the battery backup switch to OFF while the cartridge is unpowered.
The secret that I was missing is that, if you try to go to Game BASIC the slow way (instead of holding “T”) the “computer” will repeatedly demand that you set the battery backup switch to OFF, which sets the output enable on the BASIC program RAM. Presumably if you knew enough to skip right to Game BASIC, you already knew how to do this.
I suspect when I was reading all that garbage, it was because the output enable was pulled high, disabling the work RAM, and I was instead reading some oddly consistent line noise or the top part of the cartridge that is otherwise swapped out for the RAM.
Is this unintuitive and very prone to someone forgetting to toggle this switch before turning the machine off, thus losing their entire program? Yes, and that’s why Nintendo told you to get the tape recorder instead. Of course, that tape recorder wasn’t available yet at launch, according to the flyer that came in my box, and so I suspect that this battery backup was a last-minute addition that wasn’t integrated well. They probably could have designed a much better circuit like the battery-backed save RAM in Zelda, etc, but this probably predates those.
In Family BASIC v3, they added a “BACKUP” command that explicitly does the write to the cartridge from inside BASIC, asking you to turn the switch ON and OFF as needed. It also adds the ability to save backgrounds into the internal program RAM, which are otherwise lost at power-off in v2.
In conclusion, nothing at all was broken, only designed by crazy people. That’s Nintendo quality for you, right there.
Sprites Up
Drawing sprites is fairly simple, because the NES hardware makes it simple. I knew going into this that in NES 6502 assembly, you could define a sprite as being made up of four tiles and some flags for drawing.
![]()
I was unsurprised to find out that the way you define sprites in Family BASIC is basically the exact same way! While it may seem verbose, it does eventually make sense when you fiddle with it a bit.
The Family BASIC manual explains the purpose of this code very well, but I’ll break it down because sprite shenanigans will come into play later:
SPRITE ON
This enables the sprite layer entirely. With it off, no sprites show up. You can also hit ctrl-D to temporarily clear the screen of sprites so Mario doesn’t get in the way of your typing.
DEF SPRITE 0, (0,1,0,1,0) = CHR$(1) + CHR$(0) + CHR$(3) + CHR$(2)
This defines the tiles that make up the sprite. The NES supports 64 sprites, but only eight of them can reside on the same scanline. We’re editing sprite number zero.
Inside the arguments, it sets colour, “matching shape” (which seems to always be 1 in all of the manual examples, perhaps a collision mask?) z-axis priority, and whether to flip the sprite on X and Y.
The final set is the indices of the tiles that make up the sprite. In this example, the tiles will end up going like this (because we’re flipping X:)
1 0
3 2
SPRITE 0, 100, 100
Mario by default will draw in the top left, so you can only see a little bit of his booties. This puts him below and to the right of screen position (100,100.)
Cool! I dug into the manual and looked at the appendix in the back for “space ship, facing left.” Interchanging the indices provided for the ones we used in Mario, we can start to let our imaginations run wild with how cool this game will be:
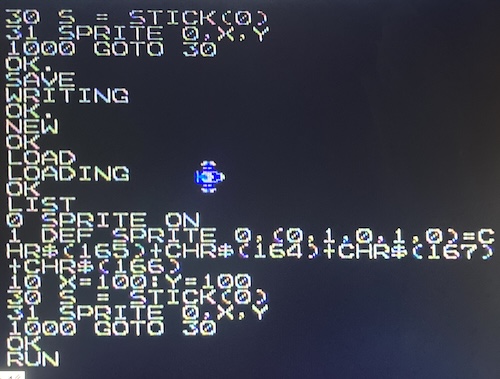
This one is made up of the tiles at positions 164 to 167, inclusive (DEF SPRITE 0,(0,1,0,1,0) = CHR$(165)+CHR$(164)+CHR$(167)+CHR$(166)).
Those of you with keen eyes will also notice a new call S = STICK(0), which reads the directional pad. The influence of Hudson MZ BASIC is speaking through this choice in naming…
I don’t want to lose my cool new game! How are we gonna store my hard work?
Taped Before A Live Studio Audience
So if I want to do anything serious, I’m going to need to use the tape. Of course, I don’t really have a handful of old tape recorders lying around. The best I can do is a battered Commodore datasette, which only has a digital edge connector and can’t be used as a general-purpose tape recorder.
Well, they can, but let’s pretend they can’t for the purposes of the rest of this article. This has all taken enough time already.
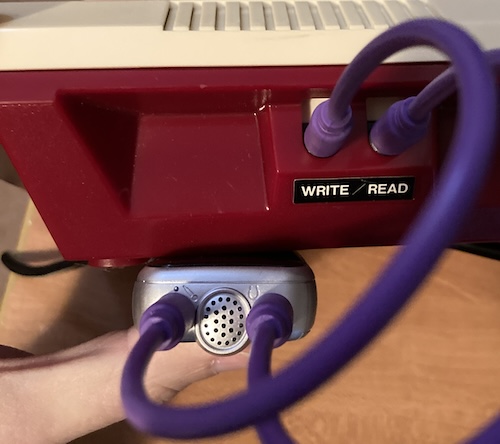
I bought a cheap Sony digital recorder, ICD-BX140, like the kind you would use for “notes to self” about wart cream for the giant wart on your posterior, and hooked it up to the keyboard with some mono 3.5mm RCA cables. Although they can be pricey at retail, these things are super common on eBay, even in new condition. Later models have more storage, SD card slots, and USB connectors, but this one is caveman simple and just has audio in and out.

Nintendo actually does a pretty good job of labeling the outputs in a sane way, so you just set it up like this:
| Keyboard pin | Recorder pin |
|---|---|
| Save/Write | Microphone |
| Load/Read | Earphone |
I was a little worried that the Sony, being a voice recorder and all, would try to filter or compress the data, so I made sure to test with a basic “Hello World” program first in order to dial in the settings. Of course, as anyone who has dealt with tapes before knows, there’s a lot of fiddling to get the exact right volume levels, quality options, etc.
In the end, a small, easy-to-miss throwaway sentence stuffed into an unrelated part of the Sony’s manual told me what the problem was:
If you connect the headphones to the (headphone) jack, you can monitor the recording.
In other words, while you’re recording, the recorder is proxying the sound onto the headphone jack. That’s not something that most home tape recording decks do! Maybe all that noise on the read port was interfering with the audio coming out of the keyboard.
Could it be that simple? To try it out, I unplugged the READ -> headphone cable, and then started a new recording using SAVE. When I plugged the headphone jack back in and LOADed it, My program was restored from the voice recorder, like magic!
Is this the first Family BASIC setup with solid-state storage?
Custom background graphics – of which I didn’t use any in my game – need to be saved separately from the BASIC program, inside the BG Graphic editor. Don’t forget!
MAME
To get a better keyboard to type on, I decided to get the whole mess running in MAME. Originally, I tried the popular fceux emulator, but ran into trouble when I had to try and rebind Scroll Lock to something that was actually present on my Mac’s keyboard. Even when it worked, I ended up with autorepeat and debounce issues and it was just not a lot of fun for a quick “do sprites work this way?” test.
MAME, of course, supports the Famicom and the Family BASIC Keyboard. I decided to fire it up and give it a shot to see if its keyboard handling was any better.
Like the real Famicom, the MAME emulated version of Family BASIC will hang up on a grey screen if you start it up with no keyboard attached. Make sure to attach a keyboard to the exp port:
./mame famicom -cart Family\ BASIC\ \(Japan\)\ \(v2.1a\).nes -exp fc_keyboard
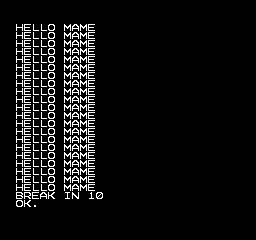
This booted and ran fine, although annoyingly backspace was mapped by default to “stop/break.” This was a quick remap in the MAME options (you can even remap “stop” to ctrl-C, which makes it feel like most other 8-bit computers) and soon I was off to the races.
I used save states (shift-F7 to save, F7 to load) to track my progress between milestones2. This is especially important because it’s very easy to accidentally hit ESC and kill MAME with no confirmation! It would be fun to make a tool that decompresses the save state and reproduces the BASIC listing in RAM, but that’s a project for another day.
I also managed to mount a tape image by creating an empty WAV file with touch output.wav and then attaching it using the -cass output.wav option on MAME’s command line. In order to record to this image, you need to remember to go into the Tape Control menu in MAME and start recording before you type SAVE. The same goes for LOAD, except you want to prepare the machine for LOAD before you start playing the tape. Jumping through this process was kinda clunky, so I didn’t end up using this for development.
Diagonals
I noticed when I was messing with input code that the Family BASIC manual tells you to use only four cardinal directions. And what’s more, if you do diagonals, it just seems to ignore them. Diagonals are essential to a good-feeling game, but especially a space shooter.
I wrote a small program to figure out what values Family BASIC’s STICK() returns for diagonals:
10 S = STICK(0)
20 PRINT S
30 GOTO 10
It turns out that you end up with these values:
| Direction | Value (Decimal) | Value (Binary) |
|---|---|---|
| Up | 8 | 0b00001000 |
| Down | 4 | 0b00000100 |
| Left | 2 | 0b00000010 |
| Right | 1 | 0b00000001 |
| Up/Left | 10 | 0b00001010 |
| Up/Right | 9 | 0b00001001 |
| Down/Left | 6 | 0b00000110 |
| Down/Right | 5 | 0b00000101 |
This makes sense - 10 (up/left) is 2 (left) + 8 (up). As you can see, the shift-register output from the Famicom controllers is a bitmask after all. And since you can use bitwise operators with Family BASIC, it will shorten my input-handling code.
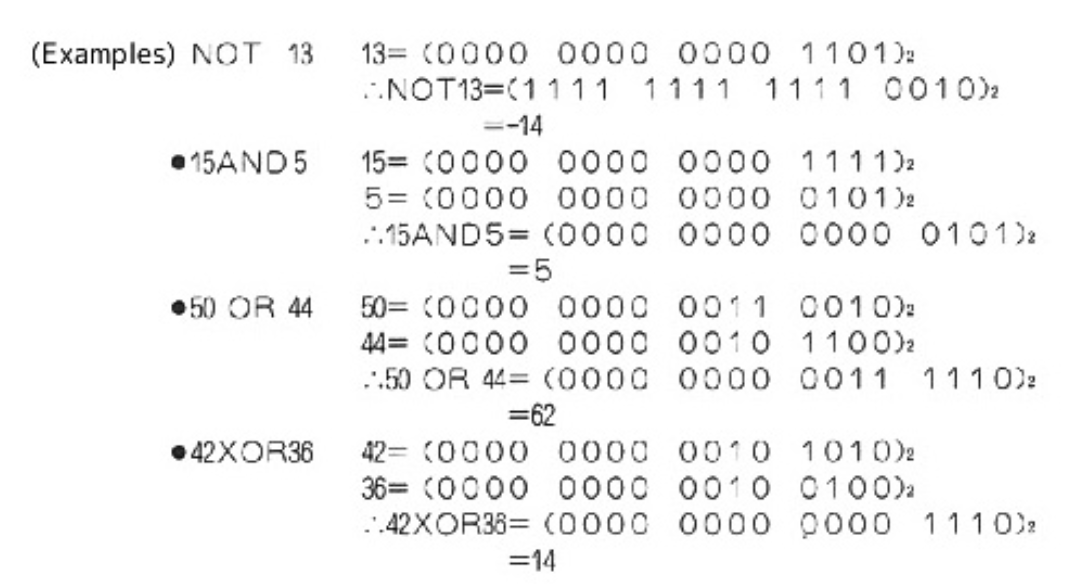
The manual even tells you how they work, a nice little inclusion that probably made a curious kid even more curious.
Here’s what I ended up ginning up. I found out quickly that, yes, the parentheses are required:
10 S = STICK(0)
11 IF (S AND 8) <> 0 THEN Y = Y - 1 ' Up
12 IF (S AND 4) <> 0 THEN Y = Y + 1 ' Down
13 IF (S AND 2) <> 0 THEN X = X - 1 ' Left
14 IF (S AND 1) <> 0 THEN X = X + 1 ' Right
This worked great, letting me smoothly move the spaceship around. My up-and-left direction on my heavily-loved Famicom gamepad is a little fiddly, but that doesn’t keep it from feeling better than the “cardinal directions only” hoo-ha that the manual tried to pass off as appropriate input handling.
Shooting, Part 1
Part of a space shooter is shooting. It’s right in the name. But how do we represent one of our heroic space ship’s shot shots when it’s in flight? Without any knowledge to the contrary, I think the best way is to use another sprite.
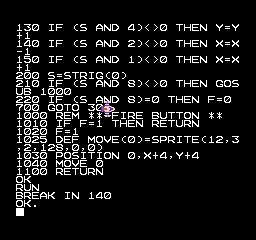
First, we need to detect when they hit the fire button. STRIG (trigger) will tell us when it’s down.
10 S = STRIG(0)
11 IF (S AND 8) <> 0 THEN GOTO 1500 ' A button

...

1500 REM HANDLE FIRE BUTTON STUFF HERE
1501 GOTO 10
Similarly to the diagonals, I detected the fire button by looking for 4 (B) or 8 (A.) It still bothers me that A is on the wrong end of the controller on a Nintendo system. To get revenge on the Nintendo conspiracy that cost me my precious Sega hardware, I have arbitrarily decided that “fire” will be A, which is the inverse of virtually every Nintendo space shooter.
Now that I’ve made lifetime enemies, I needed a small sprite that I could turn on and off and fling across the screen. Reading over the manual, DEF MOVE seemed like a good way to handle a bullet. This special function of Family BASIC lets you take a sprite and animate its position automatically every frame.
Unfortunately, MOVE only lets you pick one of 16 pre-defined metatiles to draw it with3. As with SPRITE, you’re not forced into using four-tile sprites. Some of the hardcoded movable objects are four-tile metatiles (like Mario) and others are single-tile (like a fire flower’s fart.) Mario even animates when he runs when you do this example cribbed from the manual:
10 SPRITE ON : CGSET 1,0
20 DEF MOVE(0) = SPRITE(0, 3, 2, 35, 0, 0) ' run 70 pixels to the right
30 POSITION 0, 0, 0 ' move Mario to top left
40 MOVE 0 ' start moving, Mario!
50 IF MOVE(0) <> -1 THEN GOTO 50 ' loop until Mario finishes moving
60 END
Number 12 in its table of hardcoded movable objects is called レーザー (laser,) so that’s probably good enough for us. It looks like this, and is clearly a single tile:

Sorry, even though there are six exciting kinds of lasers (80s Japan really did have it all,) you can only use the first one. At least there’s multiple palettes.
POSITION n,X,Y is used to place these movable sprites, and you can read the current position during animation using XPOS(n) and YPOS(n). It seems like Family BASIC v3 has a CRASH function that does collision detection, but no such thing exists in this older version of the cartridge. We’ll have to use these functions to check if it hit anything.
For starters, I decided that when I hit the fire button, I wanted a bullet to appear at the nose of the spaceship and travel onward until it fell off the screen on the right side. When this happened, its journey into the universe would be erased from the screen with ERA n.
Because STRIG doesn’t tell us if a button has just been pushed, only that it’s down, I also added a quick variable to tell me this. I invite the reader to figure out a better debounce than this.
My first obvious method for shooting a bullet was to POSITION the bullet sprite to the vague vicinity of the player spacecraft, and then do MOVE 0 to send it on its way. However, if I shot multiple times before it was able to finish its animation, it seemed like MOVE didn’t necessarily reset the “how many pixels to run” counter for the new bullet. Some bullets would go farther than others. Sometimes, they’d just sit under the space ship, refusing to move at all!
The only way I could work around it was by doing the entire DEF MOVE(0) = ... boilerplate code inside my fire button handler. Inelegant, but didn’t feel any slower. That’s life, I guess.
Enemies
Enemies are an essential part of the space-shooter experience. Since we’re just doing a little game today, we’re not going to do anything fancy. A good extension for the curious hobbyist here would be to add multiple enemy types, or even bosses.
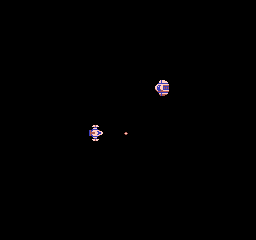
These guys are pretty dumb, and will just randomly appear and fly up and down on a sinusoidal pattern until they either hit the player, fall off the left edge of the screen, or get shot down. Then they’ll be replaced by another enemy, except a little bit faster this time.
The most important part of an enemy, of course, is how it looks. I dug through the Family BASIC sprite sheets again to see if I could find someone worthy of being shot at. There’s a left-flying crow that looked promising, but I can’t condone violence against our corvid superiors. Instead of the crow, I bravely picked “another spaceship.”
Explosions
Reacting to the hit is always harder than detecting the hit. I wanted the space ship to explode in a jillion pieces, which meant finding an explosion sprite. That’s easy. There are two metatiles for explosions:
![]()
Similarly to the MOVE problem earlier, I noticed that if I defined two sprites and switched between them for the explosion, I would get an odd flicker. Instead, I redefine the sprite while animating the explosion. This code is super clunky and I’m not happy with it, but that’s what making games is all about.
Explosion frames:
176,177,178,179
180,181,182,183
define with string?
FA$ = CHR$() + CHR$() + CHR$() ...
FB$ = CHR$() + CHR$() + CHR$() ...
DEF SPRITE 0, (0,1,0,0,0) = FA$ or FB$
yeah that’s the way to go
When the animation is “done” – its two frames have expired – I hide the sprite by simply calling SPRITE 2 on its own. It took me a shockingly long time to figure this out even with the manual in front of me.
Enemy AI
Yeah, I used the A-word. Venture capitalists, bring me a couple billion dollars to set on fire. I promise we’ll innovate the hell out of some technology. I definitely won’t spend it on old Japanese computers.
Spawning and animating the enemy is the next challenge. I want to create enemies at a random vertical position on the screen, which means finding a function that produces a random number. The manual reveals that RND(x) is the function to call, which produces a value from 0 to x-1, inclusive.
Once they’re in position, I just send them flying at the player. Surprise!
Moving the enemy in an interesting way is the final challenge. Since Family BASIC doesn’t have a nice convenient SINE() function, I ended up making my own terrible imitation of a sine table using a DATA statement.
A DATA statement is like an array, except the pointer in it auto-increments, so you don’t need to keep an index. Unfortunately, it doesn’t loop by itself, but will crash if you run off the end of it. You have to manually reset it back to the start with RESTORE.
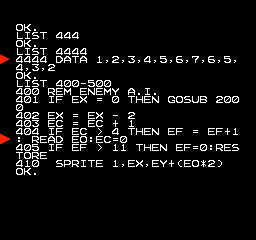
I ended up keeping three variables, EC (enemy counter,) EF (enemy frame,) and EO (enemy offset) to keep track of the animation.
Every frame, I:
- Increment
ECby one - If it’s been enough frames, I go call
READ EO, which reads a cell out of theDATAstatement and stores it inEO. Then I incrementEF, so I remember which frame I’m on. - If
EFis now pointing off the end of theDATAarray (EF > 11) I reset the pointer usingRESTORE - Apply the
EOoffset to the sprite’s Y-position so it moves up and down from its original Y-location that it was spawned at.
This produces a vaguely sinusoidal movement:
Since I knew I was going to offset the enemy, I also left a little bit of safety margin in the random spawn Y-position, so they wouldn’t end up sinusoidaling themselves off the screen and crashing the game.
Shooting, Part 2
Now it’s time to tie all these systems together. I need:
- Faster bullets;
- The ability to detect a collision between the enemy and a bullet;
- The ability to detect a collision between the enemy and a player;
- and animated explosions wherever a collision happens.
All of these were relatively simple to implement. Bullet speed was just a matter of turning down the speed variable in the MOVE definition to 1, the fastest it can go. It’s still quite a bit too slow, but I managed to make it feel faster by cranking up the player’s movement speed as well.
The right way to do this would be to have written some code to manually move a bullet sprite, but I was already starting to run out of memory at this point (see the next point) and didn’t have much room to write another chunk of code.
Bullet-enemy collision was surprisingly difficult. While it’s obvious that it should be something like “if bullet inside enemy rect,” something about Family BASIC’s sprite coordinates didn’t exactly line up. I would constantly be able to “skim” the bullet off the top two or three pixels of the enemy space ship. To try and fix this, I ended up adding some fudge factor until it felt right. Hey, that’s what real game developers do, too.
Collision with the player is relatively simple. To make things performant, I didn’t want to do box-box collision but instead just did a simple “is player midpoint inside enemy rect” check, similar to the bullet one. I wanted to spawn an explosion when the player is hit, and animate it out, and then go to the “game over” screen, but I was so far out of memory at this point that I could barely fit in the “GAME OVER, SCORE” text. This is my biggest regret on this project.
As for explosions, this was a simple state machine.
That turned into a larger problem because I didn’t properly draw out my logic before writing it in BASIC and trying to optimize it. I wasted a couple hours before realizing I forgot to update my “counter” variable properly. Once it worked, it looked really good, and I spent a few minutes just blindly zapping my foes. I wish I had more than two frames of explosion to work with, but you take what you’ve got. Most BASIC programmers don’t even have one frame.
The Dreaded Out of Memory
I started to get OM ERROR on seemingly do-nothing instructions, crashing my game. OM ERROR is, as you likely guessed, “out of memory error,” and it was failing because it was unable to allocate a temporary variable for the result of an evaluation such as S AND 8.
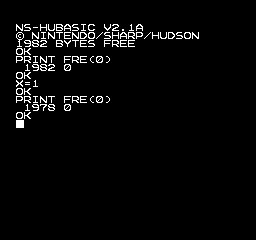
Running out of memory is no surprise to your average BASIC programmer, back in the day. And with only 1,982 bytes of program room available to you, Family BASIC v2 is especially constrained. But surely Nintendo/Hudson didn’t do something stupid like every single integer variable take up a ton of room, right?
Uhhh… maybe that’s just overhead for allocating a table or something, right? Surely the next one will be smaller than 32 bits. It is a Nintendo, after all.
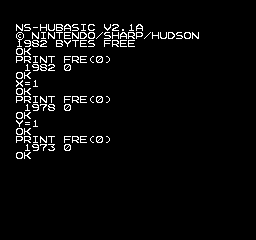
That one took five bytes?
If I ever wanted to finish this project, I was going to have to put my program on a diet. I set about doing some very simple low-level optimizations, such as changing IF FOO THEN GOTO 300 to IF FOO THEN 300, removing extraneous spaces and comments, and getting rid of never-changing tuning variables in favour of in-program constants.
This got my program running again, but it was never the same. I was spooked and gave up on adding some cool features, such as the high score table, sound, and a scrolling starfield background.
I think the best way to get something impressive out of Family BASIC in the modern era would be to write some kind of tool that does the optimization for you, or to convert big chunks of it into machine language, poke that part of the program into memory, and run it.
This lack of memory is probably why “BG Graphics” are optionally loaded separately in an entirely different part of the tape. There simply isn’t enough room to make the BASIC program fill in a tilemap as well.
Tuning & Polish
Once the basic bones of the game were down, it was time to try and make it fun, or at least challenging. I was feeling a bit down on the results at this point, which happens to every game developer near the end. Every single game sucks until about thirty minutes before release.
My first stop was to make the enemies more interesting. Although the drunken wobble is endearing, it isn’t very challenging. In early testing, the only way I could actually get a game over was by really asking for it: getting in front of them deliberately or occupying the right side of the screen where they come out.
What’s a cheap way to make them more interesting? Randomness. On spawn, I roll a random offset for their travel speed. Then, some enemies are fast, and others are slow. Doesn’t seem like much, but it chewed up enough additional bytes to force me to go back and reorganize even more code. At this point, I was spending about five minutes removing code for each new line of code I was writing.
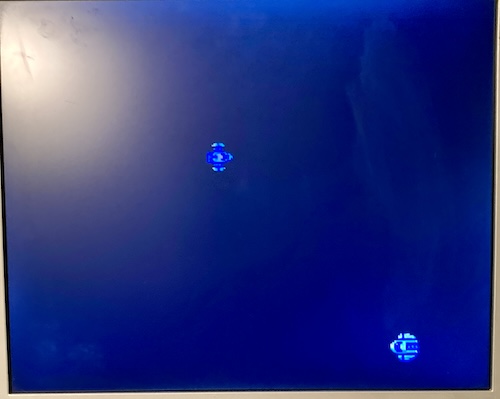
Even though I couldn’t have a scrolling playfield, I still felt that I could probably make the background more interesting. It turns out that characters 205 and 206 look a lot like stars, so I added a short loop at startup to randomly place them using LOCATE and PRINT CHR$(206). This used a lot of space, but I think it was worth it.
The player movement “feel” is still not there, but I am not sure what to do for that. I tinkered with acceleration and some other tricks, but ended up keeping it the way I found it.
I could have kept tuning and tweaking this nearly forever, but I’m happy enough with what I’ve got now to call it a day. Plus, this entry is getting super long.
Getting It Back Out
Optimism only gets you so far. It turns out that it was very hard to get the “tape” back out of the Sony voice recorder and turn it into a BASIC listing for all my lovely readers to consume.
Unlike the IC recorders that came after mine, this particular Sony does not have USB or SD-card output. That means I have to play the audio back into a computer, record the audio, and convert the resulting WAV file into an emulator-compatible tape.
First, I plugged it into my Mac. That Mac has given me lots of trouble before trying to do this kind of thing (most recently with the Sharp MZ700) where it just stubbornly refuses to accept a microphone input for reasons known only to itself, even with a splitter that is purported to work. Out of desperation, I decided to try and hold the voice recorder near the built-in microphone of the Mac and just play it very loudly in the room, which did produce a legible recording.
MAME would see the WAV file, load it and play it, but no sound came out of MAME, and the emulated Family BASIC seemed unable to load it. This was the case at multiple dB levels, so I assumed that my recording was simply incompetent.
After that, I tried every emulator I could get my hands on for the Mac. Those emulators are of varying quality when it comes to the (admittedly niche) Family BASIC implementation – all of them would boot Family BASIC, but I couldn’t use the keyboard, or load WAV-format tapes, or both.
As far as emulators, I was most disappointed in the performance of Nintaco, which has an entire Family BASIC menu full of awesome goodies that I was drooling over.
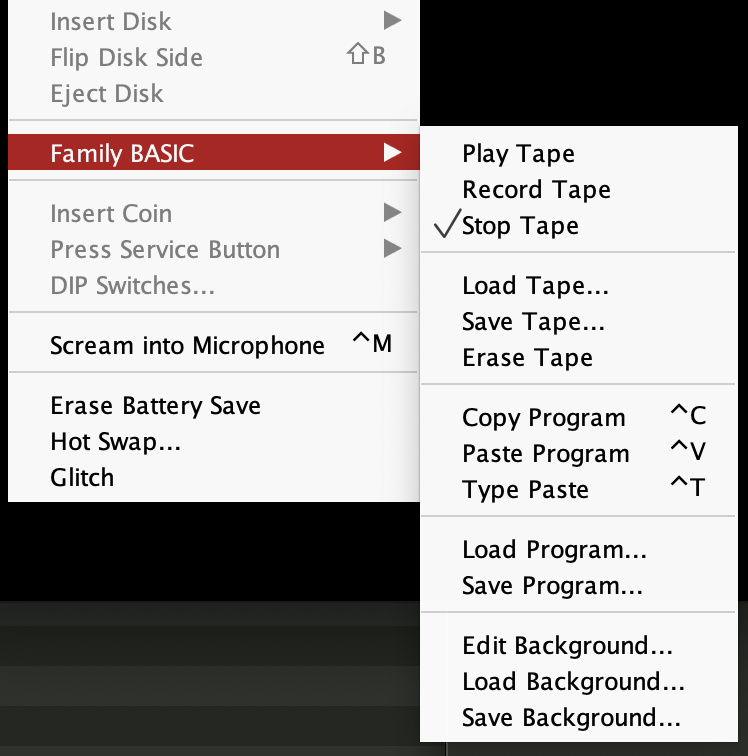
Unfortunately, it didn’t let me remap my keyboard to… a keyboard. The remap dialogue would just sit there forever and refuse to accept a key input. I did some tinkering with permissions, running it from the Terminal, etc, but I came up short. Also, it only accepts tapes in its proprietary *.tape format, which is closer to a binary encoding than audio, and I couldn’t find a conversion tool or even a clear spec for that format. Because of the aforementioned goodies, I really want Nintaco to work, so I might throw some more time at trying to solve this keyboard and tape-conversion issue in the future.
With regret, I pulled out the Windows-running ThinkPad and installed VirtuaNES. VirtuaNES is recommended by the Gaming Alexandria Family BASIC Type-In guide, and that’s good enough for me.
Unfortunately, VirtuaNES expects tapes in its own *.vtp format4, and I also wasn’t able to record using my cockamamie contraption on the ThinkPad. So I did what any reasonable person would do, and spent ten dollars on a USB audio breakout box. Surely this would let me record audio from a cable on a computer in the distant future year of 2025.
Although I didn’t end up using it, DumpListEditor has the ability to import WAVs and re-generate them as a new WAV with nice, clean square waves.
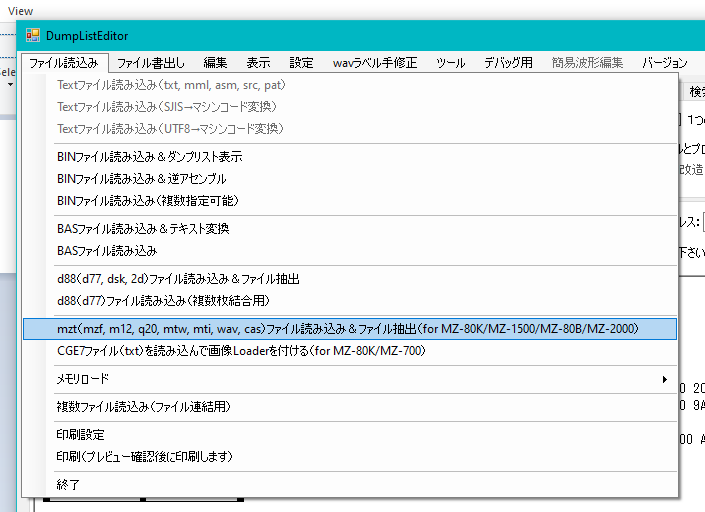
You can do so using the MZ-80 mode, because Sharp likely just reused their existing encoding for the Family BASIC keyboard.
Around this time, bsittler showed me the Family BASIC Tape Tool website, which does everything I wanted it to do. Amazing!
Once the USB audio breakout box arrived, I took another recording, and then used Family BASIC Tool to dump out the program listing. You can download the latest version of the game (with type-in listing!) on my Family BASIC GitHub repo here, along with some other utilities that may or may not be useful.
And if you were wondering what the game is like, here’s a video! I think there is a lot more to mine from Family BASIC; this game could be much better. For now, I am somewhat done with the entire project, after fighting for bytes of memory. I also kept occasionally bumping the cartridge while reaching for a controller, which would crash the game and lose lots of work.
Conclusion
This was a fun exercise in dealing with limited tools. Family BASIC v2.1 lacks a lot of features you’d expect in other game-oriented BASIC, and the on-cartridge saving is just barely short of insane, but limitations are what old computers are all about.
Would I write something bigger in Family BASIC v2? No. This nearly drove me crazy, even with a modern emulator at my fingertips so I didn’t have to deal with the tiny keyboard. Allocating line numbers in old BASICs bugs me a lot, especially without RENUM support.
Near the end, I was starting to feel some of my childhood BASIC chops coming back. Like many reading this, I got myself into writing much larger programs than I ever had any right to do so. Doing things like organizing functional blocks with REM ** ENEMY A.I. ** comment headers produced an oddly nostalgic feeling for something that’s just a lazy organizational system. And deleting all of those right afterward in order to save memory was even more nostalgic.
If I had to make something big again, I would probably do it on a higher-level language to keep things readable, and “compile down” to BASIC, with all the common optimizations included. I’d also plan out my line number usage better, and try to figure out some workflow with MAME so I wouldn’t have to type code all the time. I’m sure a tool like that already exists, or I could try manipulating a MAME saved-state to plug in my listing.
All my grousing doesn’t mean that Family BASIC’s a bad environment at all. I’m a software developer, and we’ll complain about any tool you put in front of us, and no amount of memory can satisfy our demands for “one more feature.” Nintendo/Hudson clearly put a lot of effort into this product, with relatively weak resources on hand. It’s not a cynical, toy system like some other console BASICs.
I can see what Nintendo were planning with this thing. They did a good job with the hardware they were given, including the limited memory of the cart. They tried hard to add fun “Nintendo-y” features, like only needing two lines to make a running, animated Mario, and decent control over the sound chip. And like I said earlier, I’m sure it stoked the interest of a lot of young programmers5.
I’m very grateful to the folks who scanned and translated the manual. This would probably have been a very annoying task otherwise.
In the future, I’d like to see what Family BASIC v3 has to offer, but I have my suspicions that I’d still rather be writing assembly language… even if that assembly language is 6502. Still, there’s lots more to unearth on this one: the “BG Editor,” for instance, offers a lot of interesting potential for making more complex games than Space Annoyance. This little cartridge is such a fascinating system.
Downloads
| Component | Download link |
|---|---|
| Space Shooter listing | listing.bas |
| Space Shooter tape image (WAV) | tape.wav |
-
The manual was originally translated by someone at Play Power; both Sebastien Van Damme and P/Pokun are credited. Thanks for letting me know, uglyjoe! ↩
-
I accidentally saved and overwrote a save state slot like six times while making this post, losing work each time. Save states are not a foolproof solution for development if you’re a dumbass like me, hold SHIFT at inappropriate times, and don’t make backups often enough. ↩
-
MOVEhas some other funkiness as well. It takes an 8-bit value for “number of steps,” but it silently multiplies this number by two internally. As well, even the fastest speed (1) is really quite slow for a game, which is why I ended up rolling my own bullet code in the end, anyway. I bet they overhauled this in Family BASIC v3, but I don’t want to check and make myself spend more money. ↩ -
After doing a few practice dumps, I am pretty sure the VTP format is just a pre-quantized version of the tape audio. It seems to only contain $70 and $90 bytes in the file. I was getting ready to write a converter, but the VirtuaNES documentation says “The file structure is a 32KHz 8bit RAW PCM file.” That explains a lot. ↩
-
Nintendo even hired one of them. Masahiro Sakurai got his start on Family BASIC. He’s supposed to be a YouTuber, or something? Never heard of him. ↩