A SPARC makes a little fire
Tags: computer sparcstation sun pizzabox floppy failure magic-smoke repair
Way back in May of 2018, I was unable to get the SparcStation 1+ to stop returning “Illegal Instruction” errors for any attempt at booting. This made absolutely no sense to anyone I asked about it, and they suggested replacing the PROM battery, because at least then we’d have fewer known-broken parts in the computer. I ignored this advice, and just stuck the computer in a corner with the other broken machines for awhile so it could think about what it did.
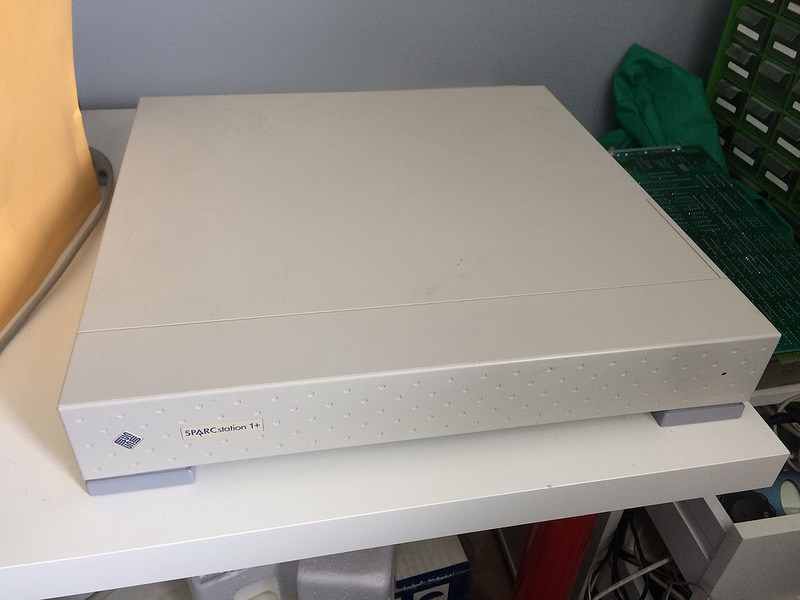
A few weekends later, I decided to go back and give the little Sun another chance. Perhaps it was the cute pizzabox appearance, or maybe it was that I needed to clear the bench space for something else.
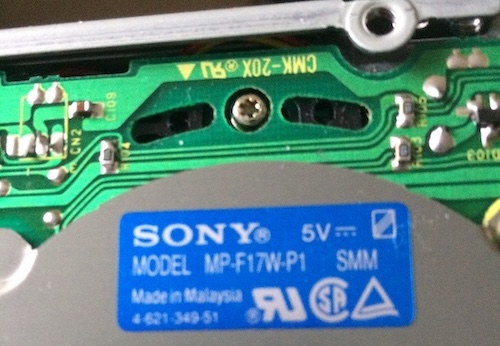
To begin diagnosis, I yanked the hard drive out, and discovered the Quantum ProDrive in it was in fact an Apple factory drive. Here’s the badge, indicating that the drive was shipped with an Apple ROM.
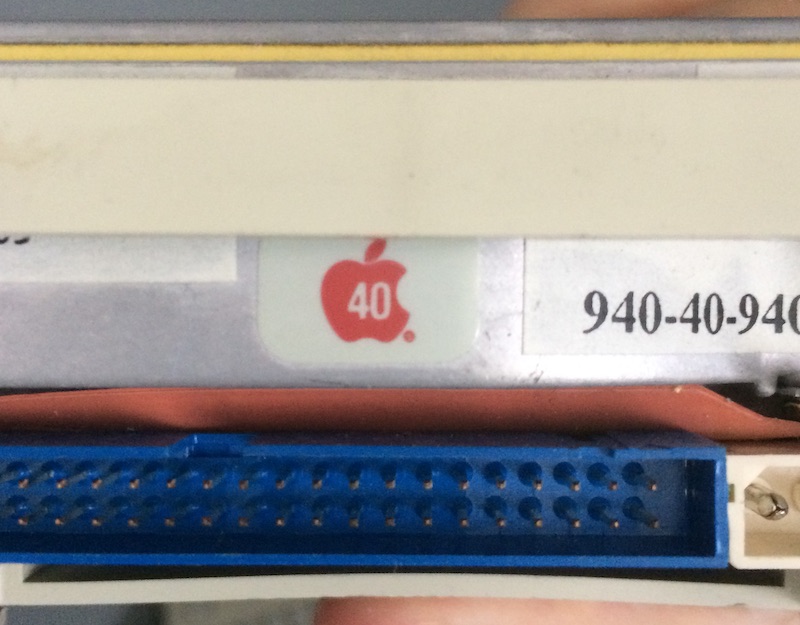
Looks like it has some pins for a hard drive access LED. Considering it’s a full-height drive, I wonder which Mac this would have come out of. Maybe an early SE or II? Definitely not an LC.
A lot of early Apple hard drives are hardcoded to SCSI ID 0, and while they have pins to reset them, they don’t come with jumpers (I realized this was since the three jumpers set the SCSI ID in binary, which should have been obvious to me before - no jumpers = all false = 0). As far as I can tell, this one is the same way.
I decided to boot it without a hard drive installed at all. Maybe that would give me a cooler error than “Illegal Instruction!”
It did - the computer decided to try and boot off the loopback device instead, and when it failed, it didn’t say “illegal instruction.” What’s more, I could now type boot sd(0,0,0)vmunix without getting Illegal Instruction either!
I immediately slammed the drive back in and tried to boot. This time, I just got a SCSI device is not responding error. Assuming the drive was dead, I began my usual Quantum ProDrive diagnostic method of:
- Feeling the drive for vibrations that indicate it is working,
- Tapping the drive gently with the handle of a screwdriver,
- Tapping the drive less gently with the handle of a screwdriver,
- Repeatedly trying to start the drive until I hear it finally come to life.
Eventually, the drive started making noise and vibrating, so I assumed it was fully alive. This was not the case, as I would find out later, but it didn’t matter.
I looked online for information about the “not responding” error, and found one Usenet post from 1995. In it, the protagonist had a similar machine (an IPX) that wouldn’t boot, but was able to boot it using boot sd(0,3,0)vmunix instead of the default ID of 0.
That’s weird, since probe-scsi was pretty adamant the drive was target 0, device 0. Some more searching revealed that, yeah, the SparcStation firmware reroutes ID 0 to ID 3 for some reason only understood by Sun engineers and/or the legally insane (pay attention - this comes up again later.) OK, whatever… let’s try it.
Now I got an even better error message - bad magic number in disk label. I assume that this is telling me that the firmware doesn’t understand the partition map of the disk.
That error message was followed by a complaint that I had pointed the computer at a non-executable file, which makes sense, since not being able to read the partition map generally makes it difficult to find any files.
More disks! More parts! More problems!
To check if I could magically make this thing start working by adding more variables to the problem, I did a little bit of disk swapping. In went a second SCSI disk from my collection, a 2.2GB Quantum Viking that I found in a greasy shoebox. While this drive is supposedly a little big for the older firmware to support, it should at least be detected by probe-scsi as a SCSI device.
The following table describes my findings:
| Viking in Left Bay | ProDrive in Left Bay | Nothing in Left Bay | |
|---|---|---|---|
| Viking in Right Bay | N/A | “SCSI bus hung” | “Bad magic number” |
| ProDrive in Right Bay | Hangs after banner | N/A | “Bad magic number” |
| Nothing in Right Bay | Hangs after banner | “Bad magic number” | Hangs after banner |
Hanging the SCSI bus wasn’t too big of a surprise in retrospect, since both drives are set to ID 0 from the factory and would of course conflict. I was not thinking awfully clearly back in 2018 when I was doing this, apparently.
What surprised me is that putting the Viking in bay 1 locked up the machine, and so did not having any disks at all. I thought this was supposed to be a diskless-capable workstation.
Nothing was adding up.
Floppy drives exist, right?
There is one more thing the SparcStation 1+ has up its sleeve: an auto-eject floppy drive. Like the Macintoshes, ejecting the floppy is driven by software, which is a feature that sounds really boring but is actually cool in person. Much like this entire machine. At least a Macintosh got to eject floppy disks in outer space.
In theory, I could make a Linux or BSD boot floppy and boot off it. Then I could use the booted-from operating system’s disk tools to look at the drive, figure out what (if anything) is on it, and maybe get a better clue as to why this computer doesn’t want to boot. Worst case, I could at least format the drive and install a new OS.
In practice, not so much. My first indication that something was up came when I tried to run boot fd() on a blank floppy. The computer ran the drive for a few seconds, and then complained that it could not read the first sector, and the floppy self-test failed.
After a few more attempts with different boot disks, I determined that nothing really worked on this floppy drive except for the eject command, which, it seemed, would be the only real functionality I could squeeze out of this computer. At least it makes a cool noise.
After thinking about it, I decided to remove the floppy drive and take a look inside. Everything looked great, except that the drive door’s spring was no longer able to hold it closed, and that there was a tiny piece of plastic - probably from the drive door - lying in the back of the drive away from the mechanism. I removed the plastic, lubed up the jackshaft and eject gears with a stingy amount of lithium grease, and reinstalled the drive.
No change.
I removed the floppy cable from the motherboard. For some reason, a previous owner had filed off the alignment tab from the cable, and then installed it backward. Could this be the problem?
It wasn’t - with the motherboard cable flipped around, the floppy drive displayed the normal PC-standard “LED on all the time, nothing else works” symptoms. I got a self-test error for “expected track 2, got track 0” and eject no longer worked. At least now I know it’s probably 34-pin Shugart, and also that the cable was in the right way around the first time, since eject works.
Fine, be that way. Who needs a floppy drive anyway?
Nice drive
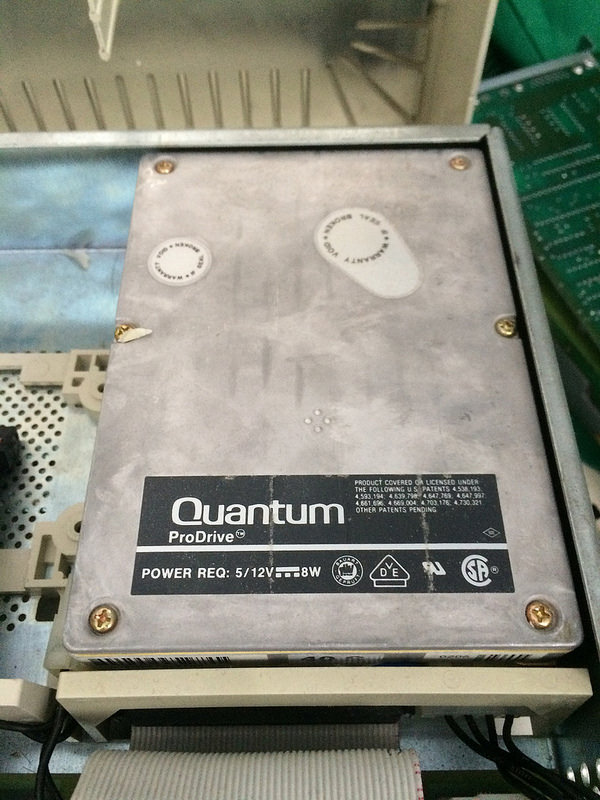
After a few more power cycles of the SparcStation, the ProDrive HDD, which was already pretty loud when booting, made an even louder noise and then started to spin at the approximate volume of a jet engine. I am pretty sure the spindle was still a little rusted during the previous attempts. Now it’s finally free to spin again!
However, the drive still near-instantly returned the “bad magic number” for ID = 3 (really ID = 0, more on this later.) Which is weird, because if the drive wasn’t spinning before, how did the computer know what was on the disk? And why can’t I hear the drive being accessed when I try this?
Something very weird was going on with this machine’s SCSI setup. And the floppy drive. And without an AUI adapter, I also couldn’t expect to net-boot the machine.
Frustrated, I decided to shelve the computer for a few months and come back to it later. And by “a few months,” I mean, like, seven years.
Several Years Later…
Picking the project up in 2025, I decided I would use my BlueSCSI in Initiator Mode to dump the disk. I had been dumping a whole lot of other SCSI disks lying around the house, and the mystery of just what was on this Apple ROM disk had been gnawing at me.
Unfortunately, as it had been a few years in the interim, the drive had seized up again. Curse you, entropy.
No amount of hammering seemed to be able to get the stuck spindle free this time, and I stripped one of the screws badly trying to remove the lid. After a few sessions of no progress, I was getting angry messing with it, so the hard drive went in the freezer for a bit to see if that would shrink the horrible rubber and loosen its impervious hold. Surprise, the thing that makes no sense didn’t work either.
After several attempts at freeing up the drive, I put it on the shelf. We’ll drill out this screw, free up the bumper, and dump it some other day. Who knows what mysterious (Mac?) treasures could be living on this hard drive?
Even though this part of the project was a failure, it got the SparcStation uncovered, and opened. So why not take another whack at fixing it?
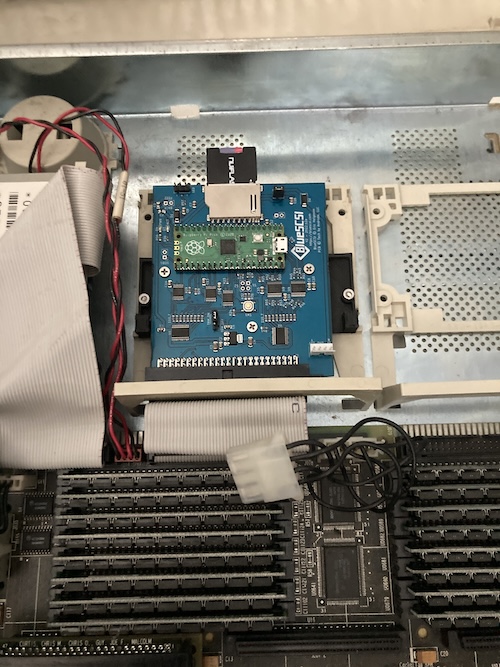
Even if the Quantum had spun up and worked, I decided it would be best to start over with a known-good drive. I put a BlueSCSI v2 SCSI emulator inside the SparcStation, with a known-good install of SunOS. And what better way to do it than to build a fresh disk image in the very same emulator that I once used to play Time Killers?
MAME-ing myself
I knew that the sun4 machines were supported in MAME, so I went looking to see if anyone would hold my hand through the process. That was a bit too much to ask, but I did get basically 90% of the way there from reading this wiki page on installing SunOS into MAME1.
After starting MAME with a valid SparcStation BIOS ROM and configuration, I had to boot cdrom, then tell the partitioner the type of disk I was running2. I didn’t know what “random 2.0GB compressed file” was in Sun-land, so I picked “Sun 1.3G” and then proceeded to partitioning.
The partitioning utility lets you pick a pre-defined layout based on the aforementioned type, which had two options for the 1.3 gig drive. I picked the “standard” one, because I don’t drive an automatic. After writing out the disk label (now I know what that is!) and rebooting, I was able to run suninstall and install the rest of the operating system.
Of course, it then punted me out to OpenBoot without any idea what to type to boot into my new operating system. After some stumbling, I determined it was boot disk3. At one point, I had to set the date and time, and the installer really did not like the idea of it being 2025. Me neither, bud. We’re all trying to get through this together. I lied to it, and said it was 1997, which has the same days of the week as 2025.
I got all the way into OpenWindows before I realized I didn’t know how to run shutdown from a regular account…
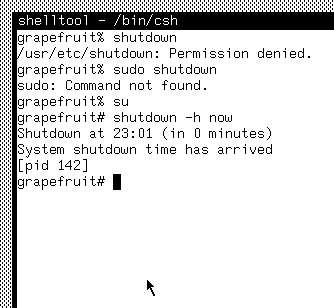
When in doubt, pop a root shell. No idea how you’re supposed to safely turn off your expensive workstation if you’re a lowly engineer without root access, but such plebian problems are beneath me.
So now I had a two-gig CHD file containing a working SunOS installation. How was I gonna get it to the SparcStation so I could enjoy the fruits of all this labour?
chdman extracthd looked like the best course of action. That dumped out a roughly 2-gigabyte flat file. I offered that up onto the BlueSCSI’s SD card, along with the CDROM image.
I crossed my fingers that I had gotten all the filenames right, but that was going to be the least of my issues…
Big Sparc, Little Smoke
After many years, it was time to introduce power into this machine once again. I had to root around my workshop to find the Sun 13W3 video adapter, but thankfully the keyboard and mouse were big enough that they were hard to lose. Of course, it had been wedged into a corner where it was not especially usable, along with a pile of other dead and half-dead machines that had been piled up in the area since the little Sun’s pseudo-accidental decommissioning.
While inspecting the machine again, I noticed that the black plastic part of the keyboard port was falling out. I shoved that back in, and made a mental note to glue it up later.
First, I plugged the BlueSCSI in without any power cables. I figured that the SS1+ was new enough to provide termination power on the SCSI connector, and therefore it would be enough to power the BlueSCSI without having to run any power cables.
To my surprise, I was wrong. The BlueSCSI didn’t light up, and the SparcStation hung after showing the sign-on banner. Stop+A didn’t work to break into OpenBoot. That sure sounds like what happened back in 2018 when I didn’t have any disks installed at all, doesn’t it?
I went rummaging through my cables for a Molex-to-Berg power adapter. Despite knowing that I had some good ones downstairs, I decided I would instead save myself the trip and get some from my ancient bin of 90s cables. In a SATA-to-IDE adapter board box, I found one.
I plugged it in, and the BlueSCSI’s power LED lit up.
The voltage regulator on the Pico lit up, too.
And smoked. Huh.
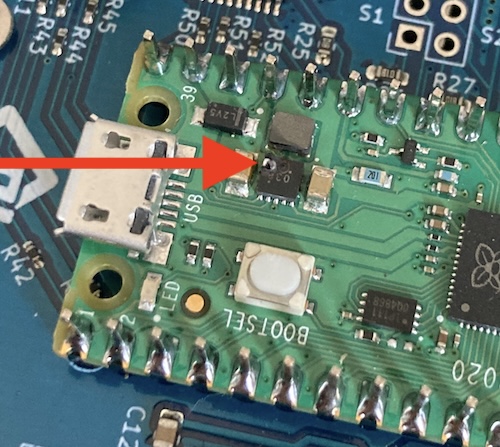
After quickly shutting everything off, I unplugged the BlueSCSI and checked the voltages coming out of the SparcStation. +12V was coming out of the red wire on the adapter. Someone a long time ago had wired the Molex end backward in this adapter, while wiring the Berg end correctly. I didn’t notice, because the cables coming out of the SparcStation are all black3. If I had seen a red/yellow mixup between the motherboard and adapter, I would have never turned it on.
The Pico on my BlueSCSI was now dead, having been force-fed +12V in a place that it expected to receive only +5V.
The microSD card that was in the slot at the time also refused to mount or even identify later on my modern computers, so the damage was quite comprehensive.
In the future, I’m going to swap out the Pico and see if the BlueSCSI comes back to life. I will probably also see if the stricken Pico works when powered directly from 3.3V with the voltage regulator disabled. I’m not confident that the board will be in good shape, especially the level shifters, as they would have also gotten whacked with the twelve volts that killed the SD card. It will be more of a “for fun” project.
Luckily, the SparcStation itself seemed to be fine, with it able to boot to the same useless “just the banner” screen as before I installed any hard drives. Still, it would be hard to tell for sure until I got another hard drive in here.
Note to self: don’t feed your five-volt peripherals twelve volts.
Land of Con-Fuse-ion
After I was done being extremely angry, I got to thinking. If only termination power had worked, none of this would ever have happened.
And, you know, it’s kind of weird that the SparcStation 1+ doesn’t have termination power. It’s a pretty modern computer. Although I wasn’t initially able to find conclusive documentation either way due to the collapse of actual useful search engines, the “Sun-Managers’ Old System and Software Frequently Asked Questions” FAQ says this:
On newer machines (sparcstations and later), many people have done this [hot swap SCSI devices] regularly without problems. Halt the machine (sync;L1-A), remove or add the device, then continue. However, it is possible to blow the SCSI termination power fuse on the motherboard. If your machine hangs immediately on powerup unless the SCSI bus is externally terminated, this fuse (2A Littelfuse) may need to be replaced. Caveat Emptor.
The sunhelp hardware reference FAQ concurs, and further says that a SparcStation 1+ does indeed have this fuse:
18) My SPARCstation 1/1+ says “The SCSI bus is hung. Perhaps an external device is turned off.” when I try to boot, or it locks up completely after displaying the banner. What do I do?
Check the SCSI termination fuse, located on the motherboard near the external SCSI connector. The fuse looks like a small cylinder that is usually clear or totally black with a black top and white writing. It is in a socket and is easy to remove. If adding an external device that powers its own terminator makes the machine work, the problem is definitely the termination fuse.
You know, this system is hanging on startup with no SCSI drive inserted (see above, in “hangs after banner.”) And before that, it complained that the SCSI bus was hung. Is the fuse blown?
I pulled out the TurboGX card and looked around the vicinity of the external SCSI connector. To my surprise, I found two fuses, along with a third one close to the keyboard port.
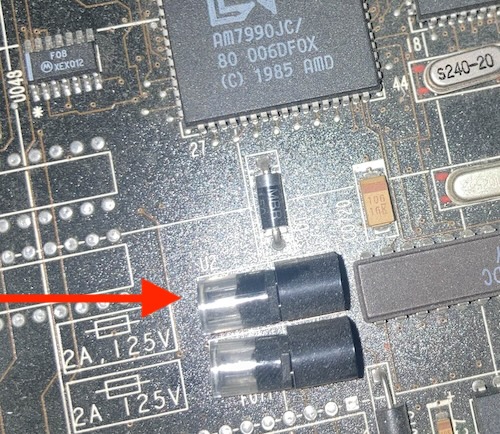
Checking them in order, I found that the one marked “U2” was open. Both of the other two fuses were intact. Checking part III of the Sun hardware FAQ, it was confirmed that U2 is the SCSI termination fuse on the 4/60 (SparcStation 1) and 4/65 (SparcStation 1+) motherboards, Sun part number 150-1174.
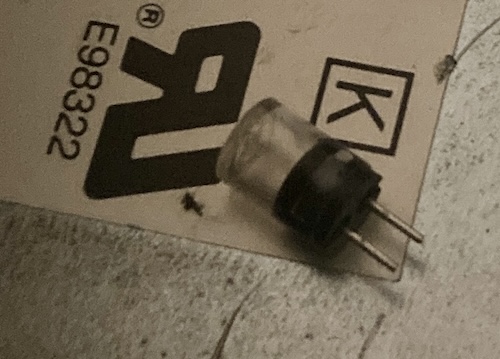
Blown fuse! Time to get another. On the top is written “125V 2A LF,” which confirms that it’s a Littelfuse part. However, a couple years have passed since it was made, and Littelfuse has changed hands quite a few times, and what’s left of Sun probably isn’t about to sell me one. Would I still be able to find whatever fuse this was?
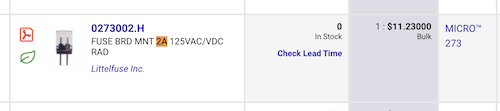
After some searching, I was able to figure out that this is called a Micro 273 fuse, part number 0273002.H, and they are still in production. Unfortunately, Digi-Key wanted $11.23 Canadian for one fuse, and they were also out of stock.
My luck finally began to turn when I saw that Littelfuse had a samples program that included the 0273002.H, so I ordered two. Hey, I might need another depending on how this goes.
At the time of writing, they haven’t shipped these sample fuses yet. When that changes, I’ll change this sentence.
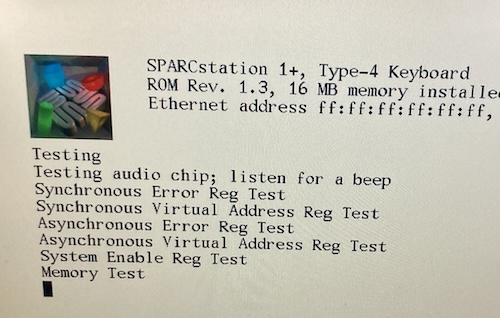
In the meantime, I swapped the intact Ethernet fuse to the SCSI position and fired up the machine with no drives in it. Sure enough, it got past the banner immediately and proceeded to the self-test. After a couple minutes, it kicked me out to the boot prompt. This is what I had been expecting it to do back in 2018, so at least we’re making some progress.
Not having bus termination would sure explain some of the weird stuff going on with this computer.
Fuses don’t just blow on their own. Who or what blew the fuse? Considering the shenanigans with the SCSI cables and the mismatched Quantum hard drive, I’m guessing the previous owner, or even the recycler that sold it to me. The FAQs blame hot-swapping SCSI disks for blowing these fuses, but I can’t imagine a lot of people using a Sun workstation would ever think that’s okay to do.
It’s too bad I didn’t figure this out before I turned a BlueSCSI into very expensive smoke, but that miswired cable would have eventually killed something anyway. I’m glad it wasn’t the entire computer.
Another emulator
All of my BlueSCSIs were being used for other purposes, so I needed another disk emulator to keep momentum going on this project.
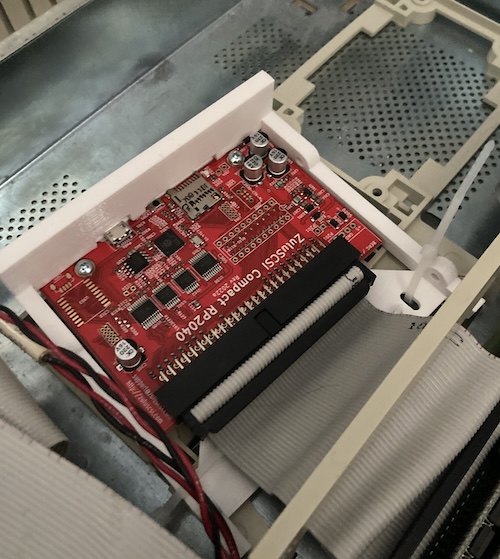
Drake was out of BlueSCSIs, so I ordered a ZuluSCSI Compact RP2040 with mounting brace from DECromancer. I’d been meaning to try out the Zulu for a little while, and this seemed like the perfect excuse.
The mounting brace is not exactly what I thought it would be. I figured it would be an adapter plate so that the ZuluSCSI would easily screw into the Sun’s plastic standard hard-drive retainer like any other internal hard drive, but it seems to be designed for use as a front-panel for a computer with 3.5” bays.
I took the opportunity to redo my disk images, as well. Having the mismatch between the 2-gig file and the Sun1.3G layout was bothering me, so I decided to create a whole new image of the correct size.
The BlueSCSI platforms page for the SparcStation tells me that a Sun1.3G drive is 1,369,661,440 bytes long. I went ahead and used chdman to produce a hard drive image of that size, and then repeated the SunOS 4.1.4 install as described in the previous section.
This time, I picked the “full install,” instead of opting only for a developer-style workstation. We’ve got one point three gigabytes of storage, man. We’ll never run out! And if we do, I’m sure I can figure out how to use up the rest of this 8GB card on a second “drive” that gets mounted into the tree.
I plugged the SD card into the ZuluSCSI, and it was time to party. Unfortunately, nothing came up on probe-scsi, so obviously booting would have failed. The ZuluSCSI blinked five times rapidly at startup, which indicates “SD card not detected.”
I noticed a suspicious-looking solder bridge on one of the buffers, so I took a picture and sent it to the ZuluSCSI support email written on the board. Alex got back to me within a half hour (on a weekend, even) and explained that it was normal and not to worry about it. After some more back-and-forth, he asked if it was running the latest firmware.
I had no idea what firmware this board was running, so I plugged it into a USB cable and got ready to flash a new Pico UF2 file on it. But at that moment… the LED blinked only once. When it was plugged into USB power, the ZuluSCSI had absolutely no problem seeing the SD card!
I went back to the SparcStation and plugged it back in. Five blinks. I measured the +5V power at the unpopulated Berg connector on the top of the ZuluSCSI, which should be reflecting how much power the RP2040 microcontroller is seeing from the SCSI termination line.
It was only showing 2.4 to 2.6 volts, which is certainly not enough for a 3.3V system, and definitely not enough for a 3.3V system that expects to be given a 5V power source! Termination power, it seems, was still not in great shape on this SparcStation after all.
After some grumbling and anger at the universe, I decided to externally power the ZuluSCSI.
USB powered
It was getting late, so to temporarily test this theory, I ran a too-short micro-USB cable to an old phone charger and powered the ZuluSCSI inside the SparcStation. Now, probe-scsi would actually return some devices!
After some fumbling, I managed to get the SparcStation to attempt boot by typing the command boot sd(0,0,0)vmunix, which got it as far as trying to mount the /usr filesystem (at /dev/sd3g) and failing.

We’ll get to that complaint about the ZuluSCSI-brand CD-ROM drive later.
I think this is because I built the image while telling MAME it was at ID 0, but the firmware does a little swapping for historical reasons, and maps ID 3 into ID 0 and vice versa. So that “3” in /dev/sd3g probably means the SunOS install was done thinking it was at SCSI ID 3, which is really at SCSI ID 0, which means that telling the ZuluSCSI to mount it at SCSI ID 3 makes the computer think it’s at SCSI ID 0 which means it should be getting it from /dev/sd0g but is not. Confused yet?
I renamed the HD3_512.img hard drive image to HD0_512.img and then started the system again. After typing boot sd(0,3,0)vmunix I was soon inside SunOS. After login, it started OpenWindows and the OpenLook window manager. In colour.
Unfortunately, at this point I wasn’t sure how to get out of it and safely shut the computer off. I hadn’t plugged in a mouse, I wasn’t sure if the mice could be hot-plugged, and I didn’t have the right mouse pad for the (optical) mouse, either. After a little fumbling and key-pressing to try and get a terminal to appear that I could type into, I gave up and switched the SparcStation off at the switch on the back.
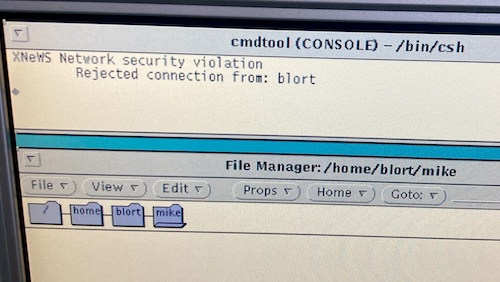
I did see a mysterious “network security violation” error on the open console complaining about refusing a connection from itself (the hostname blort,) which I didn’t see in MAME. It seems like that would have kept me from getting a usable terminal even if I had a mouse installed. I wonder what that’s all about?
Conclusion
There’s a lot more to do with this thing before it can become a fully operational SparcStation:
- Find a usable mouse;
- Find a fuse for the Ethernet, and get it working;
- Figure out what exactly is going on with SCSI termination power on this system, and what regulates it;
- In the meantime, put a Berg connector on the ZuluSCSI so I’m not using a phone charger to power it;
- Bodge a battery onto the NVRAM module so we can have permanent settings and not wait minutes for a memory test every time;
- Glue the loose plastic part of the keyboard port back in, if that’s even possible;
- Upgrade the ROM to the same version I used in MAME, and see if that supports the other video card I bought;
- Figure out how to work OpenLook well enough to write some code.
Phew! Making a working computer out of someone’s dumpster liner is hard work.
For now, though, this is the most progress made in the last, oh, eight years? I’ll take it.
Thank you to everyone who gave me advice on how to misuse this once-expensive machine as an e-waste toy. And thank you to Sun, for making this system very wide and very flat, so I could stack other broken computers on top of it while I was waiting to fix a problem that (in retrospect) was very obvious.
Thank you also to you for reading.
If you’ve got a broken old computer you haven’t looked at for a while, you should dust it off and give it a try. What’s the worst that could happen, letting the magic smoke out?
Repair Summary
| Fault | Remedy | Caveats |
|---|---|---|
| A perfectly good SCSI emulator seems to be smoking. | Don’t mix up +5V and +12V next time. | |
| SCSI initialization appears to hang forever after banner. | Replace blown SCSI fuse at U2. | It is still unknown why the fuse blew. |
| ZuluSCSI refuses to identify SD card. | Add additional power. | I still don’t know why termination power is so weak on this SparcStation; it should “just work.” |
-
What even is the difference between SunOS and Solaris? SunOS >= 5 became “Solaris 2,” but it’s not just a naming exercise. Along with several other Unix vendors at the same time, Sun wholly changed the source base of the operating system from BSD to a “unified” Unix System V, after several years of slowly altering SunOS to be more compliant with the latter standard. ↩
-
Based on the questions I got asked when I picked “custom,” this relates to the geometry of the disk. ↩
-
The cables also look badly soldered, and not crimped, so I wonder if these are someone’s homemade cables. This poor SparcStation has seen a lot of action. ↩