Attempting CoCo 'brane surgery
Tags: computer tandy coco keyboard corrosion repair
Without a working keyboard, the CoCo that I’ve been working on over the past few months might as well be a fancy desk ornament. When I took a look at the keyboard last time, the membrane had some pretty serious damage to its carbon conductive traces. Before spending money to replace the keyboard, I’m first going to try and fix those traces with the conductive paint I already paid for.
I picked up some “Electric Paint” conductive paint to try and fix the broken volume potentiometer on the PC-6001, and it worked pretty well for that task. This success made me feel comfortable that the paint was probably worth trying out in order to redraw the traces of the membrane.

The ugly rusty screws holding the case together still haven’t been replaced. The grit and gunk in the head of those screws means it’s a little more challenging than usual to remove them from the computer. Once the keyboard was out, I put the rest of the computer together loosely and put it aside so it wouldn’t have to watch me brutalize its poor keyboard.
Taco ‘Bout That Membrane
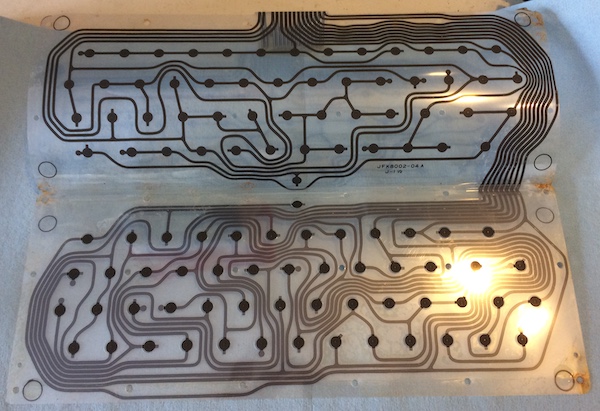
I worked my way around the periphery, removing any glue that was holding the two halves of the keyboard membrane together. This went surprisingly easily - it just split in two and popped open as soon as I gave it a little bit of force in the corners.
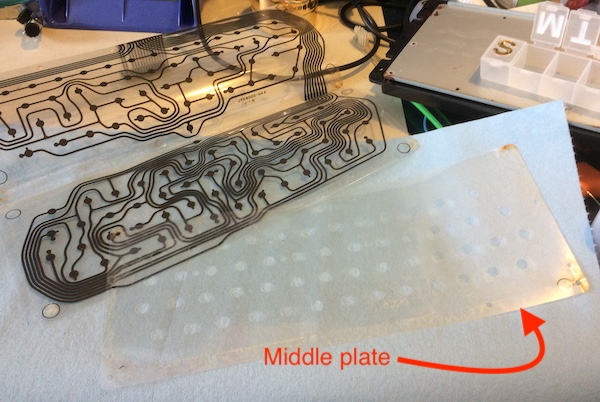
There is a little non-conductive plastic sheet that goes in between the fold, so that the keyboard layers aren’t always touching each other. This is an important part, so I took it off the bottom (very carefully - the glue here was still extremely sticky) and set it aside so I could get a look at the traces.
These looked broken, and the multimeter’s continuity-test mode agreed. Most of the broken/flaky-looking traces were still intact, but showed resistance too high to be considered “continuous.”
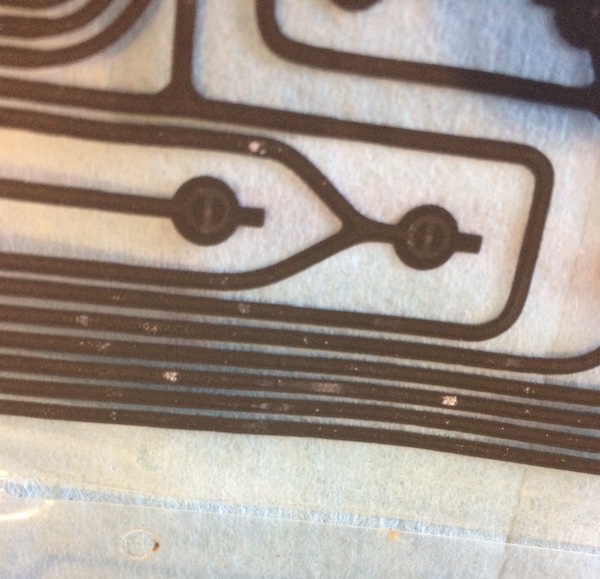
I started “walking” along the tracks a little bit at a time with the multimeter probes to try and isolate some breaks, and then once I was convinced I had caught a few, I broke out the paint. I used a toothpick to apply it, but my technique was lacking.
In theory, this is a pretty easy task. The wiggly nature of the thin plastic membrane and the abnormal behaviour of the paint made this a challenge to cleanly apply.
My first attempt (to fix the long broken trace identified in the previous entry) produced a huge glob of paint. It’s difficult to remove the paint once you get it onto the plastic, so you need to be right the first time. Even so, I think I managed to clean it up fairly well, and it was best to start way away from the other traces to avoid bridging them by accident while I was still figuring out my strategy.
What seemed to work the best was to place the head of the toothpick perpendicular to the trace, and then use the conical pick tip to apply the paint. I fixed some more traces - not too many to start, in case it didn’t work - and only ran my hand and wrist through the small blotch of paint I was using for my palette about thirty times.
I also took the opportunity to brush some MG Total Ground, a similar paint intended for resistance, onto another bad part of the trace so I could test them both at the same time.
Then, I let both test samples dry. After about half an hour, I still didn’t see any continuity on the trace or within the paint blob, which is not what I was expecting at all.
Even though I was disappointed, I remembered that the paint initially displayed really high resistance on the PC-6001’s volume pot, but as it dried that resistance would drop. It was also really cold that day, even in the shop. Looking at the taco-like shape of the membrane being opened made me hungry, so I went to get some lunch.
At two and a half hours past application, the resistance across the test blob was still dropping. After a few days, it had pretty much bottomed out. I wasn’t super happy that I wasn’t getting a continuity beep.
Test Fire One!
The Total Ground remained at the same high resistance forever - no surprise, as it is intended to be resistance paint. I ended up brushing a bit of the Electric Paint over it, and let that dry for a few more days. Then, I reassembled the keyboard to see if painting a handful of traces actually repaired anything.
I was surprised by the results!
| Still-working keys | 2, 3, 6, 8, 0, :, Up, R, P, Left, S, D, F, J, K, ;, Enter, Z, X, C, V, B, N, ., /, Right Shift |
| Newly fixed keys | 4, 5, 7, -, W, E, T, U, P, L, M, comma |
| Still broken keys | 1, 9, Q, Y, I, @, Right, Down, A, G, H, Clear, Left Shift, Space |
| Total working keys | 40/53 (75%) |
We’re going in the right direction! I didn’t think this would work at all, especially with the wonky resistance readings, but it clearly fixed at least a few of my test traces. Impressed, I decided to tear the machine apart for another attempt at repairing the membrane traces, this time exhaustively.
Let’s look at the matrix again:
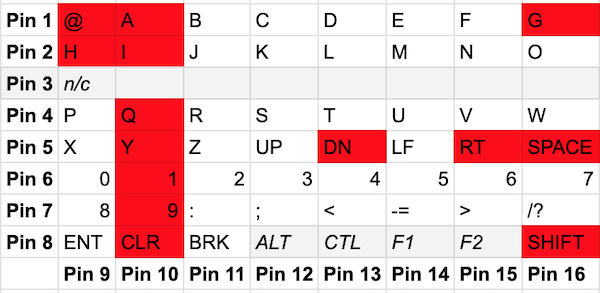
There’s still an entire bad column. I’m not entirely sure what’s going on with the arrow keys. It’s weird that you can have one bad key and have the ones that come after it on its row/column still work.
All in all, a pretty solid experiment. Can I actually get this thing fixed?
Test Fire Two!
Emboldened by the knowledge that the membrane might be fixable after all, I proceeded to fix some more traces. This is a little difficult, since most of the corrosion damage is only visible on the non-conductive side, which means I had to constantly flip the mylar over and try to remember which side was which. And if you’ve seen me make PCBs, you know that I have a lot of trouble keeping track of which way things go when you flip them over. I also bridged a couple of traces with the paint, but swiping a clean toothpick through the bridge seemed to clear it.
I found a broken trace almost immediately at the start of where ‘pin 10’ starts on the bottom half of the membrane, and cleaned that up. I also touched up the little breaks that I could see, and spent a lot of time meticulously painting the two-inch long bald patch on the outside trace that runs all the way around the board to the space bar. It wasn’t an intense job by any means, but not fast at all, which tends to sap my motivation.
I waited a few more days for it to dry (if only this would happen faster!) and then tested again.
This was sort of a disaster - although all the keys that were not working before were now responding, some of them were tied together with other keys so that pushing one produced two, or produced the wrong keys entirely. For instance, space produced XY, left shift pushed return and cleared the screen, and 1 produced 01. Obviously, I had bridged the traces with some errant bits of paint… which is very easy to do when you’ve got a pretty globby paint on the end of a toothpick and are rushing through a job.
Chastened, I tore the machine apart for a third attempt at the membrane.
Test Fire Three!
I had noticed before that painting to flexible plastic isn’t a really great cure; the paint seems to lift in some spots if the plastic gets flexed. Trying hard not to twist the plastic and break the traces, I picked away at the obvious bridges with a toothpick and then reassembled the machine for the nth time. This time, I got the following results:
| Broken keys | 7, W, O, G, left-shift, space |
| Total working keys | 47/53 (89%) |
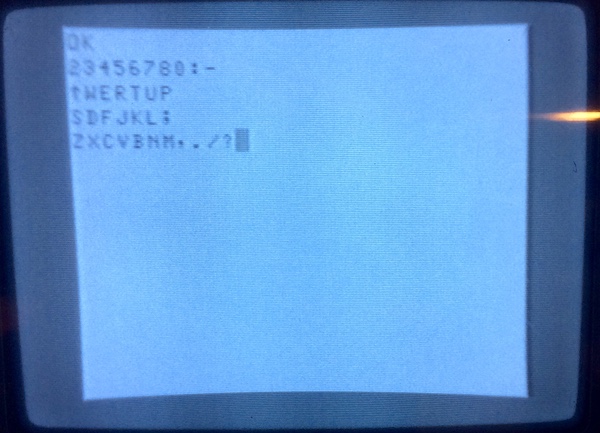
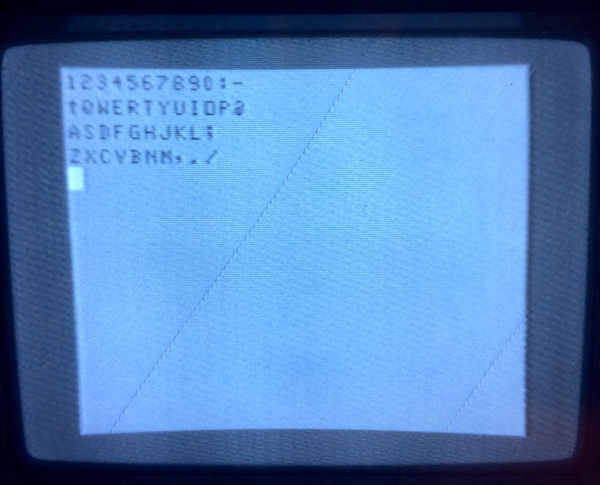
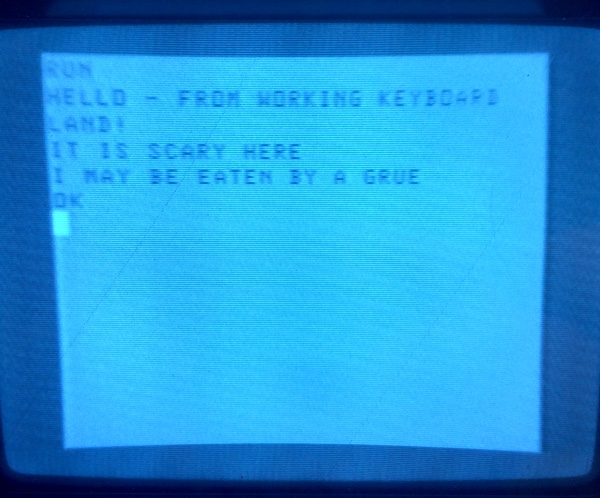
While it appears some keys had regressed, I at least now had enough to type PRINT MEM (most Microsoft BASIC implementations don’t really care about spaces - that’s how the truly elite saved a byte or two on their programs!) and get the readout.
It was at this point that I realized that the right and down-arrow keys actually did respond, but only when shift was held. It seemed like they made sane characters, so I considered them fixed for now.
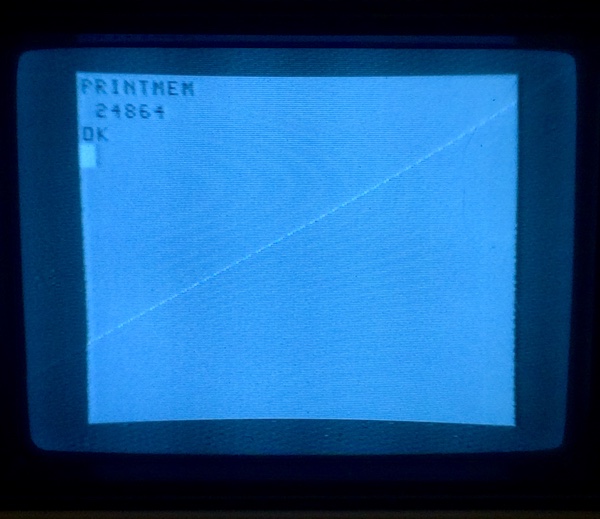
24K free? There’s no way this thing has only 16K. It’s definitely been modified. Now I’m getting excited.
It’s kind of interesting that left shift and space on the previous step worked (albeit through a bridge), and now they don’t work at all. With only six keys left to repair, I was in the home stretch.
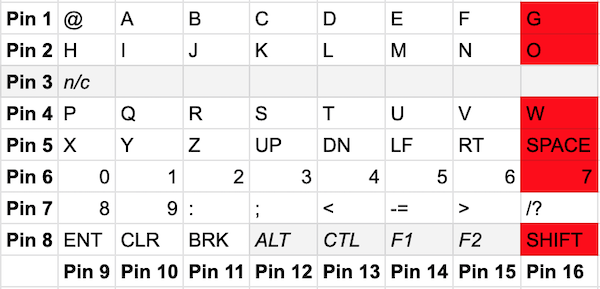
There’s another pattern, too. Only the keys in this column are still bad gone bad - so the fresh break is probably very early along all those keys. I guess I just got lucky when I “fixed” some of them since the last time.
Indeed, when I split the membrane after this, I found that I had pulled up a big chunk of trace 16 from the adhesive that holds the inner mylar sheet. There was an extremely obvious missing bit. With some careful painting, I globbed on enough to repair the break, and hopefully give it some strength.
I waited a day for it to dry, and then went to test it again… and no change at all.
Angry words were said. You would think you could live without six measly keys, but you absolutely can not.
Test Fire Four!
My best guess, based on metering the membrane, was that the additional conductive paint had added too much resistance. While the circuit was still “complete,” even short distances over the conductive paint were well into the 4-5kΩ range. All that resistance probably kept the keyboard logic from switching properly.
The Electric Paint knowledge base admits that the resistance goes up pretty quickly with length. I had read this before I used it on the PC-6001, but I didn’t internalize it at the time. “Sheet resistance” is one of those things where a human brain just really can’t comprehend it very well. Or at least not my human brain.
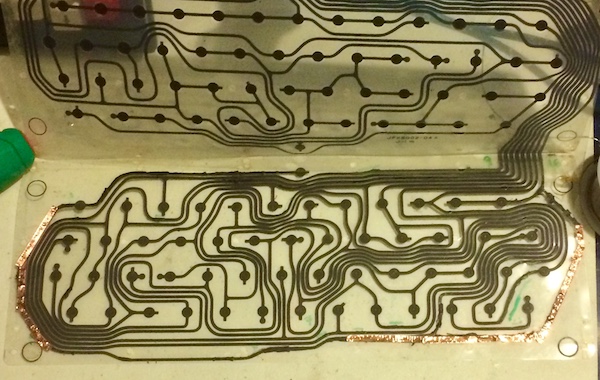
My next step was just to throw more money at it. I bought some conductive copper tape off Amazon. Then I cut that tape to width and laid it down over the more heavily “repaired” parts of the membrane. I was hoping the resistance would drop. It did - quite dramatically in some places. Resistance measurements from the furthest point (the space bar) back to the main trunk of the trace were still over 2kΩ, but all the keys before the really long side trace were now well under 500Ω.
Before I went any further, I put the machine together and tested to see if it would indeed revive the other keys.
| Broken keys | left-shift, space |
| Total working keys | 51/53 (96%) |
Now we’re talking. I could live without left shift and call it done, but… I really want to have the space bar.
Test Fire Five!
This is probably really like test fire eight, but who’s counting? If I were counting, I probably would have also counted the amount of time this took to disassemble/repair/reassemble/test (definitely into the double-digits of hours), and given up on it.
Luckily, I didn’t give up on this poor battered little keyboard.
Once it was apart again, I did a full continuity test around the space bar line until I found a dead spot of paint. It didn’t dry to the plastic but was instead just loosely bridged. Some bumping with the probes shook it loose, and then I made a nice copper tape replacement for it (see left side):
Did this work?
| Broken keys | ∅ |
| Total working keys | 53/53 (100%) |
Now I have a working CoCo1 keyboard! This is awesome. I typed on it for about fifteen straight minutes to see if repeatedly beating on it would make the repair fall apart, but it didn’t seem to so far.
I’m not sure what’s next for this plucky little guy, but I have a lot of options:
- Mount floppies over a serial connection to a newer computer using DriveWire and a homemade serial cable, then play a bunch of games;
- Do the same thing but with the CoCo SDC;
- Do a composite video output mod so I can use it on more monitors around my lab than just the slowly-dying monochrome Citizen portable, which was picking up more and more circular, pulsing interference the longer this testing went on;
- See if I can get OS-9 running on this thing;
- Learn machine language for the 6809 by implementing a Forth;
- Build a joystick;
- Build or find a cartridge.
These machines have a lot of flexibility and a surprisingly strong community behind them. If you get a chance to save a CoCo, you should follow my lead and pick one up - even if you have to fix a keyboard membrane to do it. They might be just your type.
Repair Summary
| Fault | Remedy | Caveats |
|---|---|---|
| Many keys don’t work. | Repair keyboard membrane with copper tape, conductive paint. | Paint is likely to break in future as membrane is flexed. |