Pippin in My Orchard
Tags: console apple bandai pippin pickups repair
One of my white whales finally came up for a price that I could justify. Let’s see just how wounded it is, and then welcome it home with a little bit of help from some smart friends.
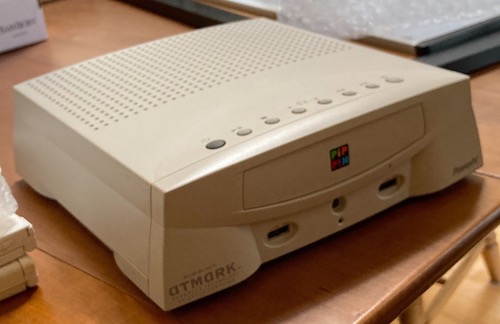
The Bandai Pippin, in case you’re unfamiliar, was an attempt to produce a game console and/or set top box. Apple would define the standard and provide some of the hardware, and the licensee would integrate Pippin technology into their consumer products. It’d be a cheap way to surf the Web, or enjoy interactive content.
This is technically a Bandai Pippin Atmark, which is the name for one variant of the hardware that Bandai constructed around the Pippin standard for the Japanese market, the other being the @WORLD. They also made American models, which by all accounts are rare as hen’s teeth. A Norwegian firm, Katz Media, also licensed the platform and made a sleek black model known as the KMP 2000 for Europe and Canada. I’ve never seen a single one of those, so I’m not sure which part of Canada it was destined for.
Like a lot of 90s Apple products, they didn’t have a tightly defined product plan, and some evidence exists that Apple worked hard to extricate themselves from the entire project by the time Bandai was preparing it for launch.
As you’d expect from a 90s Apple product, it’s based on 90s Apple technology and is a gently disappointing Performa-like piece of inexpensive Mac hardware. You’ve got your PowerPC 603 CPU (I’ve yet to hear of anyone upgrading it to a G3, but it’ll happen) on a PCI bus. There’s no 3D hardware acceleration, unlike the period’s front-running Sony PlayStation.
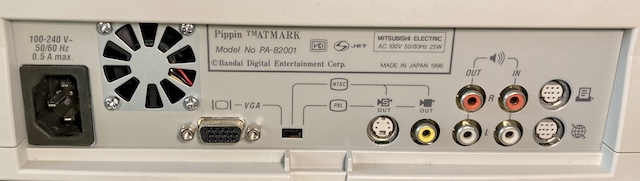
Ports are pretty typical - VGA, composite out, RCA audio out (and in?!) and a toggle to change between VGA, NTSC and PAL outputs. Why you needed the latter two on a machine destined for the Japanese market, I don’t know. The auto-ranging power supply is very welcome, however, and it’s fun to see that Apple stuck it out with the regular old serial port (albeit in GeoPort form) rather than design something proprietary. Easier to set up Bolo that way.
On the underside are two covered-up ports: one holding a giant white plastic blob, which I believe is the (upgradable) system RAM, and the other holding what looks like a miniature PCI slot. The plastic on those port covers felt worryingly fragile, and given that this came out of the “Spindler plastics” era, I’m not going to be signing up for any more prying than I strictly have to.
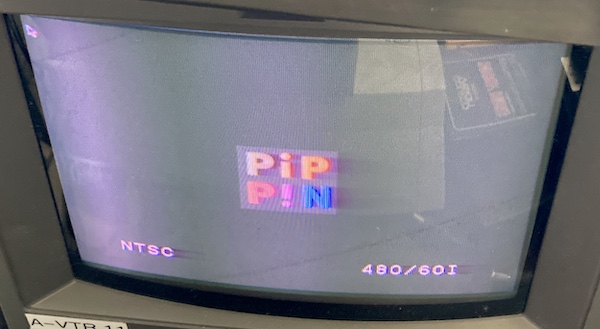
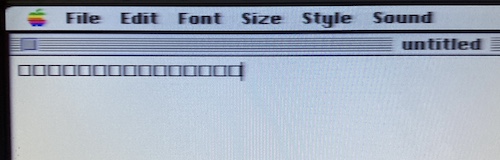
It’s that Macintosh-based aspect that I find the most interesting part of the Pippin. I do love my gently disappointing 90s budget Macintoshes, and my short time with the machine so far confirms that the quirky Apple charm of that era has shone through. For instance, the startup screen shows a Macintosh mouse cursor:
For input devices, Apple wrapped ADB in a sort of ruggedized connector called “P-ADB.” It’s not at all clear if they’re hot-swappable, but I certainly hope so. My Atmark came with the standard AppleJack Pippin controller, which looks sort of like an abbreviated Saturn controller with a mouse trackball in the middle of it.
Update: I’ve changed this from “AppleJack” to “P-ADB.” The controller was named AppleJack, but the connector itself is correctly referred to as P-ADB. Thanks to Keith Kaisershot for noticing this.
This controller is why I think this particular machine was affordable. The ad just said “controller malfunction,” which could be as simple as a dirty contact inside the controller, or it could be as ugly as a damaged ADB (or AppleJack equivalent) controller chip. The ambiguity could have scared off other bidders, who weren’t willing to get this and then have to come back for another rare controller. I decided to open it up and take a look, to save myself the disappointment of testing it and finding it to be stone dead.
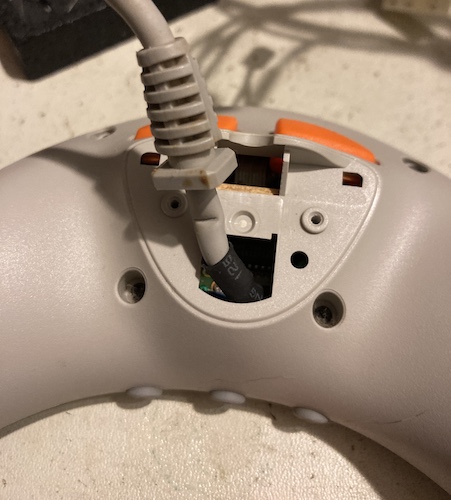
Removing the screws on the back is a bit of a pain. There’s a plastic “hump” here that covers the cable strain relief gland, and one of the screws was cammed out pretty badly with a bit of cross-threading, so it was hard to get both removed and reinstalled. The cable was a little gunky inside the strain relief, which could be some kind of spilled drink, but I didn’t see any other evidence of grossness inside the controller itself.
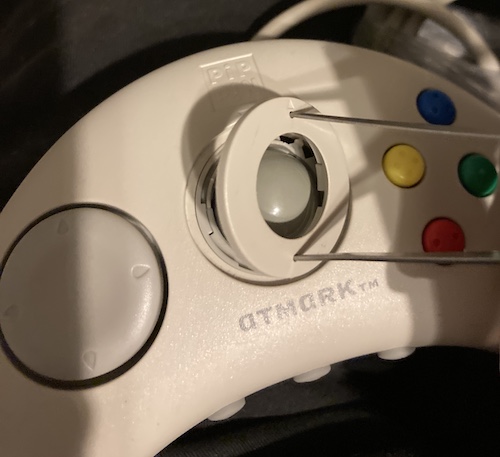
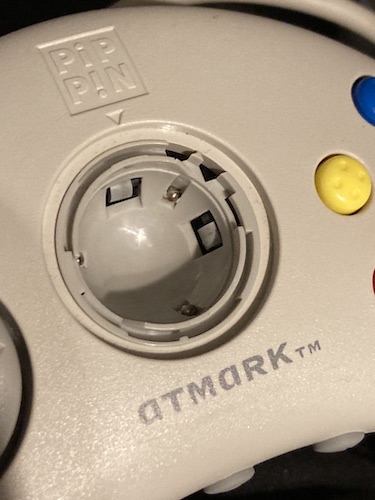
I don’t think it is possible to split the controller without removing the trackball first, because the trackball retainer holds a plastic ring onto the front of the controller. It’s just like an old ADB ball mouse, except the ball is much smaller, and there are some ball bearings in the corner to keep the ball “up” when the controller is facing you. The ring is annoying to remove by hand, but I was able to bend a pair of strong tweezers into the recess holes on the front to spin it out.
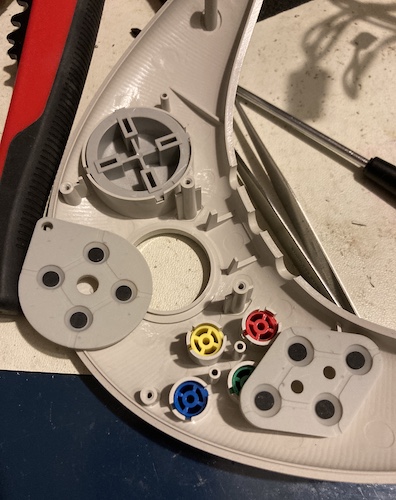
Once the controller is split, I pulled out the membranes. They looked perfect. In fact, most of the interior of this controller looked virtually untouched. Hmm.. it’s almost like people who bought a Pippin new didn’t get much use out of it.

Nothing spectacular was going on with the PCB. There was one soldered-down through-hole pin that looked a little bent, but it wasn’t shorting. You can see that the trackball mount is soldered through it.
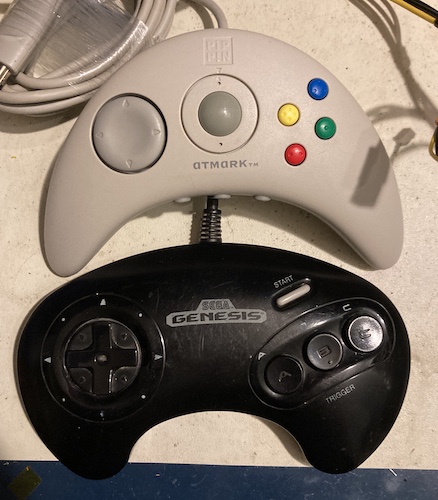
After scrubbing the carbon pads on the membranes against some fresh printer paper to clean off any varnish – there wasn’t much – I reassembled the controller. It struck me then just how small the buttons and d-pad are. Here it is with a Genesis 3-button controller for a size comparison. It’s mildly uncomfortable to use, and I don’t have huge (or even medium) hands.
Other than the screws and the hump, the Pippin controller has very good design-for-manufacture, not typical for a computer part. Clearly, Bandai’s toymakers had some influence on stuff like the buttons having specific keyed tabs so they can only be inserted one way on the assembly line.
So if the controller is indeed malfunctioning, it must be in a way that’s not obvious to me from my previous experience cleaning gross old controllers. Uh-oh.
Test it! Test it!
Unfortunately, I don’t have any Pippin software to test the controller with to see exactly how broken it is.
So first, let’s pirate some Pippin software. The Pippin has some degree of software signing so you can’t just slap in any bootable CD, but freelance genius Keith Kaisershot has built a boot disc that circumvents the signing process. He’s also working on a solution to “Pippinize” your own homebrew software, but at the time of writing it’s not quite ready just yet.
I fired up Pippin Kickstart v1.0.1 just to see if I was burning CDs that worked (at only a few megs, it’s a very quick burn):
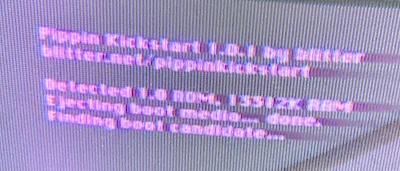
Yep. It appears I have a ROM 1.0 machine with 13 MB of RAM1. ROM 1.0 is kind of a downer because it means I can’t natively boot off of SCSI devices, but between the time this article was written and the time it was published, Keith came out with Pippin Kickstart v1.1, which adds cool graphics and SCSI boot support for my ancient-ROM machine. An aftermarket ROM board would be a cool homemade-hardware project to work on, but I’ve got enough of those at the moment. Thanks to Keith and blog friend Kate for their hard work on this. Now for some games!
Just for laughs, I tried shoving a Power Computing System 7.5.2 boot CD into the drive after unlocking it with Pippin Kickstart. It loaded up and then crashed, but crashed inside 7.5.2, with an “OS incompatible with hardware” error. I wanted to try with my other MacOS CDs, thinking that maybe a “retail” MacOS 8 disc might work, but I couldn’t find them.
Even though you can’t easily run your own Mac applications without the Kickstart disc, there doesn’t seem to be any copy protection on the retail game discs, however. You can just download an ISO and burn it. I picked Super Marathon, a bundling of Marathon 1 and 2 - it made me feel the least greasy about piracy because I already own all three original Marathon games, plus the Xbox 360 port. Hopefully Bungie isn’t going to be too mad about this and send The Webmaster after me.
After burning the game, I crammed the disc into the Pippin and tried to power it up. I initially hooked it up to a crappy IBM LCD because that’s what was closest to the console’s hoarding position, but when that didn’t seem to work (I had forgotten that VGA was a toggle,) I grabbed the PVM again.

Super Marathon booted right up, offering a choice of Marathon 1 and 2. Surprisingly, the mouse cursor and all the menus of the original games (including extremely fuzzy dialogue boxes, drop-down menus and confusing preferences) were present! I expected a little more of a “console-ified” experience rather than just the Mac Marathon 2 program running on the Pippin.
All the buttons on the controller seemed to work. There’s even a dedicated automap button! Bungie did something clever with using the shoulder “mouse click” buttons as sidestep, which feels very natural and satisfying with Marathon 2. Looking up and down is still super clunky, but almost all 2.5D shooters of the era wanted to discourage you from doing that, and with good reason.
My only complaint with the controller is that the d-pad felt a little bit imprecise, which actually seems to be part of the design, and I got used to it eventually. As far as I could tell, this controller was working 100% fine, and didn’t seem to merit the scarlet letter of a “controller malfunction” badge. I doubt my cleaning really fixed anything, so maybe it was as simple as an incomplete test on the part of the seller. Thanks for scaring away the other bidders!
Once I remembered that the VGA/NTSC/PAL switch existed, and toggled it over to VGA again, I was able to enjoy Marathon 2 on the IBM LCD. With the game set to “high resolution” mode, it’s surprisingly choppy - I’m not sure what the video chipset in this thing is equivalent to, but I remember even Power Mac 6100s running the game faster than this.
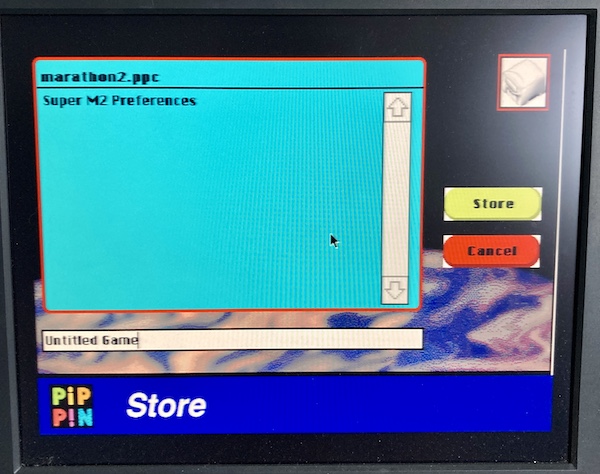
They also got rid of the mid-level save game feature – all of the “pattern buffer” terminals have been replaced with ugly wall textures where they used to go. Instead, you have a weird and somewhat ugly Pippin save screen which must have been part of the SDK. It’s interesting that so many things running on the Pippin seem to assume you have a keyboard – here, you’re asked to name the game you’re about to save. There’s no on-screen keyboard, so it seems that you just keep overwriting your one saved game.
Audio CDs
I figured I would try the audio CD player. Here’s what it looks like:
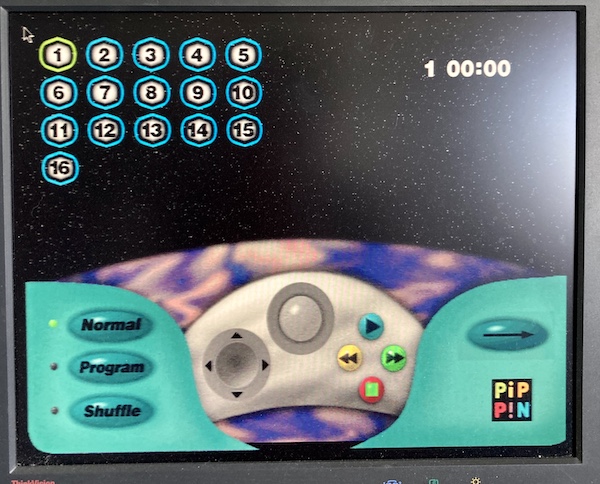
It appears to subtly change the palette of the bottom half of the screen in time with the music (in this video, it doesn’t, but it twinkles some of the stars in the background.) Very odd. When you eject the CD, it reboots the machine (which is the normal case with any software, other than Pippin Kickstart.) You can obviously also control the CD playback from the awkwardly-placed buttons on top of the console itself.
Declockin’
There’s a clock battery installed in all of these, and like any other Mac in my collection, I wanted to pull out the battery before it could leak and do damage. For my purposes (extremely infrequent usage; weird game homebrew) a working real-time clock is unimportant. No doubt this was much more relevant to Web browsers at the time.
Opening the case is pretty simple; it does use a security Torx bit which is a little unusual for a PPC-era Mac, but Bandai loves their Torx bits. The only surprise was having to remove the CDROM bezel in order to get access to the final (front) Torx screw, a caveat which I thankfully read about in the Brian’s Computer Retreat blog entry about disassembling the Pippin. Thanks Brian!
I didn’t have the correct security Torx bit (T10) on hand, so I made a quick order and waited patiently for it to arrive. By which I mean I played some more Super Marathon.
Once you remove all the visible Torx screws, including the aforementioned one in the CDROM tray, you can kind of shimmy the plastic top off of it. I wasn’t super careful with the flex ribbon that connects the play/eject/etc buttons to the motherboard and it popped itself out. The front clips on with four plastic clips - two top, and one on each side.
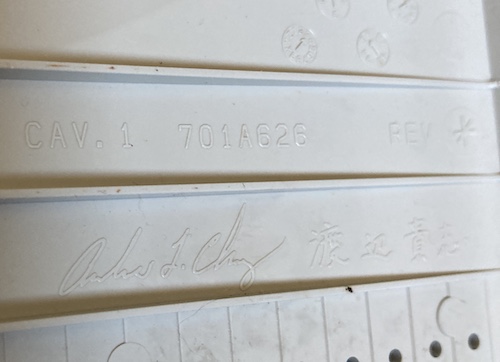
In a very “Apple-y” flourish, the top case has the signatures of some of the people who worked on it. I bet they were happy to get to this part of the project!
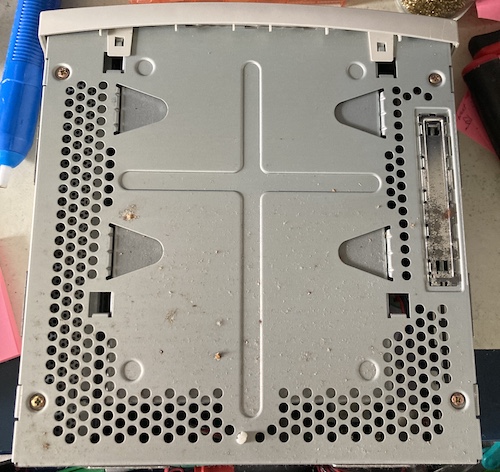
Once all the plastic is off, the metal-caged bottom reminds me a lot of an all-in-one Performa’s guts. I wonder why that could be?
That once-shiny, now-tarnished cover on the right is an access door for the ROM card. I’m not sure how you’re meant to remove this without taking the machine completely apart, because even my relatively small fingers don’t fit in the gaps left behind once it’s pried up.
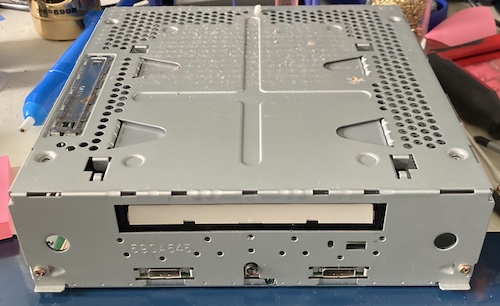
Back to the cage: I loosened all the screws, including the ones on the front, and pried the top cage up with some effort. It’s heavy, because the CD-ROM drive is attached, but there’s lots of room to unplug all three of the cables, including the SCSI ribbon cable with a turquoise pin-1 stripe.
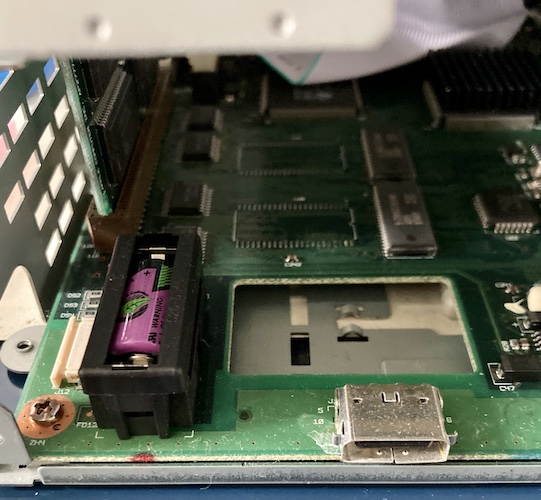
As soon as the cage top and CD-ROM drive start to move up, we can see our target: the dreaded clock battery. Luckily, it’s a Tadiran - I’ve seen very few of these leak, even when they’re decades old. To the right of the Tadiran is a hole cut in the board. That hole looks to be about the size of the old Rayovac plug-in clock batteries that Apple briefly used on some Performas2.
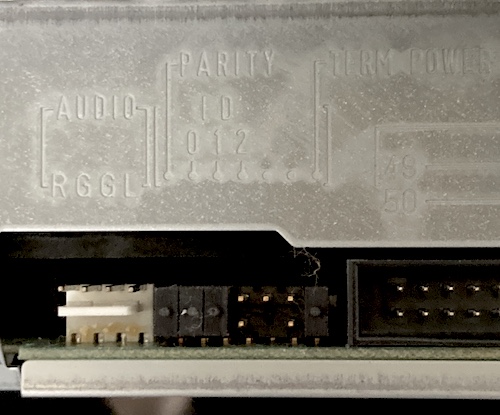
The Matsushita CDROM drive seems to be just a common Mac SCSI one, complete with ID jumpers. The volume dial and headphone jack that would ordinarily stick out the front are depopulated on this board. I gave the cage a quick wash and dry to shift some dust and gunk, but it obviously didn’t do much to fix the rusty spots. It’ll be fine.
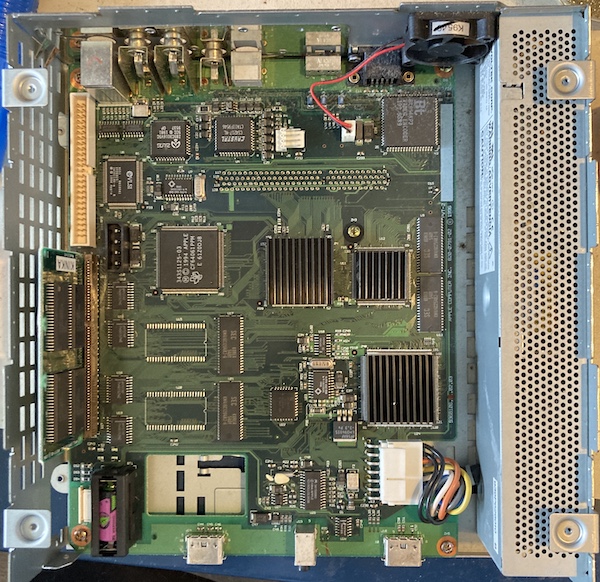
At last, the motherboard is exposed. There’s a lot that looks familiar to long-time Mac users, and just as much that looks somewhat weird. I was disappointed to see that there was no cut-out in the back case that could be punched out to provide an external SCSI port, like the development units and KMP2000 had. It looks very similar to a Performa 5x00 series computer inside.
I yanked the battery, tested it (0.01V!) and then threw it in the jar with the other bad batteries. Thanks for not leaking, now goodbye forever. Then I decided to play tourist while I was in town and snap some pictures of the local landmarks.
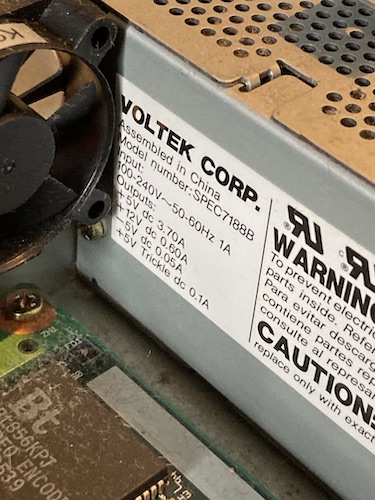
The switching power supply runs the length of the case. It’s a Voltek unit, who also made the supply in my long-gone Power Mac 7100. Not much headroom on that +12VDC rail.
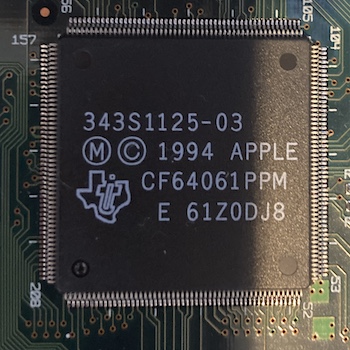
A lot of lines are going to this big Texas Instruments gate array, which I’m guessing does a lot of bus controlling and decoding. It’s one of the few big chips that isn’t covered up by a heatsink, so it probably isn’t hammered as often as a memory controller or video chipset.
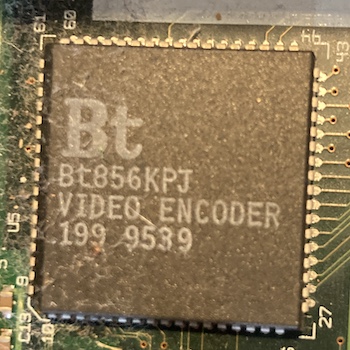
This Bt856 video encoder chip is right underneath the solitary cooling fan, and it got a lot of dust on it as a result. This seems like a fairly popular chip for set-top-box applications, and converts RGB into NTSC or PAL composite video. Judging from the blurry quality of the output, I hope it was also extremely cheap.
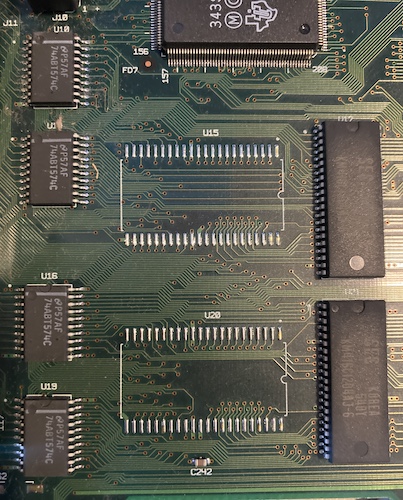
These unpopulated footprints near some RAM are impossible to miss. Since they look to be about the same size and pin-count as the ROMs on the ROM board, I’m guessing these were meant for permanently-installed ROMs somewhere down the line when the ROM stabilized enough that it no longer needed to be on an expensive expansion card slot.
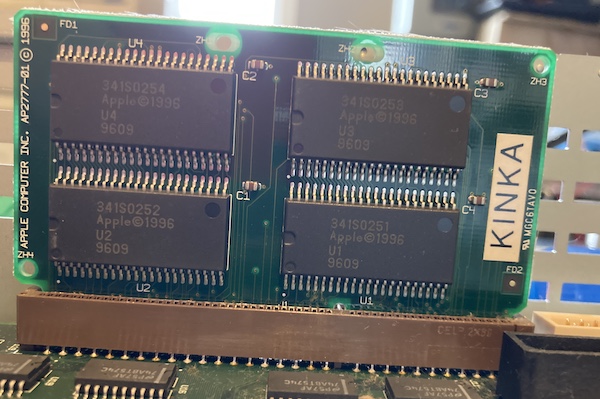
The ROM card itself is in a suspiciously mini-PCI-looking slot. Mine says “KINKA” on it. As we’ve already established, my ROM is v1.0. It’s not clear to me what the meaning of “KINKA” is – it’s likely an acronym – but all the versions of the Pippin ROM seem to use it.
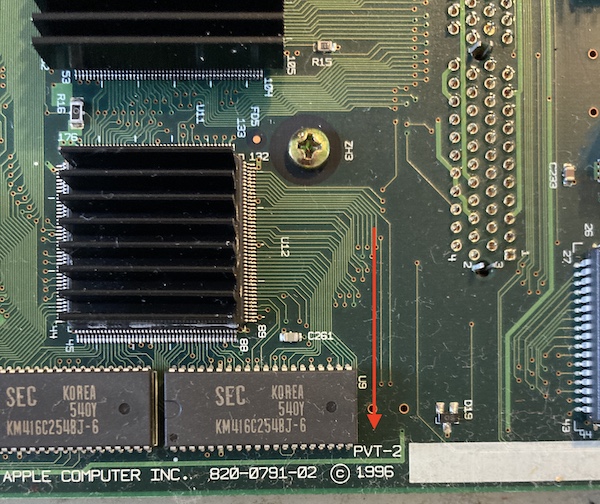
The motherboard says “PVT-2;” at Apple, and likely at other hardware companies, “PVT” refers to “Production Validation Testing.” My understanding of production-speak is very limited, but I think this means that the Pippin must have cleared production testing on the second attempt.
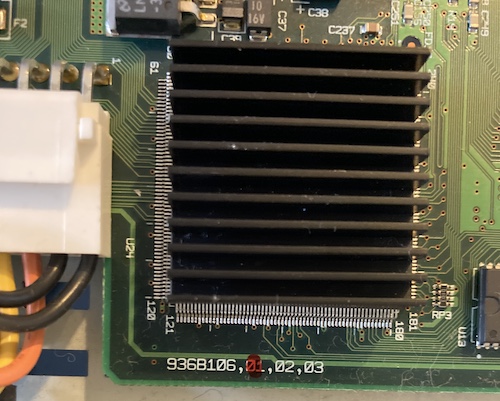
I’m not sure what this marking means. Perhaps there were three “options” of these boards in production and mine is just the normal boring one, 01. Or it was produced in factory 1, and they didn’t want to re-rev the board just to change the silkscreens per-factory. Check out the pin count on U24! This sucker is huge.
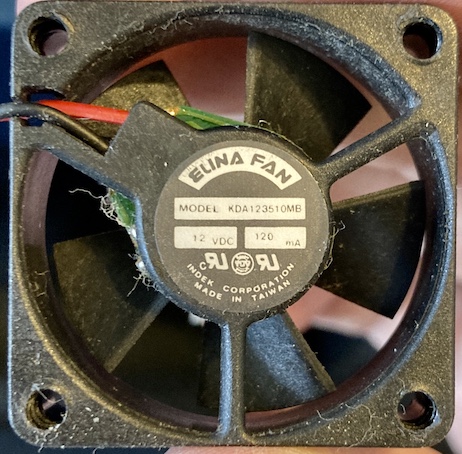
My Smallest Fan
The exhaust fan in this thing sounds haggard. Even though I assume no example of the Pippin ever saw that much use, this poor old fan sounds worse than I would expect to hear from even a heavily-used Mac of the era.
Although it didn’t come out very well on the recording, the noise is sort of a roaring like a bad car wheel bearing. It has a bonus death rattle when the power is cut. And that’s because the bearing inside the fan is dried of lubrication and likely rusted up from poor storage.
This little computer deserves a better-sounding fan that doesn’t make it seem like it’s teetering on the edge of death. Plus, the fan is the only active cooling the system has, so keeping it in good shape will help all the components live as long as possible.
I’m no thermal management expert – I only played one on TV on ABC’s short-lived computer-cooling drama, The Blow Hole (2007) – but this fan isn’t placed very well. Because of the mass of cables inside it, it feels like dust is pulled through and just lands on the video chips near the port rather than maintaining enough velocity to leave the Pippin. Oh well, it’s the best I can do without cutting new holes.
Once I took the fan out of the opened Pippin, though, it didn’t sound all that bad laying flat on the desk and running it with my bench supply. Just to be sure, before putting it back together, I stood it on its end, so that it would be tested in the same orientation as it would be when installed in the Pippin. That definitely made the noise, confirming that the bearing had excessive radial play.
It’s a teeny-tiny little 35mm jobbie, but surprisingly it’s 12V! Most fans this small run on 5 volts nowadays. My local computer parts store didn’t have any 35mm fans at all; their smallest was a $20 40mm Noctua that didn’t even light up and flash. I managed to find a Nidec 12V 35mm fan on eBay, although it had a 3-pin connector. However, as we found out with the Sharp X1turbo, 3-pin fan connectors won’t stop me.
While I was waiting for the replacement fan to arrive from China, I still wanted to play with the Pippin, so I peeled the sticker off the back of the original Elina fan. This exposed the back of the bearing shield, which I then hosed down with some ceramic lube I had sitting around and let soak in. Now the fan wasn’t necessarily quiet - in fact, it was extremely loud and annoying - but it sounded so much better.
This wasn’t a permanent fix – especially because I suspect there’s actually two bearings, front and rear, supporting the fan’s shaft on either side of the motor drive – but it was good enough to put this 25-year-old fan back on the road.
Of course, I only got a few more sessions with the Pippin before the new fan arrived, and I set to work converting the 3-pin fan to a 2-pin. I depinned both fans, but the crimps were different sizes. The original Pippin fan connector appeared to be a 2.50mm JST XH. The crimps for it were completely out of stock, so I ended up snipping and spliced the original 2-pin connector onto the Nidec. Hey, I already removed the original fan’s sticker anyway: I’m sure the future collectors’ market will forgive me in time.
With the new fan installed, and the Pippin closed back up, all was right in the universe again. Except that the new fan was super loud and sounded like a vacuum cleaner at full tilt – it must have been an industrial-spec fan that I didn’t understand was inappropriate for home theatre use. It didn’t seem nearly as loud when I was testing it on the bench, but I guess that’s the nature of these things. It is a completely miserable experience like this, like being in the room with a leaf blower. At least it pushes a ton of air.
I’ll keep an eye out for a quieter one – perhaps an oversize Noctua mounted on the little rubber isolators instead? – but in the meantime, let’s make some good use out of this thing.
Pima County Isn’t Real
There’s one thing I absolutely wanted to try out before I could bring this entry to a close. “Tuscon” (sic) is the nickname for the demo CD that let you boot a Pippin into a full-fledged System 7.5.2 environment. Without a keyboard, I wasn’t sure how far I’d be able to get, but the whole experience promised to be a genuinely weird and unique one.
After grabbing the disc image from the Macintosh Repository, I burned it to a loose CD-R, and stuck it into the howling Pippin. It booted and brought me to a very pretty StartupScreen featuring many of not-Tucson’s attractions.
Reportedly, this magic disc came from the late Tony Diaz, who directly acknowledged it when asked, and was confounded by the name given to the image by others. He worked with Bandai clearing out unsold Pippins near the end, which is likely why this disc is full of so many weird Bandai things and other leavings. Also, why it’s cryptographically signed (“Pippinized”) to be able to boot on a Pippin without the use of the Pippin Kickstart.
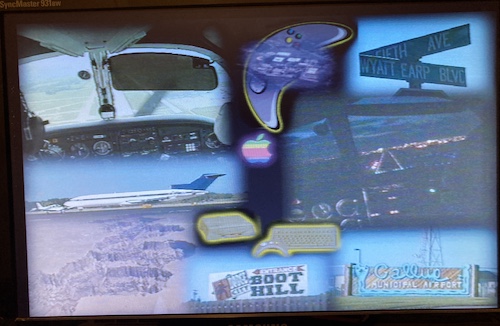
Apologies for the Samsung widescreen monitor stretching the picture and tricking the phone camera’s white balance: I was in the middle of a shop reorganization, and this was the easiest desk to hand at the time.
Once the thing has finished booting, you’re dropped into a Mac desktop. It’s got aliases for HyperCard, HyperStudio, Netscape, and The Virtual Museum on the bottom. These things are likely here because, according to Tony Diaz, Bandai was trying to get rid of their leftover Pippins as interactive kiosk machines. It would be very easy to build something for that purpose that works well on this machine in HyperCard.
There’s icons for the startup volume (“Pippin Netscape,”) the Trash can, and a mysterious one called “Flash!”
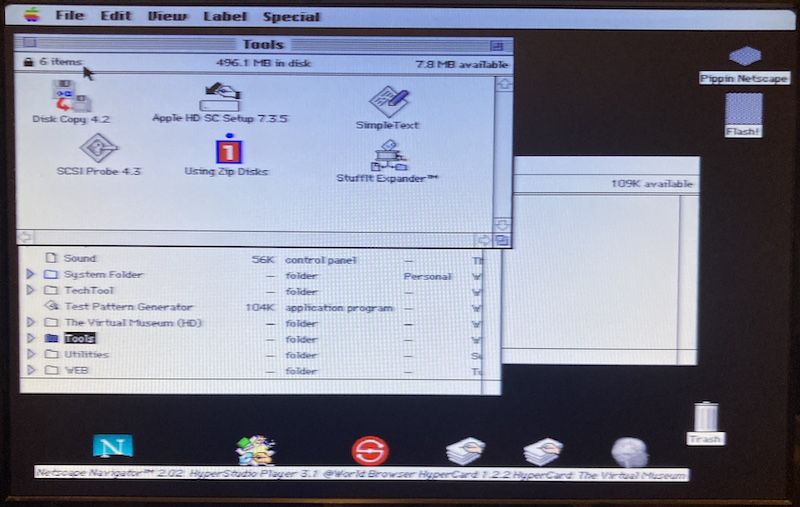
What is Flash!? It’s the Pippin’s internal flash storage, used for save games. On mine, it listed the Marathon saved game.
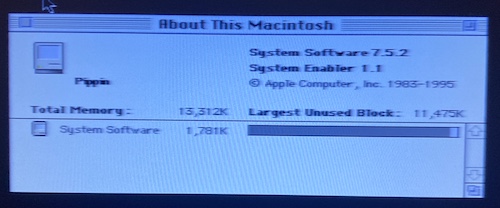
What does About This Macintosh say? Well, it’s a Pippin, running System 7.5.2 with Enabler 1.1. And it has about 13MB of system RAM. There’s no model-specific icon, which is a pity.
I had heard that the Pippin controller just sends certain key commands, but this seems to be only somewhat accurate. SimpleText reports these as “unknown character,” whereas I expected to see something like F appear when I mashed the buttons. There is no Key Caps DA installed, either, to see what it thinks it is. Ah well. I guess that would be too easy.
The disc has some other development-related goodies on it, like ResEdit, DeBabelizer, (an uninstalled) MacsBug, and a handful of TCP-related debugging tools. There’s also a lot of conventional Mac user utilities.
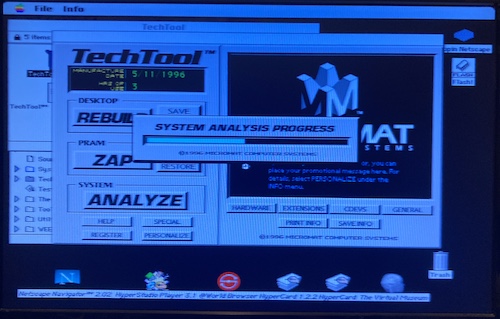
Here, TechTool is scanning the system before telling me that the hardware is fine.
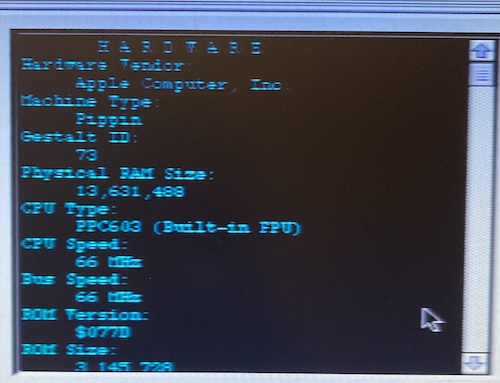
The TechTool hardware report didn’t tell me anything new, either: it’s a Mac, with Gestalt ID 73 (a Pippin,) with about 13-and-a-half megs of physical RAM. It’s a PowerPC 603 at 66MHz.
Using the trackball on the mouse to click on things feels very natural and accurate, something which certainly is not the case with game consoles even today. While on the small side, and with crampy buttons and a terrible d-pad, the AppleJack controller’s mouse is fun to use. I wish they had made more of these, as I would love to have a second one.
I wanted to see if I could eject the CD, and load something else instead. Unfortunately, I couldn’t drag the startup volume to the Trash – I got a little lecture about it, as is the way of classic Mac OS – and hitting the Eject button rebooted the Pippin to the startup screen.
Conclusion
I had fun with this uncommon piece of Apple history. Although they certainly don’t want to admit it, they and Bandai did a bang-up job making a little Mac that you could put under your TV.
Was it a great game system? Absolutely not. But there are lots of great game systems out there, and most of them are just normal consumer computer hardware nowadays, too.
Don’t worry, I’m not done with this machine. I think it would be really fun to make a Centipede clone for the wacky trackball!
Repair Summary
| Fault | Remedy | Caveats |
|---|---|---|
| Reported controller “malfunction.” | No such malfunction observed after basic cleaning. | |
| Clock battery exists. | Terminate with extreme prejudice | |
| Noisy cooling fan. | Lube fan bearing | Temporary fix, at best; replaced with new fan later |
| Bad fan bearing. | Replace with new fan. | New fan is extremely loud. |
-
As far as I can tell, this indicates I have 14MB, which means my Atmark has been upgraded from the onboard 6MB of RAM, and so the RAM card in the console’s belly must be 8MB. ↩
-
Indeed, Pierre from Journal du Lapin has confirmed that the Performa Rayovacs fit the hole! Thank you, Pierre. ↩