Giving my PC-6001 a LIFT
Tags: computer nec pc60 pc6001 homemade-hardware homemade-software
Most software for the NEC PC-6001 was sold on tape cassettes. Tapes are great, but they require a lot of patience. I do strongly prefer the modern conveniences of floppy disk and ROM cartridge. What do you mean those aren’t “modern?”
Background
In this article, I am going to be trying to get some of Inufuto’s homebrew games to run on my PC-6001. Since 2020, he has been working on homebrew games for 8-bit computers.
When I say “8-bit computers,” I mean a lot of them. Inufuto’s gotten his games running on everything from a Sharp PC-G850V to the PCjr, posting nearly-daily updates to his Twitter feed. He’s even made games for the Hitachi BASIC Master Level III, which is certainly welcome as soon as I remember where I put that computer.
In fact, it’s Inufuto’s ports to the Microcomputer Mahjong home game console that is how I found out about all his amazing hard work.
As you might expect, he’s also made several games for the best 8-bit computer out there, the NEC PC-6001. Most of his modern games are big enough that they need to target an upgraded 32K machine, but a lot of the earlier 16K games are already offered as a cartridge ROM.
Of course, it’s the 32K games that I want to play. Specifically, I was most interested in two of them:
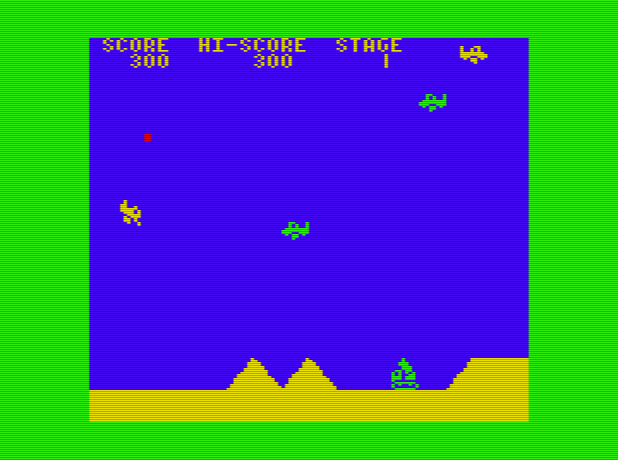
Aerial, a side-scrolling biplane shooter similar (if you squint) to the PC classic Sopwith.
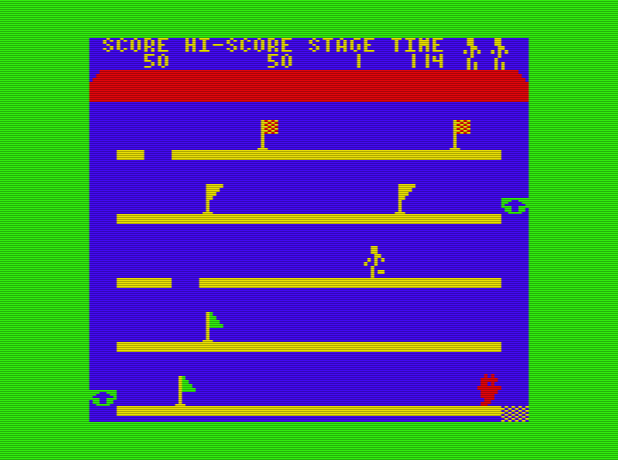
Lift, a platforming arcade game that’s like a hybrid of Lode Runner, Elevator Action, and BurgerTime.
Please note that I wasn’t entirely sure why the 32K games weren’t offered as a cartridge ROM, and didn’t bother thinking about it very hard before soldiering on with this exercise.
The cartridge
Of course, it is silly to just do this on the emulator. I want to do this on real hardware: my beloved PC-6001.
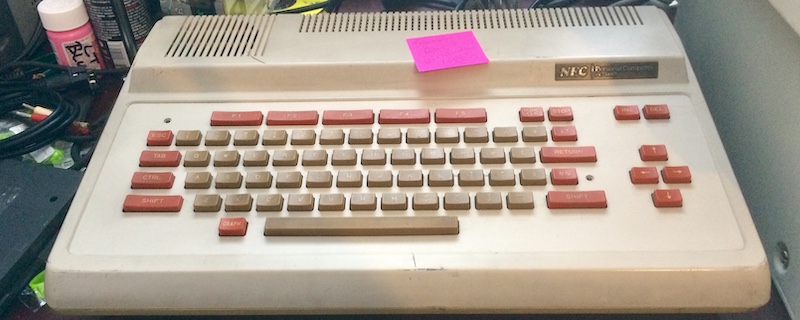
There are a couple options for putting a ROM on a cartridge at home, and one of them was sold by NEC themselves. The PC-6006 expansion cartridge provides 16K of RAM and two sockets for ROMs, and I just so happen to have one.
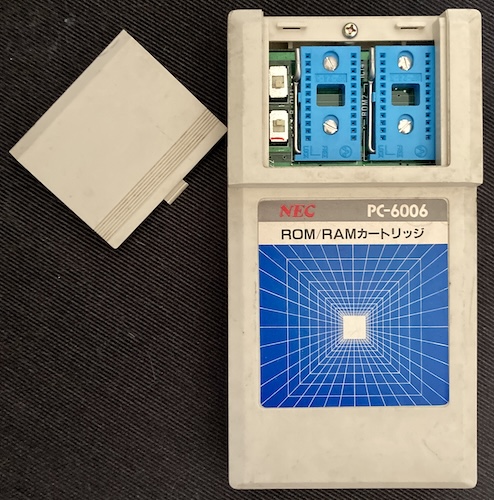
Perfect, right? Not so fast: each of those oddball ZIF sockets only accept an oddball ROM. The NEC µPD2364 is an 8K x 8 ROM with a pinout for a 2564. Unfortunately, I only have a huge grip of 27c64s lying around the property, as the µPD2364 and 2564s are not super common on AliExpress or in old computers.
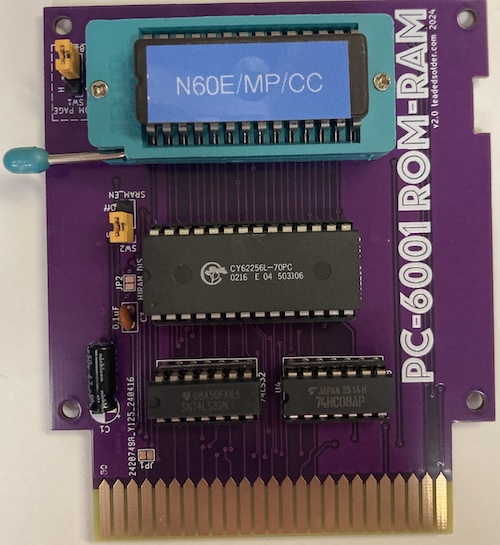
To work around this, I made my own PC-6001 ROM/RAM cartridge, which provides 32K of RAM1, and also uses a more modern 32kByte 27C256 EPROM socket, split into two 16k banks. This is actually the second revision of the cartridge PCB, and the post about that is forthcoming.
Test the games
Before I started modifying the game, I needed to figure out how they were supposed to work. This meant loading the tape image in an emulator and doing the LOAD/RUN dance in BASIC. For this, I used the PC6001VX emulator, which is a Qt-based, Unix-friendly port of the popular PC6001V emulator.
The first time I tried loading the tapes, I had set the machine to the default configuration: 1-page mode, and 16K of RAM. I soon found that I needed to use 2-page mode and 32K, or the game would suddenly stop working after booting into the machine code stage of the loader.
Once I had 2-page mode and 32K set, I was now able to play the games in the emulator.
So now we know that there are two requirements for the cartridge:
- It has to have 32K RAM
- Somehow it has to change into “2-page” mode, or the equivalent.
The first one is very easy (the RAM/ROM cartridge pictured above provides 32K,) but the second one is more difficult. I don’t know how to do it, and a quick check of the PC-6001 compatibility BIOS’s API list doesn’t seem to list a system call that lets you change between 1-page and 2-page mode after the system has started.
I decided to start on reverse-engineering the game now, and figure out that inconvenient part later.
The P6 format
As with a lot of other 80s 8-bit systems, the file formats that are used to distribute software in the modern day originate from emulators. Occasionally, emulator authors disagree with one another on what the format should be, so you end up with multiple formats.
There’s at least three big formats for tape images in the PC-6001 world:
- CAS, which is a bare binary file, akin to a “sector dump” of a floppy;
- P6T, which attempts to better describe the raw audio form of the tape in a compressed format so that it can handle modified/copy-protected tapes (lags, variable baud, etc);
- And P6, which is a partially-ASCII BASIC dump.
Inufuto’s games are all distributed as P6 format, so that’s the file format we’ll be messing with for the rest of this article. If you’re dealing with the other tape formats, a tool like P6DatRec or DumpListEditor may help you.
BASIC bootstrap
Before figuring out how to modify the game, it’s worth understanding what format it’s in. Luckily, the source code is provided by Inufuto for each of the games. For Lift, the source code is entirely in assembly and C, so we know that it has to be a machine language binary.
How do you load a machine language game into a computer that’s meant to run BASIC programs? On the PC-6001, and lots of other 8-bits of the era, the answer is to write a small BASIC program that pokes the assembly program into memory and then executes it.
For Lift, the loader can be seen here, after reading it in from tape using CLOAD and then using the LIST command in BASIC2:
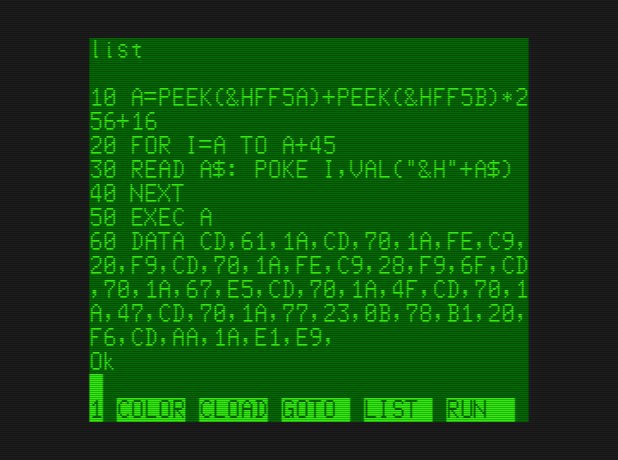
This looks a little noisy with that huge blob of hex and the accesses to cryptic memory addresses, but I’ll break it down:
- Line
10checks the memory addresses $ff5a and $ff5b to determine the starting location of the stack and then count up from it to find the location of the BASIC program in memory. Yes, that’s the same program we’reLISTing. - Line
20to40read the ASCII contents of line60, parse them into their true values, and then poke the bytes into memory. - Line
50executes the program that was just poked into low memory (i.e. the contents of line 60.) - Line
60is an executable Z80 program in machine language: a byte array encoded as a string of hex digits.
Like I said earlier, this is the general pattern on a lot of 8-bits. Some systems like the CoCo have keywords to automate this process (BLOAD) but most in my experience are peeking and poking from a big ol’ DATA statement stuck in the middle of a BASIC program.
So is this the entire game? No. It’s only 45 bytes long, but transferring to a small machine-language loader program will give us control over the system to load the rest of the game.
The Stage Two Loader
At this point, we have abandoned the cradle of BASIC for the vast unknowable power of raw Z80 machine-language programming. We have full control over the system!
What does that loader do? I wanted to know, so I started disassembling it. As I said earlier, the array of hex characters that we see in line 60 of the BASIC program is a Z80 machine-language program.
I read out the array into a text file (by copying and pasting it from the raw ASCII in the P6 file) and then wrote a quick Python script to convert that array into a binary file, essentially replicating the VAL call of the original BASIC loader. Now I had a nice binary copy of the loader on my Mac, and could disassemble it using z80dasm -l.
This produced a source code listing that I could read. I then went through and started figuring out what the code did, by using the basics of PC-6001 tape disassembly page to tell me about the relevant addresses of BIOS calls it was making.
call 01a61h ; motor on
l0103h:
    call 01a70h ; read byte from tape into A
    cp 0c9h
    jr nz,l0103h
l010ah:
    call 01a70h
    cp 0c9h
    jr z,l010ah ; wait until the c9c9c9 delimiter stops
    ld l,a      ; divine target address for dump
    call 01a70h
    ld h,a
    push hl
    call 01a70h
    ld c,a
    call 01a70h
    ld b,a      ; load remaining record length
l011fh:
    call 01a70h ; load from tape
    ld (hl),a   ; store in memory
    inc hl      ; advance pointer
    dec bc      ; decrement remaining size to copy
    ld a,b
    or c
    jr nz,l011fh ; still more to read?
    call 01aaah  ; stop motor
    pop hl      ; restore original target pointer
    jp (hl)      ; jump to first byte written (the game)
Specifically, there are only three calls that we really care about here:
- $1a61 - starts tape motor
- $1a70 - reads byte from tape
- $1aaa - stops tape motor
Notice that there is no call for seeking the tape. This means the tape is still spinning while we’re reading from it: we don’t have precise control over the tape and are just reading from it as it passes under the head.
If your timing is not exact, you could potentially miss bytes as the tape head passes onto another section of the tape. In reality, this probably doesn’t matter too much as the tape drive is way, way slower than the Z80 and 8049.
A variant of this technique is reportedly used for copy protection of some tapes, which is a concept that I want to look more into in a future article.
The Program Being Copied
I didn’t need to run this code in the debugger to figure out where the header ended and the game program started. As you can see in label l010ah, The machine is waiting until it runs out of $c9 bytes to start reading the rest of the tape, so everything we care about will have to start after a block of $c9 .
And there they are:
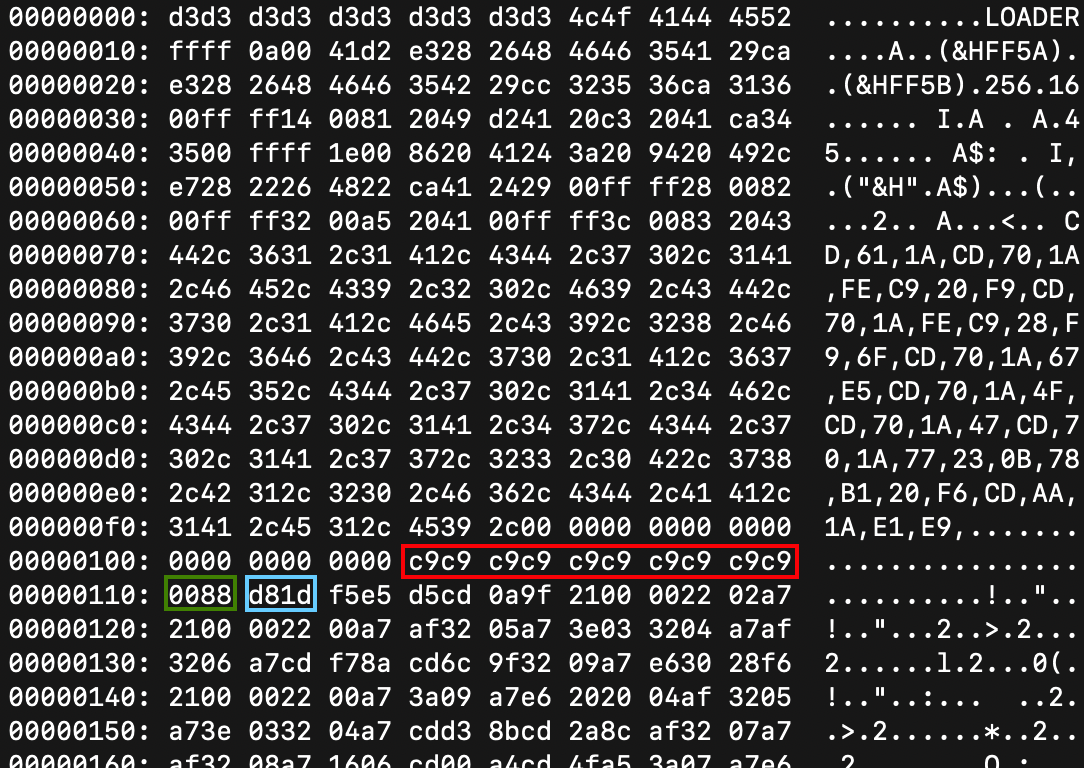
We then read two more 2-byte/16-bit blocks out of the tape, followed by the program.
Those blocks are, in order:
- 2 bytes target address to write to (always $8800 on Inufuto’s tape games, as far as I have checked; remember the Z80 is little endian so these are stored on tape as $00 , $88 )
- 2 bytes remaining length to read from tape
- the program itself
I wrote a quick Python script to use these fields in order to pull out the game program from the tape image. Sure enough, it seemed to be valid Z80 code when disassembled.
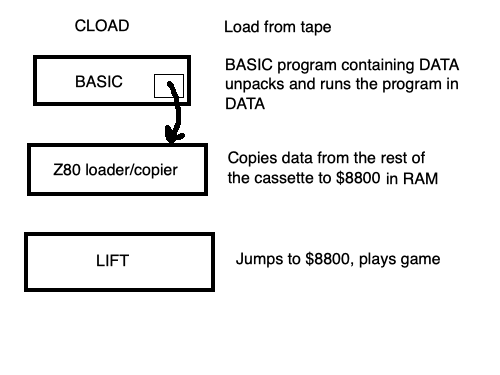
So far, we’ve found that when the tape is loaded, it will do the following things:
- Read a BASIC program into memory.
- When the BASIC program is executed, it stabs a small machine-language loader into memory and runs it.
- The small machine-language loader controls the cassette tape player to read in the game program from the rest of the tape and store it at $8800 .
- The game is executed from $8800 .
Copying from a Cartridge
I wrote my own version of this loader into the header of a cartridge ROM. When the cartridge is booted, it will copy the game into $8800 and run it just as the tape did.
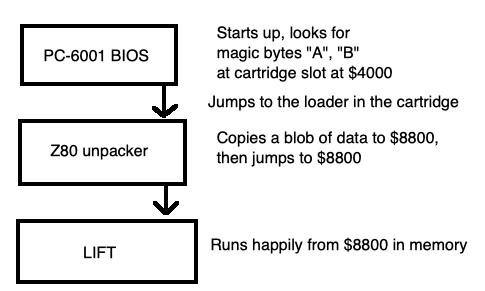
Why am I bothering to copy it into memory, if it’s going to be identical to the ROM contents? Can’t we just jump into the cartridge and run the entire game from there? Well, the game as it is written expects to be running from $8800 , which is not where the cartridge is in the PC-6001’s memory map. A game running on a cartridge would start somewhere after $4000 .
If there are any absolute jumps inside the program, I would have to patch those jumps to point to the cartridge memory space instead. In programmer shorthand, Lift is not guaranteed to be relocatable in memory. Many games of the era also do self-modifying code for performance or size reasons, altering their own code in memory as they run, which is hard to do on a read-only ROM.
Better to just keep it at $8800 rather than go looking for extra trouble3.
For the sake of keeping things simple, I retained the “copy” technique as used by the tape image. My own version of the loader is basically identical, but with some boilerplate for setting up the environment from a cold boot:
.org $4000
.db "AB" ; PC-6001 compatible mode ("CD" for PC-6001mkII-only mode)
.dw main

main:
    call cls
    ld hl, msg_hello
    call putstr

    ; load game target address
    ld hl, (game)
    push hl

    ; load ROM length
    ld bc, (game + 2)

    ; set pointer to start of game in ROM (target)
    ld de, game + 4

copy_game:
    ; read from ROM
    ld a, (de)
    ; copy to RAM
    ld (hl), a

    inc hl
    inc de
    dec bc

    ; see if bc is zero yet
    ld a, b
    or c
    jr nz, copy_game

done_copying:
    pop hl

    ; if you want to return to BASIC before running this,
    ; uncomment the next line
    ; ret

    jp (hl) ; run game

msg_hello:
    .db "Loading game", $00

game:
    ; db statements will be placed here by extractor script
As you can see from the inline comments, a lot of the early structure of the file is just the boilerplate that the PC-6001’s BIOS expects to see. For starters, there’s the .org statement, which tells the assembler to expect that the code it generates will start at $4000 in the PC-6001’s memory map – the location of the first ROM on a cartridge. Without this, any absolute addresses (long jumps) into the cartridge that it generates are likely to be pointing to the wrong address.
Because cartridges don’t necessarily include bootable ROMs, one that believes it should be autobooted needs to include the magic bytes { 'A', 'B' } at the very start of it.
In a similar way to how the headers on PC-6601 disks worked, changing this magic string to { 'C', 'D' } indicates that the cartridge is for PC-6001mkII and upwards, which enables 32K mode as well as some other features that may be incompatible with software expecting to be running on an original model.
Last in the cartridge header is the address of the “entry point” for the cartridge’s software. This is simply the address of the main label. The PC-6001 will read this address and jump to it to begin execution. After this jump, the cartridge ROM is now in control.
The rest of the code in main is fairly straightforward, and largely mirrors the original tape loader:
- Print a “hello” message to the screen.
msg_hellois the ASCII string “Loading game” with a null terminator. You will hardly be able to see this before the game starts, because ROM is so fast, but it’s nice to have anyway. - The destination address, length, and start address of the game-to-be-copied are loaded.
- A loop runs that copies the game from the ROM into RAM, starting at the destination address and continuing until we run out of bytes to copy. The
bcregister is used as the counter for how many bytes are left to copy4. - Once the loop has completed, we jump into the destination address.
poprestores thehlregister to the value it was at when wepush-ed it; it was incremented as we were counting up while writing the game into memory.
I wrote a quick script to mash this “loader shim” together with the “payload” part of the tape image, and soon I had a cartridge that would try to boot Lift.
There was just one problem: the emulated PC-6001 kept crashing and rebooting on me!
The Torture
This is the part where an easy afternoon project turned into a blog entry! Earlier in this project, I determined that the games need 32K (check) and two screen pages. That’s easy enough to fix as a person – you just type “2” when it asks you “How Many Pages?” before loading your BASIC program.
But what does “two screen pages” actually mean? And how do we get the computer to do it to itself, so we just plug in a cartridge and go?
To start my exploration, I decided that I would bail out of the loader just before jumping into the game. This is easy enough to do, because the PC-6001 BIOS is smart enough to do a CALL into the cartridge’s entry point, rather than a jump.
Since the cartridge was entered by a function CALL, putting the source address on the stack in the process, it means you can simply return out of the cartridge using a ret instruction and resume execution in the BIOS. PC-6001 BASIC starts up as normal, except the game is loaded into memory and we can poke at it.
In other words, the process now looks something like this:
- The cartridge is picked up by the PC-6001 BIOS and the loader is jumped into;
- The loader copies the remaining contents of the game into RAM starting at $8800 ;
- We inject a
retinstruction, which returns execution to the PC-6001 BASIC. BASIC starts up as normal.
I learned about this technique from ezm’s excellent conversion of Door Door mkII to cartridge, where bailing out to BASIC periodically let them dump the entire “loaded” contents of the tape.
Using this technique also makes the PC-6001 BIOS ask “How Many Pages?” From here, I was able to type “2,” hit enter, and then run EXEC &h8800 to jump into the game. It loaded and ran perfectly, which proves that at least the copier code works!
Now I needed to figure out a way to replicate this phenomenon automatically, without user input. When you put a 16K cartridge game like Tutankham into the PC-6001, you don’t have to tell it “How Many Pages,” even though it’s clearly in two-page mode when it starts up. How did they do that?
My first stop was to check the “Compatible BASIC BIOS” listing of system calls. This compatible BASIC, a great work of open-source reimplementation by Fujishi Akikawa, allows emulators to work with an infringement-free version of the PC-6001 ROMs. They have been implemented in a “black box” fashion, entirely from the descriptions published in other works.
As a side effect of figuring out how it all works, the accompanying website also contains a significant amount of information on what the various system calls of the original PC-6001 BIOS are, and where they would be located. That’s what I took advantage of here, and also in another assembly-language project that you’ll see soon.
Unfortunately, I didn’t find any calls that would be used to change the “how many pages” configuration of the PC-6001. So I started comparing the code in Inufuto’s 16K games that worked fine to the 32K games that didn’t. This took a long while, at which point I realized that the 16K games ran just fine in “page 1” mode. Whoops.
Undeterred, I burned an evening running MAME in each mode, and then comparing the PC-6001’s “Work Area,” which is the area in high memory where the BIOS’s global variables are stored.
I found very few differences, but after a couple hours, I figured out that the SP – stack pointer – was wildly different immediately after entering pages=2. This made immediate sense to me, because the “User Area B” on the memory map shrinks when you have two screen pages: Page 2 comes in at the top, just below the Work Area, and makes about 7k of room for itself.
| Number of pages | Approximate initial SP |
|---|---|
| 1 | $f900 |
| 2 | $dc00 |
These addresses are rough estimates. Finding this was hard. It was difficult to pin down because I didn’t have a good place to put my breakpoint: part of my investigation was trying to figure out exactly what code ran after you pushed return on the “How Many Pages?” prompt.
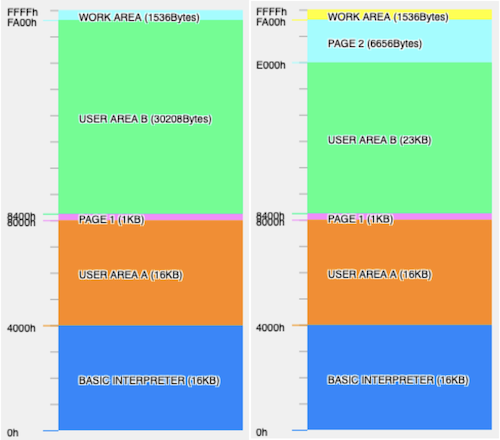
Thank you to Takuya Matsubara for this excellent PC-6001 memory map visualizer.
Presumably, at my original stack location, which is now the middle of Page 2, I was clobbering the stack whenever the graphics backbuffer was being changed. This meant that a ret statement was fetching some random garbage instead of the program location it tried to push earlier, and then ran off into the stratosphere and crashed the PC-6001.
It turns out that there was some code around $00be that was not just changing the SP, but actively copying code from the “old” stack position to the new position. I found that surprising, and I wonder if NEC had originally intended for this to be a system call in the first place, but ran into some kind of system integrity bug that made them get cold feet. Lacking that functionality, I was going to have to find a second way to make things work.
Could it be as simple as just resetting the stack pointer so it was living in the second user area instead? I hacked in some quick code that forcibly set the stack pointer to $dc00 , as I had seen it, and… Lift ran!
So, resetting the stack pointer to the “two pages” position makes it work, but is that really the right way to do things? Steeling myself against the might of Konami’s attorneys, I disassembled Tutankham and Canyon Climber, and found that… they were doing the exact same thing.
Tutankham, specifically, was using $dc51 , so I quickly changed my loader to use the same address. I’m not entirely sure why they picked such an odd stack pointer, but I was a little tired of looking gift horses in the mouth at this point and just wanted to play some games instead.
Reality Check
Of course, just because it works in MAME doesn’t mean it will work on the real machine. It’s possible that my hackjob to “get it working” doesn’t actually change some latch or move some control register on physical PC-6001 hardware. Testing on a real cartridge is both essential, and the intended conclusion of this project anyway, so let’s get to it.

Recall that the cartridge PCB I am using has a 32kByte 27C256 EPROM, split into two pages of 16kByte. You can choose which page is active by moving the SW1 jumper on the board. Since Lift and Aerial are both about ten kilobytes, I decided to put one on each page. Hey, it’s a multicart!
I reused a quickie Python script to pad each one up to 16K, and then concatenated them together using the cat command on my terminal. My long-suffering TL866 was then used to burn them onto an AliExpress salvage 27C256.
Once everything was ready, I plugged the cartridge into the PC-6001’s PC-6011 expander. Why use the expander? The ZIF socket’s handle interferes with putting it directly into the PC-6001, because I am a dummy and laid the board out without realizing that the handle goes down. There is no electrical reason whatsoever for needing the expander.
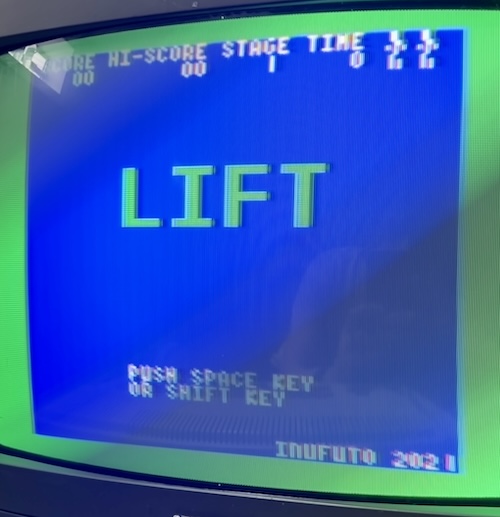
As soon as I flipped the switch, I got our “loading game” screen, and then the title screen of Lift. It works!
Wow, that feels pretty good. And the game plays well, too!
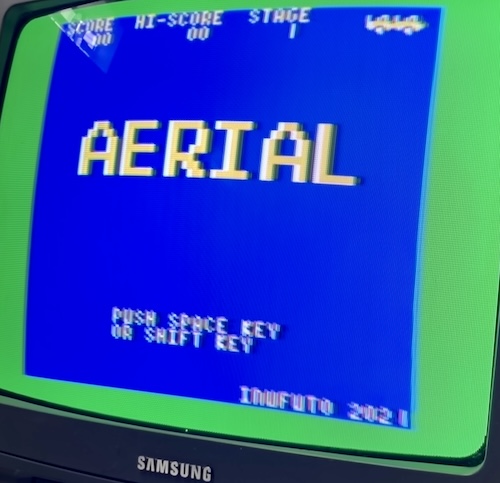
Does Aerial work? I powered down the system and flipped the jumper to the high-16K portion of the ROM, where the other game lives. That game also fired right up, and I proceeded to spend most of the afternoon trying not to get fried by bombers. I found out that you can shoot down the missile launch at the start of the game and get an extra life!
Both of these games are great, but I think my favourite of the two is Aerial. Thank you to Inufuto for making these great games, and giving them away!
-
Only 16K of the 62256 on the ROM/RAM cartridge is usable, as I did not want to hook up Soggy-esque paging logic yet. Maybe in a future version. ↩
-
Your BASIC program can be hidden from
LISTin many ways, and many commercial games use some of those techniques to obscure the functionality of their loaders. This would not stop someone with a memory editor or hardware in-circuit-debugger, of course, but it will deter casual reverse-engineers like yours truly. ↩ -
One big benefit of converting Lift to run properly off of cartridge would mean that it could possibly work on an unmodified 16K PC-6001, not just a 32K one, as removing the game’s code from RAM would leave more of the RAM for the runtime. Lift also provides its source code, so it’s possible we could just recompile and reassemble it with a different offset. I did not pursue this, as the goal here was to learn how to convert an existing tape game to ROM. ↩
-
Yes, I could have used the
ldirinstruction here to shave a number of cycles and lines of code, but I always end up making an off-by-one error when I do this, so I kept the original tape loader loop out of laziness and fear. ↩