Call In The PROs When It Gets Dirty (X68000 PRO Part 1)
Tags: computer sharp x68000 x68000-pro repair
What happens when you bid on a Sharp X68000 PRO without looking too closely at the photos? For one thing, you win the auction. What also happens is that the computer spends a while in your garage, waiting for all of its little tenants to be vacuumed out.
I had been looking for another X68000, not least because my grey X68000 ACE was proving extremely resistant to being repaired. The PRO models are basically identical to an ACE internally, but have more expansion slots and a more conventional design than the “twin-tower” computers. Therefore, I justified that I would be able to study this easier machine in order to fix the more difficult ACE. I bid with reckless abandon, and soon found that I won for pretty close to my maximum bid.
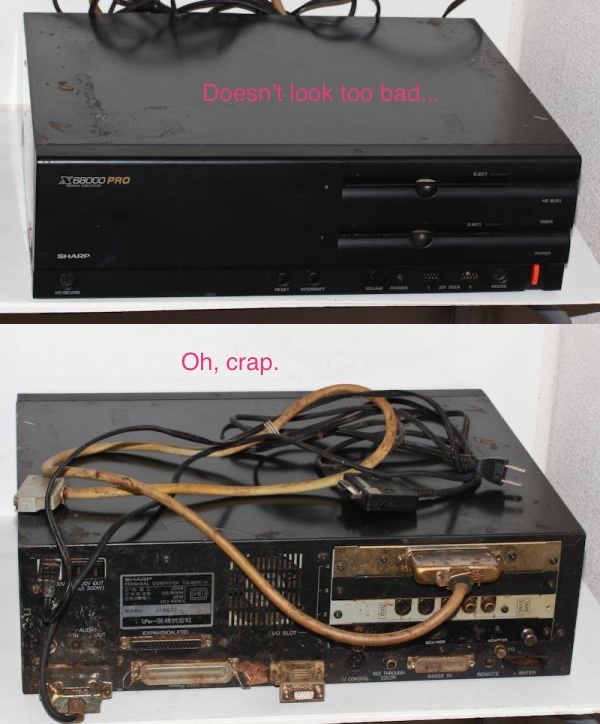
Of course, my heart sank when I looked at the other photos in the listing.
This thing had spent a long time in bad storage conditions. There was rust, visible dirt, and the tell-tale high water mark of flood damage. Since the computer was being sold from Chiba, it seemed likely it had gotten hit by one of the tsunamis and flooded out. After asking some folks with a better knowledge of the Japan junk scene, it was posited that it had probably spent a couple of years in an abandoned house before being rescued and resold by a property clear-out/junk-disposal service.
However, my mood soon raised when I took an even closer look at the photos. Three out of the four expansion slots are filled, and likely sat high enough out of the water to have avoided major damage.
From what I could tell from a good old fashioned power-squint, I had at least these expansion boards installed: a hand-scanner, SCSI, and MIDI.
Why is a MIDI card remarkable? The original X68000 MIDI boards are hard to come by in the modern era, and lots of X68000 games take advantage of external MIDI devices like the SC-55 if you have one. In fact, those cards are so uncommon and expensive nowadays that Thomas Daede designed the Midiori board a few years ago, the discovery of which was hugely inspirational to me. Before watching him design and put it together, I hadn’t considered it to be possible for a “regular person” to make an expansion device for an old computer.
All this means that even if I had to write off the entire computer, as long as the MIDI board survived I could probably actually turn a profit. And it’s already paid for, so why not try fixing it, too? Probably get one helluva weblog entry out of it…
There was another “bonus,” too. If you look closely at the picture, you’ll notice that there was also a floppy disk stuck in the top drive. Because X68000s are soft-eject, you can’t eject disks without power (there isn’t even a paperclip hole like on a Mac.) Might this mystery disk be something rare and undumped? Could this be my ticket to Japanese PC preservation fame? Almost certainly not, but it’s fun to dream.
Before We Go Any Further…
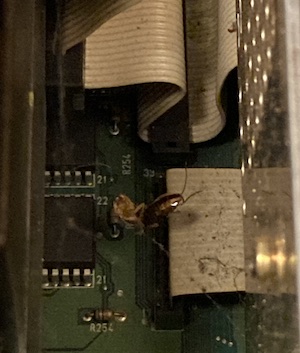
Content warning: There are actual bugs in this computer. Not, like, computer bugs, although those are here too. If you’re really squicked out by this sort of thing, you may want to skip this entire article.
Don’t feel bad about it. We’re all friends here.
Not A Good Fifteen-Footer
The paint is totally trashed. A lot of the metalwork has gotten rusty, which has caused it to swell up and crack the paint or bend plastic retaining clips. The front panel doesn’t sit quite straight as a result.
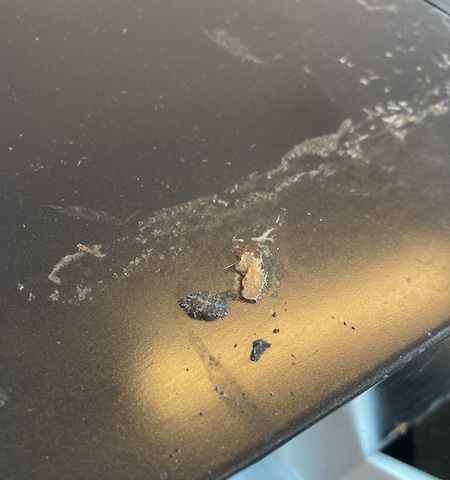
This can all be fixed: a few hours of sanding, grinding, and bodywork will make the outer case look good again. It’s a lot easier to repair than plastic, at least until a hole appears.
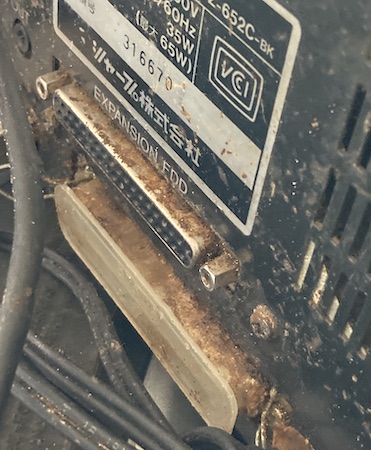
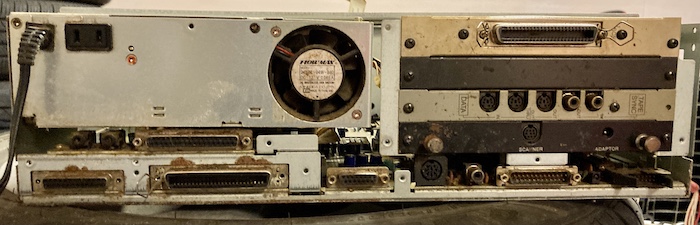
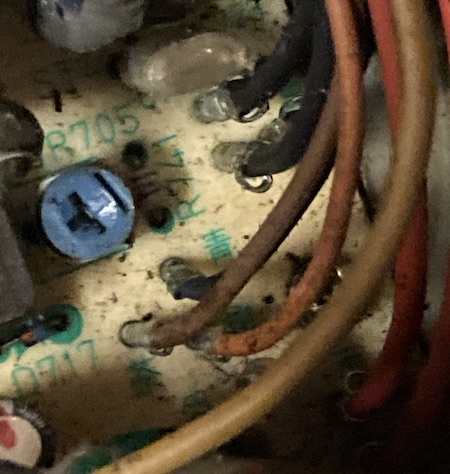
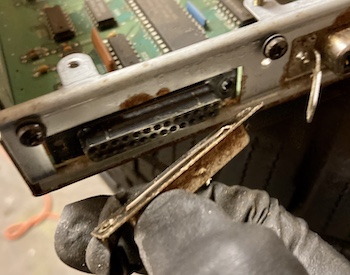
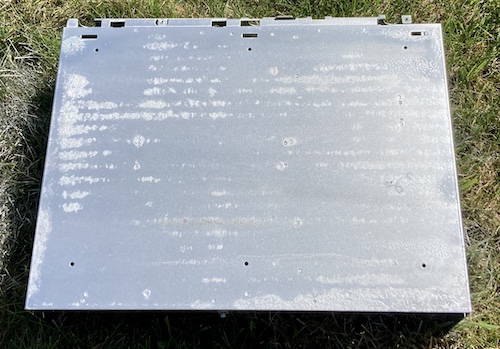
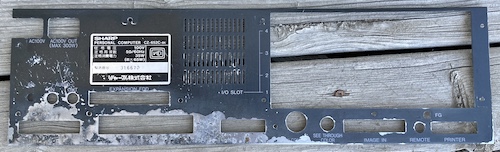
All of the port metal had grody rust on it. This would need to be scrubbed off so that there was at least some good metal exposed for cable shields to touch.
![]()
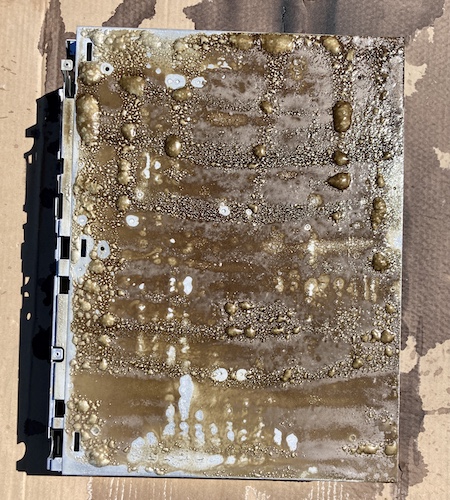
Upon removing the SCSI cable from the expansion card in the back, I was happy to see that both the cable and card had untarnished pins and plastic on their connectors, even though the shields were pretty ugly. This is a good sign; it means that whatever got in here didn’t get too deep. It likely wasn’t fully immersed.
There was also a 25-pin Japanese RGB to VGA adapter that was packed full of rusty gunk. Since I already have a couple of those, it ended up in the bin.
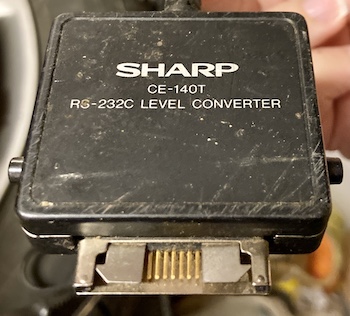
There was also a weird cable attached to the serial port, which I found out was a Sharp CE-140T serial cable adapter for Sharp pocket computers. In order to get the rusted DB25 end off of the computer, I had to bust this loose from the serial port with a screwdriver. There was more damage to the serial port as well, which we’ll get to in a moment. I’ll still hold onto this cable in the hope that I’ll meet another hobbyist in the future who desperately needs it, although it will probably live in a sealed ziploc bag for awhile until the funk subsides.
The power supply was almost certainly packed with bugs and gunk, but I figured the rest of the computer should be kind of okay. With X68000s, it seems likely that the power supply will be completely replaced anyway although I wasn’t looking forward to cleaning out the housing and scavenging the wiring harness, even with gloves on.
Open It! Open It!
Opening this thing is basically the same as the X1turbo; it has almost exactly the same screws, though the plastic isolation washers had worn away from weatherbeating. I had to open-palm smack the case a few times in order to get it loose from the front of the case, as the metal had rusted and taken a “set,” but it came off fairly easily after that.
I held my breath, expecting to see the absolute worst…
Phew. There’s a lot of spiderwebs, and some dead bugs, but really not that bad.
I made sure to check the battery before I closed everything up – nobody likes a battery bomb. It all looked very good. The PRO uses a nice little coin cell, but I’ve seen those blow up before when they get wet.
The Big Clean
After throwing a new bag and filter at the trusty garage Shop-Vac and popping in my earplugs, I got to work sucking out the dead roaches, larvae, egg sacs, spiderwebs, and assorted grit. Some eggs and gunk took a little bit of work to get free, and I didn’t want to use the brush attachments for the vacuum for fear of ESD, so I had to scrape them off with my (gloved) hand and feed them to the hungry maw of the vacuum.
Eventually, it was starting to look like a computer again.
I didn’t find anything immediately amiss, although I did locate a broken black plastic tab lying way in the back of the case. Figuring it might be from the front plastic fascia, I bagged it to keep it safe from being lost.
A lot of the white plastic connectors (such as the Molex from the power supply) were looking oddly yellow, and when I removed the structural crossbar braces1 to vacuum around them, I noticed that the metal around where the bar used to sit was also yellowed. I wondered if this was cigarette tar. Make that I hoped it was cigarette tar, and not bug pee. Maybe a thick layer of smoker’s lung helped keep more of the bugs away?
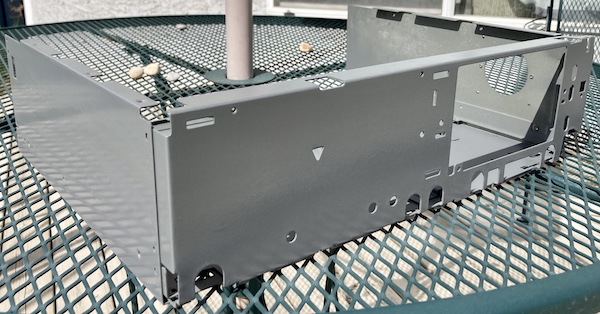
The nastiest part of this computer by far was the exterior ports. Every port had some gunk inside or outside of it, shielding metal was rusting nearby, and a lot of crap came loose when I pulled the back panel off. Still, the backside metal looked serviceable, if not exactly clean. I was clearly going to lose some of the screen printing in the process of repairing and repainting the metal, but that can always be replaced.
I spent a lot of time vacuuming out even more gunk, eggs, and spiderwebs from the motherboard after removing the rear panel. The whole rear area provides a nice shelter from the elements for generation after generation of pestilence.
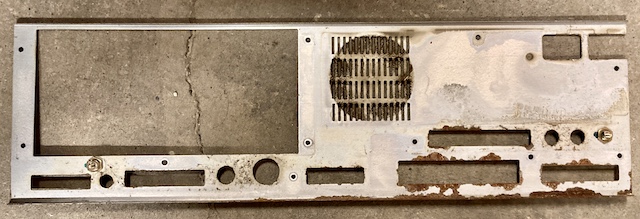
The corner near the RS-232 port got the brunt of the corrosion damage, but the external hard drive connector didn’t escape unharmed, either.
Power Supply, De-Supplied
I was able to work the power supply cables loose from the motherboard and disk drives and then remove it from the computer.
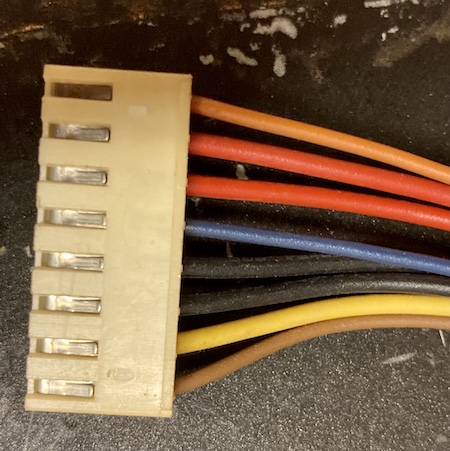
From the outside, the power supply’s board looks surprisingly clean. The connectors also looked to be fairly standardized. The only semi-unusual one is the motherboard power connector, which still appears to be a boring 3.96mm JST VH-style connector, common in Japanese PCs of the time, and – coincidentally – Meanwell PSUs.
Lest you think that Sharp was losing their edge by making reasonable connector choices, they also left in a 3-pin Berg power connector. This extremely non-standard connector is somehow used for hard drives in the “HD” models. It carries 5V, 12V and ground.
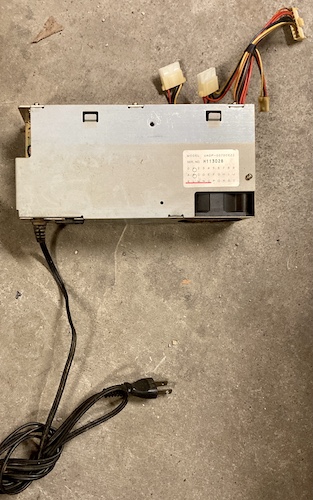
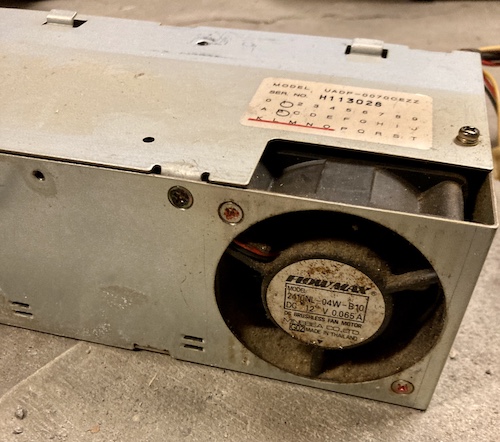
The fan is pretty gross; I was not able to get it any cleaner than this, despite having a literal Shop-Vac applied to its inlet.
The harness is pretty grody, but it cleaned up well enough to be reusable.
I had other things to check and clean, so I didn’t open up the power supply. From the open end of the supply, it looked like there was some nature inside. I decided to deal with this later… and boy, did I.

After removing the power supply, I had a lot of gunk to vacuum out from underneath. Spider webs, bug eggs, dirt, cocoons, the whole gamut was here. This small breakout board, which provides audio in/out ports as well as an external floppy connector, needed a bath at the very least.

There’s a 50-pin connector that’s underneath a bunch of other ribbon cables that appeared to be unused. I assumed this must be SCSI (or at least SASI,) for an internal hard drive.
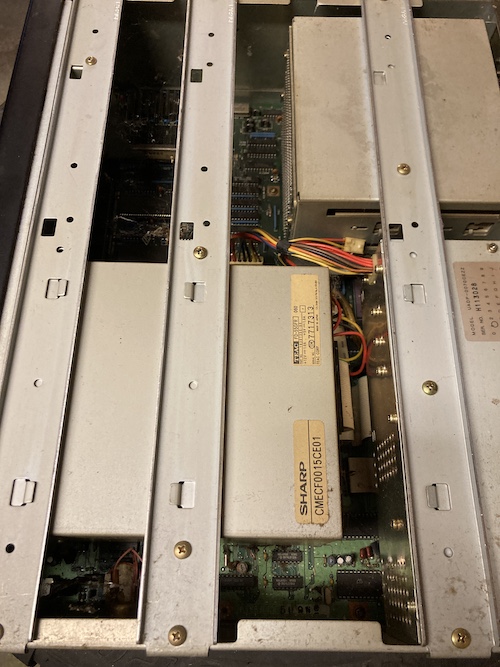
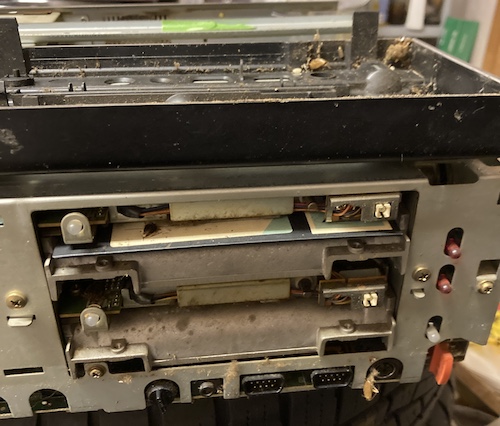
Card Cage, Uncaged
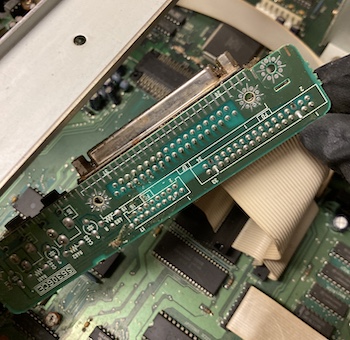
Next up is the cage which holds the expansion cards. The card cage is only held in with two screws and a friction-fit connector. There’s a third screw for a ground wire as well (pictured above: it’s a thin metal wire wrapped in a probably-once-clear-now-yellow plasticy tube of insulation.)
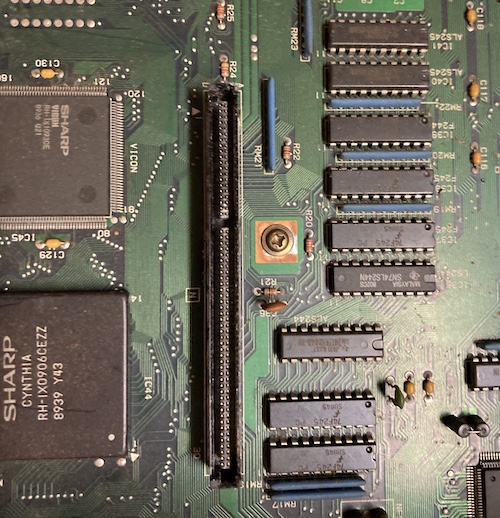
Both sides of the card-cage connector look like some water has dried out in it, which is not a good omen. However, the actual conductors looked fairly shiny. Lots of sticky gunk got cleaned off the bottom of the lowermost card – thankfully it’s “just” the hand-scanner control card.

I put the cards to the side to clean them separately, and moved on with the motherboard. Underneath the card cage is the Cynthia sprite controller and Vicon CRTC chips, and they both looked fine once their nest of bug crap was removed.
Floppies, Bopped
The next major component to remove from the system was the floppy drive cage. It contains a pair of very interesting floppy drives. They’re TEAC FD-55GFRs, which are desirable high-density drives that you would find in higher-end IBM PCs of this era. They connect using a standard 34-pin edge connector, and are powered using a normal 4-pin power connector. It’s very refreshing to see an X68000 with some standards.
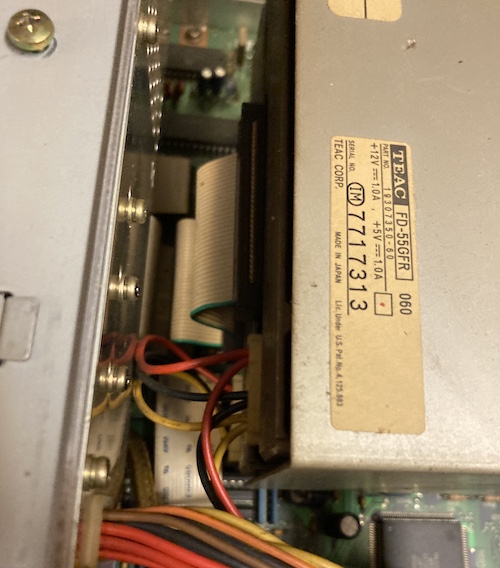
However, Sharp still could not resist the urge to make proprietary modifications to them, and these two little 15-pin flex cables connect to a port on the side of the disk drives near the front. I’m guessing this is for the auto-eject and -inject feature, “soft eject” buttons, as well as the LED controls, but it sure seems like a lot of pins – maybe they have the whole 8-bit “I/O board” data bus on here. Another one of these flex cables is also run to the backside, where it presumably provides the same signals for the external floppy connector.
Not all is easy in floppy drive land, though. The metal cage that holds the drives is bolted into the front of the computer’s case, so you have to remove the front plastics to remove the drives. And the bottom is supported by only one single very ugly-looking hex standoff. The majority of the structural support for the heavy drives comes from the crossbar brace on top of them, which retains the drive holder both with screws and the little hooks on top. Because the standoff and front-panel screw provide so little support, I had to work everything back into square when I re-installed the crossbar brace, which is annoying.
I flipped the X68000 on its side so I could see how the clips on the bottom retain the front fascia of the case. The rust has taken a very weird pattern, I wonder what this was sitting on? Maybe corrugated cardboard?
The front panel is held on by three clips on the bottom, three clips on top, and one clip inside. There are also two alignment clips on the front corners that you can’t reach and appear to free themselves when you loosen the case – one of these is the one that got broken off by the previous owner, so maybe I just got lucky by being the second idiot to try and break into this thing.
Eventually, I managed to free all of the clips from their gunk, and got the front fascia moving.
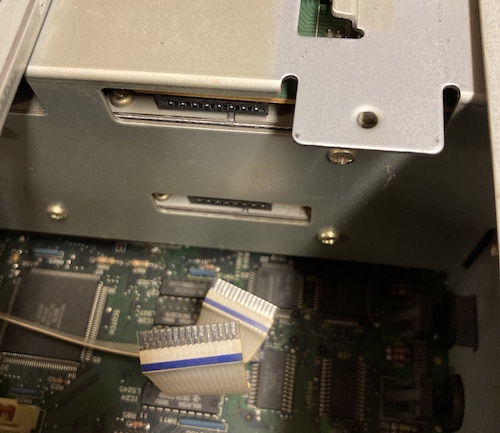
Once the front fascia was off, I vacuumed up all the bugs and dirt and unscrewed the floppy drive cage from the front. After a little bit of tugging of floppy drive cables – and removing the crossbar braces again – the drive cage was free, and I was able to take a look at the floppy that was left stuck in the drive. It’s a Brother-brand “Takeru” floppy disk2, and it has a handwritten label that I can’t quite make out.
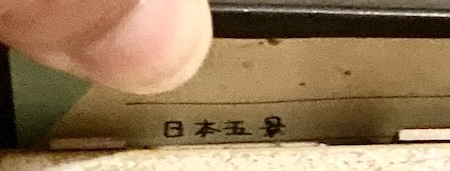
I was able to translate this to “nihon go” but the last character was too hard for me to read. After asking the PC98 discord server for assistance, krugman read it for me: it’s 日本五景, or “Nihon Gokei.” This is likely an indie/doujin shooter game from 1990, 2136 Nihon Gokei. Let’s all take a look at it in action:
Honestly, even with the “programmer art,” it looks like it might be fun. I found a couple copies of it online, so even if this disk doesn’t work, it should still be possible to make a working disk.
Mother Earth, Leave Mother Board
Now, on to the motherboard. I couldn’t figure out a way to get the “port board” on the back disconnected from the rest of the motherboard. It looks like they used some kind of IDC cable to connect the floppy drives and external-floppy port board to the motherboard, but without an actual removable connector on the end. They must crimp these for a male pin-header connector, and then just solder it down into the motherboard. Inexplicable.
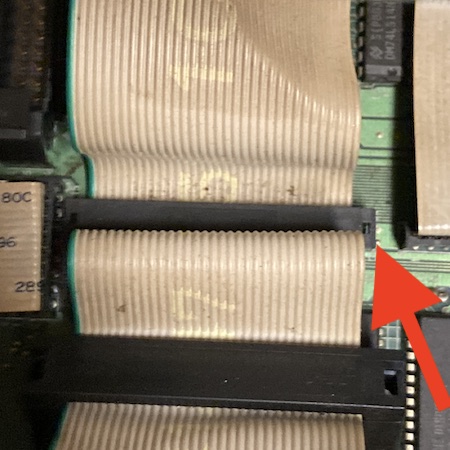
Even the official FDD-DRIVE SWAPPER instructions just say to unscrew the board, fiddle with the cables, and then reinstall everything with a spacer. This kind of stinks for a clean removal of the boards, especially since I wanted to wash the cable, but it’s not really a showstopper either. Hopefully I don’t have to replace the floppy cables any time soon!
After vacuuming out some more of the dead bug residue, I chucked the front fascia into the sink with some Dawn dish soap to think about what it did, and then got busy and forgot about it for a few days. It came out okay, but I didn’t think to take pictures.
Depower Supply
My main power connector seemed to agree with the pinout posted on nfggames.
Because the 4-pin power connectors to the floppy drives also had yellow wires in their 12V position, and the nfg page agreed, I initially assumed that this yellow wire was 12V. However, it wasn’t a direct continuity beep when I tested it, with about 120Ω shown on the meter. I wondered if maybe the drives and mainboard power came from different regulation circuits.
My rails weren’t called out by voltage but instead by colour, to ease the original assembly at the factory.
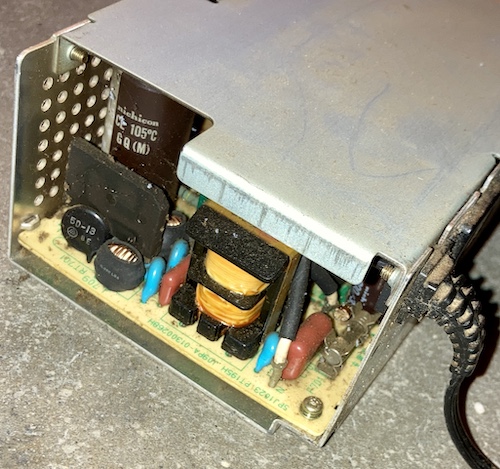
It was filthy inside the supply casing, but not as bad as I had feared.
One interesting wrinkle of this supply is that “live” and “neutral” are called out on the silkscreen; I don’t remember seeing that on the ACE board. Maybe they were getting ready for a Western release?
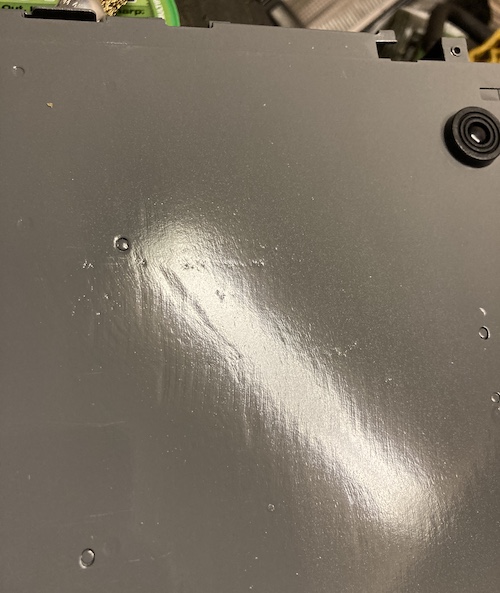
The solder side of the power supply PCB looked mostly fine, except in one of the corners. I think that this was probably from capacitor leakage rather than environmental damage, because the tinwork was stained around this spot.
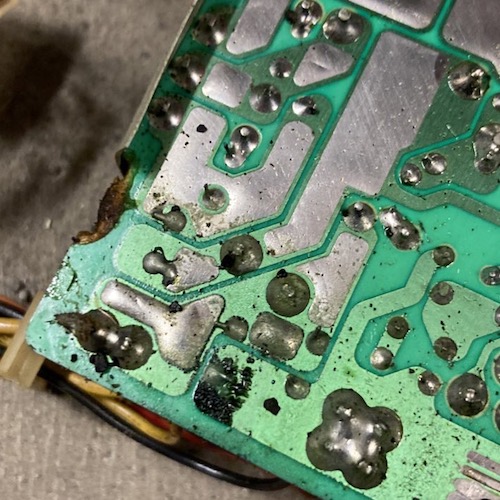
This is probably repairable; I didn’t see any major component damage, and the trace/mask damage could be cleaned up with a couple strategic globs of solder and some patch wire.
The metal PSU case components went into the dishwasher, which didn’t really do a very good job at shifting the cigarette tar and rust stains, just the bug gunk.
The fan was toast; not only was it coated in gross crap, but the bearing grinded when I was moving it. Cleaning it didn’t work, so it went in the “dirty spares” pile to be replaced by a Noctua NF-A6x25 60mm fan.
I got some info that the PCBs I had run off previously for the ACE power supply repair would fit perfectly into a PRO case, so I clumsily chopped the harness off the board using the junky, dull side cutters I had left in the garage.
Unfortunately, when I actually checked… the ACE board is nowhere near the same size as the PRO PSU case. None of the holes lined up, and it would interfere with the fan to boot.
It was bad info! I was kicking myself for a few days afterward for cutting the harness before checking.
Update: This wasn’t entirely bad info! It turns out that the “PRO2” models, a later refresh, used the Tetris-piece PSU from the factory, maybe because Sharp didn’t want to stock two SKUs of power supplies. PRO2 models are CZ-853C rather than my CZ-852C and have vastly different rear panels to accomodate the different power cord position. The wiring colours in the PRO2 also match the tower, of course. Thanks to Mobius for finding this one out (on his dime, sadly.)
Now, I had kind of an ugly choice on my hands.
- I could try to figure out the crimp pins that were used on the original harness, wash all the gunk out of the original power supply, repair the original power supply, and then solder the harness back in, but a couple centimeters shorter on every wire. I wasn’t looking forward to this either. I didn’t know if something had been shorted from all the contamination, and I would end up spending a lot of effort (and possibly money) to end up with a 100V power supply from the 80s.
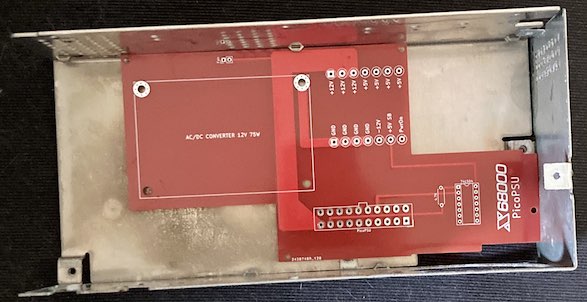
- I could try to find a replacement power supply or reformat the mattsoft PicoPSU board to fit the PRO, which creates a whole project of work for me.
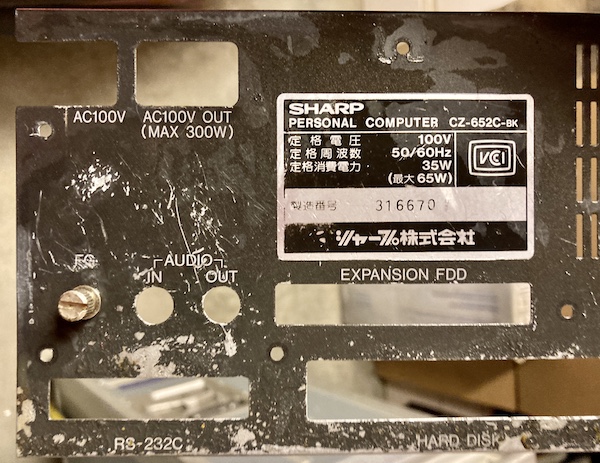
I was a little surprised to find that the rear of the X68000’s case said that the original supply only offered 65W maximum (it also stated that only 35W is drawn without any expansions or HDD,) so at least if I chose option 2, getting a replacement supply would be easy – it didn’t need to be beefy.
I resolved to leave the choice until later. If the motherboard turned out to be complete trash, then it wasn’t worth bothering putting a good power supply in it. And it certainly wasn’t worth stalling all the progress on cleaning the computer, in order to start a huge sub-project just for the power supply.
Honestly, I think you can already guess where this one is headed.
The Portopia Gross Stuff Everywhere Murders
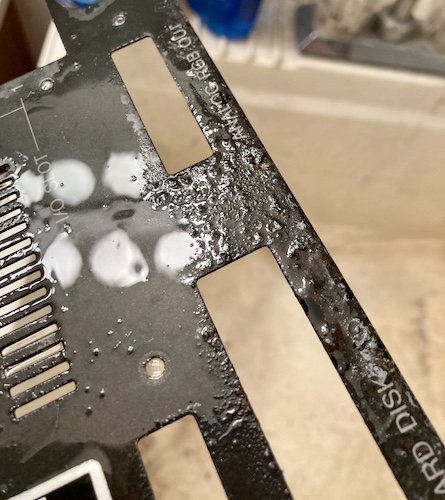
Before removing the “motherboard,” I wanted to split the card cage for individual cleaning, and clean out all the mini-jack audio ports on the cards and motherboard. It’s a lot easier to put some elbow grease into those ports while the board is still bolted into the case. I used wooden toothpicks to start scraping the gunk out of the ports, and then moved up to a couple of firm-bristled interdental brushes, and compressed air to blow out the debris as it was loosened from the surfaces.
Apparently a 3.5” audio jack is just the right size to trap all kinds of environmental nastiness, and every single one was packed solid with what I hoped was mud. Chances are some of these jacks have corroded out badly enough that they will need replacement, just like the Supervision’s power jack. They are pseudo-standard parts, however, so that hopefully won’t be a big problem.
The “motherboard” on the PRO is actually split into two boards; one seems to be the analogue of the I/O board in the tower X68000s, and the other is obviously the motherboard. They’re connected through a weird horizontal mezzanine connector, and should be screwed securely to a bunch of brackets that run through the case, but those screws were missing from mine. Probably someone has removed the I/O board in the past.
Like the card cage, the RAM upgrade also had some grossness in the slot. It shifted easily, though, and I was able to vacuum some of it up.
As I continued to strip down the machine, I ran into a few interesting things. There’s a pair of brackets at the front and back of the machine that go between the two boards; they actually penetrate through some small rectangular holes. Don’t undo the screws in between the two boards, because these brackets provide some structure. Sharp gives you a clue here by making it REALLY difficult to remove the front one without taking the entire board out of the case… guess what I did anyway?
You do have to unscrew the other screws, including the ones holding down the ports at the back. When I went to take the 25-pin serial port’s screws off, the rusted chunks holding the screw retainers broke out of the plastic and then the metal shield on the front of the port fell off.
That’s a first.
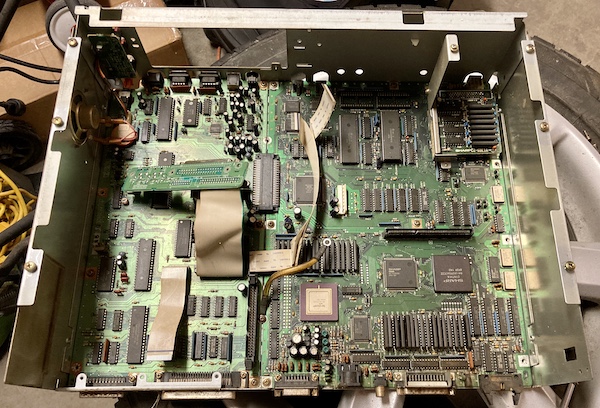
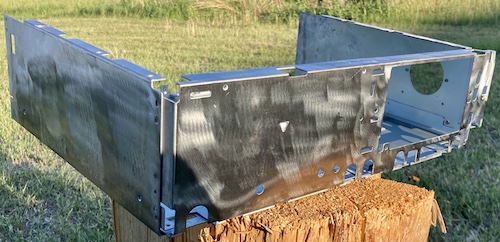
Undercarriage Inspection
At last, it was time to remove the motherboard(s) and see how bad the bottom of it was. This moment would decide whether the machine was complete scrap, or if it had a fighting chance. I held my breath and began to pull out the two boards…
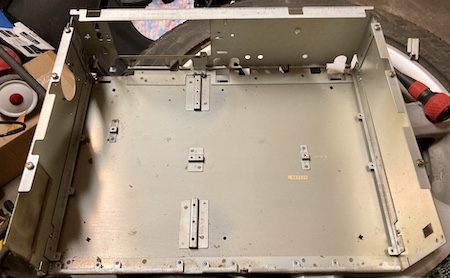
It’s clean!!
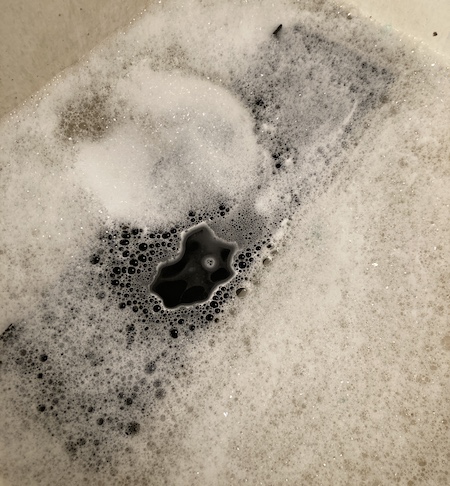
Although it was covered in bug gunk and a dead roach or two, it quickly all went into the vacuum and then I popped the inner case skeleton directly into the utility sink, where it produced some disgusting black water that smelled awful. I brushed off the solder side of the boardset and set it safely aside, happy to see that the solder joints were in good condition outside of the normal flux-happy Sharp rework. After a few cycles in the sink started producing clean water, I stuck the inner case into the dishwasher for a final blast.
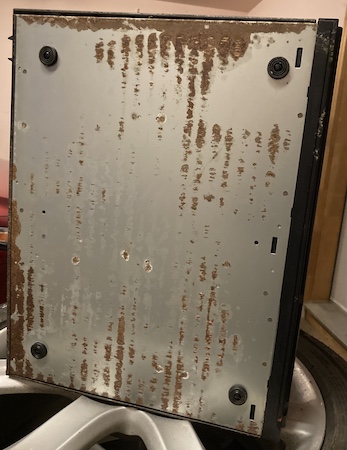
Even better, the back panel of the machine also cleaned up well in the sink, revealing that most of what I thought was rust was actually accumulated mud (and egg clutches for some kind of weird-looking Japanese bug.) Some heavy toothbrushing sent most of it into the drain.
There were still some ugly rust bubbles to fix, and some chunks of missing paint here and there, but at least now I don’t have to form a whole new rear panel in addition to completely repainting everything.
I find it hard to put my level of relief about the condition of the motherboard into words. This whole machine was an accidental gamble, and it was starting to look like it might have been a smart one. Now, all I had to do was clean everything thoroughly enough that I would feel okay with letting it into my home.
Peroxide For My Oxides
First up was to get the bottom of the inner case prepared for paint. Removing the little feet isn’t hard: there’s a little push pin in the middle that can be driven out with a small screwdriver, and then the rest of the “foot” just comes right out. They were all a little worn and dirty, but cleaned up with some soap and hot water.
At first, I tried the gentle, slow method by brushing a bit of CLR onto the rust, but it didn’t do anything except loosen some surface rust and make a thin brown stain.
After scraping the loose rust with a small wire brush for a bit, I decided I would just use Tremclad “aluminum” paint. This cheap hardware-store paint contains some kind of sacrificial oxide, and is “paint and primer in one.” Also, it was sitting in my paint cupboard.
Using this paint was a huge mistake.
I gave the bottom of the case a scuff with some eBay trademark-infringing knockoff Scotchbrite pads in order to give the paint a better tooth, washed it off with garden hose water, and then gave it a thin coat with the Tremclad. This worked out pretty well. A subsequent coat had a bit of a run in it because of a clogging nozzle, and obviously the surface isn’t flat, but no rust was peeking out on any of the corners. Good enough.
Unfortunately, it wasn’t good enough. It turns out that the aluminum paint, which I’d never used before, is even more special than I thought. A few days later, I brushed up against the bottom of the case while moving it aside, and saw that little flakes of aluminum paint were left behind. I scrubbed it with a paper towel, only to see a whole bunch of aluminum transfer to it. Not appropriate for a desk, especially one covered with other sensitive electronics!
After looking up reviews online, this seemed to be a pretty common complaint for this specific paint. So I was now in a position where I had to figure out how to strip it and what to paint the case with, again. Aargh!
Stripping the Case, Again
The obvious choice for stripping paint is to buy paint stripper. Guess what my local hardware stores did not have any of in June of 2021?
First, I tried an old bottle of Eastwood “Fast Etch” that I had lying around. This stuff is actually meant to remove rust, but I figured the phosphoric acid in it would do a great job of breaking up the Tremclad and letting me scrape it off. After a few coats and a couple hours out in the sun, the old paint was bubbling up and peeling off in rubbery chunks under the brownish zinc coating produced by the Fast Etch:
Unfortunately, this stuff was really hard to keep in one place. Since it’s basically liquid, it was running off the top of the case almost immediately, and would dwell in low points rather than spreading out. I also had trouble keeping it from drying out in direct sunlight, which is where the ugly, rubbery brown stains in the above picture came from.
Fast Etch wasn’t meant to be a paint stripper, though. Once all the paint was scraped off mechanically in a very satisfying session, I went to wipe clean with a shop towel and kept coming back up with aluminum flakes. Ugh.
After a rinse-down, I reached into my pile of auto body supplies and came up with a bag of tack cloths. These are basically baby wipes, but extremely sticky, and they’re used to get rid of dust, bugs, lint, etc before painting a surface. I kept dragging my tack cloth across the bottom of the case until it stopped coming up dirty and silver, which took a lot more time than I thought.
So: I still need to do something about the rust, and then I still need to paint it. Back to square one.
Rave About The Abrade
I took it to a friend’s house, who lives in an area with significantly more forgiving neighbours than I do, and we at first tried sandblasting it. After it became obvious that we would be there for the rest of our natural lives because the el-cheapo sandblasting gun kept clogging, out came the angle grinder with a flap disc.
That did a great job of stripping everything (rust, Tremclad, original plating) all the way down to the metal, although we had to take periodic breaks to avoid “oil-canning” the bottom sheet from sinking too much heat into it. We also found out that Sharp failed to actually complete the spot-weld on one of the front corners of the case. One part of the front panel was not actually attached to the bottom, but some pliers fixed that ancient factory oversight.
A quick coat of self-etch primer, and it was ready to transport back home. I should have topcoated it before throwing it in my trunk, because any slight scratch made the primer scrape off.
However, the important thing was that it covered up the metal we just ground bare. Even though it provides some protection to the naked steel, leaving it in primer is still a bad idea: not only is primer very soft, but it also has a tendency to suck in airborne moisture and create lots of rust under the primer, eventually ruining the freshly prepped surface. So it was time for a topcoat.
Since there were limited options for curbside pickup from hardware stores near me, I ended up grudgingly going back to Tremclad/Rustoleum. This time, I picked up some of their “Painter’s Touch 2X Ultra Cover” – it’s like they’re naming a 1980s fighting game or something – in battleship grey. This paint and primer combo went on fairly easily, seems to have adhered well in the areas where I did prep properly, and I think it looks really good. I’ve since bought another couple of cans. Pity almost nobody will see it once the machine is assembled.
but since both it and the etch primer are not high “build,” you can see obvious low points where the rust was ground out of the case metal. It’s on the underside, who cares? Let’s move on.
Alfred Hitchcock’s “Rear Panel”
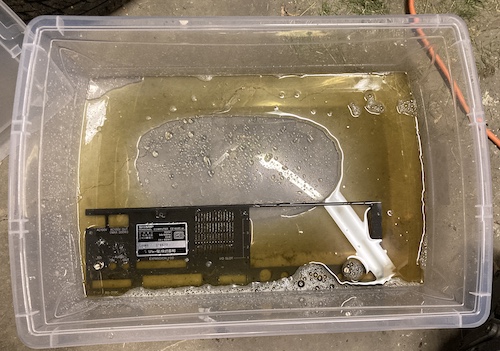
As for the rear panel, I chucked it into some Evapo-rust. Evapo-rust is a product that I’ve used before on a lot of car stuff; it’s some sort of weak acid that loves iron oxide, combined with a chemical that encapsulates the iron oxide as it is pulled off the panel. Yes, I will absolutely take sponsorship money and free chemicals: please send them to me.
The end result is usually that you get a tank full of filthy solution (which you can usually reuse until it turns solid black) and a part that is once again shiny metal (albeit often missing all the parts that used to be rust.)
I would have preferred to fully immerse the panel, rather than kind of tuck it into a corner like this. The reason why I didn’t is that I didn’t have any containers that were a closer fit for this 42.5cm-long panel without being too narrow. This 25L container was clearly way too big for 3/4 of a bottle of semi-used Evapo-rust, but Canadian Tire has also stopped selling Evapo-rust and I didn’t want to drive all over town looking for more.
As you can see, Evapo-rust is great at getting rid of rust, but it’s also great at removing the paint that used to be attached to the rust – which is okay, since that paint was doomed anyway, but I’ve been unpleasantly surprised in the past about just how much hidden rust was on a given item being treated.
After a day of sitting in the solution and then getting a quick hose off from a spray bottle, almost all the rust was gone, and the rear panel was back to bare, shiny metal in those areas. I was actually surprised how much paint was unharmed.
There were still a few stubborn spots of rust around the RS-232 port opening, so I scuffed that area with a Scotchbrite and put the panel back into the solution for another day of rust theft. I also propped up the container at an angle, so that the small amount of solution I had would better cover the rusty areas. That took care of the rest of it after a few days.
However, like I had originally expected, a whole lot more “paint” fell off in the process, and I had a much shinier/cleaner panel ready for a protective paint coat.
I realized at this point that I was going down the road of doing bodywork forever and not getting this machine working again, and so returned to the motherboard.
Cleaning up the Board of Directors
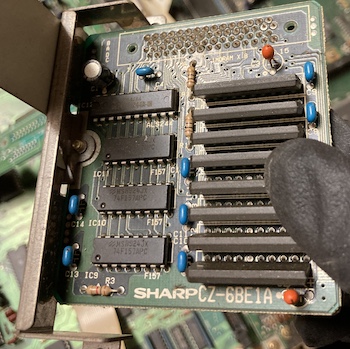
I had to figure out a way to remove all the stuff that the Shop-Vac didn’t suck off the board. Accumulated dust, tobacco deposits, roach poop and barn slime all needed to find a new place to live. Luckily, in the card cage, I had a lot of boards to test with before risking the mainboard – three expansion cards with one empty slot for another future expansion.
After I removed the cards from the cage, I broke it down too in order to clean the plastic card-mounting rails (gross) and the backplate board that holds the edge connectors (even grosser.) I didn’t take any pictures of these, because who cares? You’re just here for the cards.
![]()
The first board in the card cage is this handheld scanner board. These were a popular accessory for the X68000, filling the same sort of casual-scanning niche as the handheld Logitech ScanMans. This particular board is made by HAL Laboratory, who you might recognize from a lot of Nintendo games. It may be a relative of the “Handy Scanner” devices for the MSX, but I can’t seem to find anything on this board online. Either way, the scanner is long gone and the card is not extremely useful as a result.
I rinsed this board under running sink water and worked it with a toothbrush to get rid of the caked-on gunk. It came clean quickly, and I propped it up to dry. Since it was going to be a few months at least until the machine was test-fired, I figured it would be relatively safe to use tap water, even with the hard water in my area. Some traces near the back looked corroded, but they buzzed out okay.
The metal “back plate” on this card, however, was not in such great shape. Its decorative thumbscrews were badly rusted together. After a week in the Evapo-rust, they finally came loose along with a good two-thirds of the paint. I stripped, primed and fogged this with some cheap black spraypaint but I didn’t relabel the ports. Again, without the actual scanner to plug in, it’s likely virtually useless, but I don’t have any extra blank slot covers lying around. Maybe I’ll try to track down the scanner for a future article, or even build one!
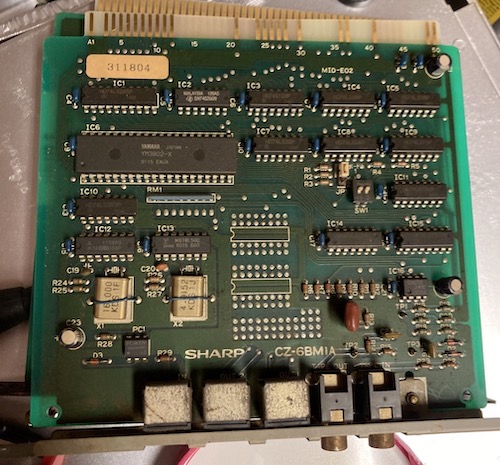
This second board is the relatively valuable Sharp CZ-6BM1A MIDI card, which is powered by a Yamaha YM3802-X “MIDI communication” chip, which handles all kinds of fun features like message parsing and clock dividing. The newer versions (v2.1 and onwards) of the Midiori card now replace this chip with an FPGA.
It cleaned up really well with a rinse.
The third and final card is the Sharp SCSI card, which didn’t need very much cleaning because it was at the top of the stack and thus relatively safe from the water and insect soup. That’s it for cards.
Booger Katamari
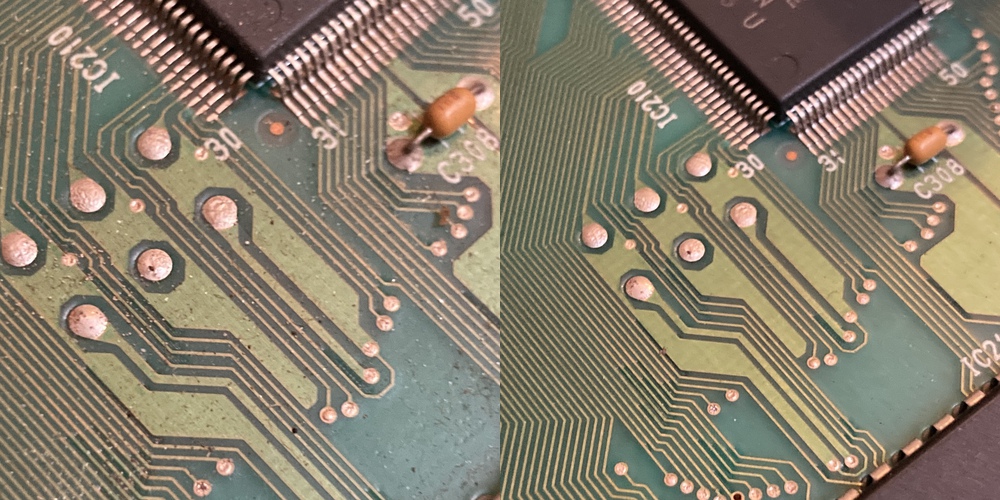
After blowing the motherboard off with compressed air, I tried something a little different. Blog idol Eric at Tube Time mentioned that he liked to use a glob of “ColorCoral” to clean grime and dust off of motherboards. I figured I’d give it a try on this. It came in a bag of little pouches containing blue goo. Naturally, I didn’t take any pictures, but follow that link for some of Eric’s.
Rolling the giant booger around the board was sort of calming, but every so often it seemed like it would get “stuck” and become hyper-sticky, leaving globs and strings behind everywhere. At first, I thought it was reacting with some chemical in dead spider goo, or electrolytic capacitor leakage.
Eventually, I figured out that this just indicated that area had a ton of gunk and I just needed to go slower and keep Katamari-ing that area until it was all gone. Overall, the ColorCoral did a decent job of cleaning the board. It wasn’t perfect at getting stuck-on stuff off the board, but basic grime and dirt was swept away as the goo turned from bright blue to dark green – and stinky – over the course of an hour. I think I’ll probably use it again in the future, mostly because I still have four packs of it.
Here’s the area around the MC68901, before and after:
I can’t put into words how relieved I felt to finally have a motherboard that I could safely touch with bare hands.
Most of the cigarette-smoke nastiness didn’t shift very well from this. For the extended-floppy-control flex cables, I ended up using a Lysol wipe, which did a great job:
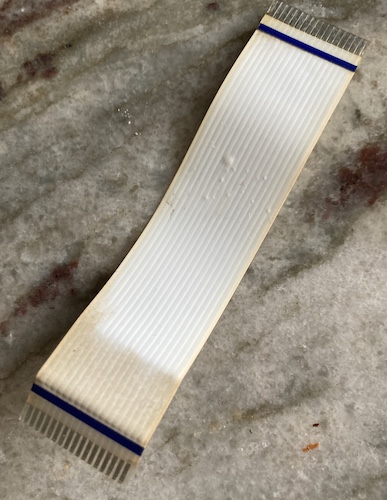
Lysol wipes didn’t do much to clean the soldered-in floppy ribbon cables, however, which remain disgustingly grey-yellow. I might have to replace them entirely later.
I left the floppy drives on the side while I concentrated on getting the “minimum viable” computer back together.
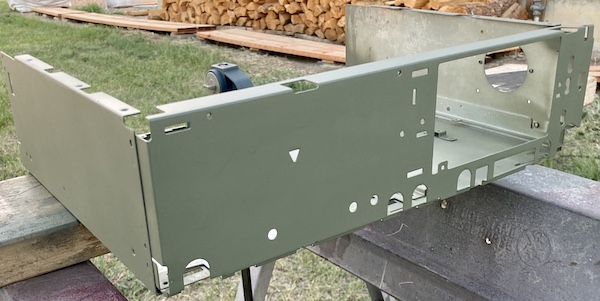
Reinstalling
At this point in the project, I was feeling pretty good. A lot of hard work had been poured into it at this point, and now I could finally stop staying up at night worrying about whether a cat or errant earthquake would screw up the loose board.
I hit upon a small problem after retrieving the painted inner case and trying to slam the motherboard back into it: it didn’t fit. Whether it was from the months of sitting out, the structure lost to the rust, or the heat we dumped into it during the paint stripping, the case just didn’t line up properly anymore.
I did some strategic pounding on one side of the case with a rubber mallet and a 2x4 as a dolly, and got the board to slide in nicely, but now all the screw holes except the frontmost ones no longer aligned with the board. Since some of those screw holes are critically important to hold up the power supply and the card cage, I had to fix this.
After studying it closely, I found out that there was a decent gap around the front and the motherboard wasn’t fully seating into the case. I ended up prying the two outer metal tabs - the one to the side of the keyboard and the one to the side of the power button - forward to give it some room. This worked. I assume that I bent them inwards in the course of painting, as they’re not welded onto anything.
At last, the cleaned motherboard was reunited with the repainted inner cage. We had something resembling a computer again, after several months of on-and-off effort!
To test it, I’d need a power supply. And I’d finally decided to take option “2” – starting a whole new, complicated project for myself. Are you really that surprised?
Repair Summary
| Fault | Remedy | Caveats |
|---|---|---|
| Computer is full of bugs. Like, actual ones. | Apply Shop-Vac until they are gone. | Nightmares |
| Motherboard is filthy. | Apply “ColorCoral” to clean board. | Not a perfect clean, but good enough. |
| Bottom of case skeleton is rusted. | Grind metal clean, prime, and paint. | |
| Ports are rusty | Not fixed yet. | |
| Power supply is damaged | Not fixed yet. | |
| Rear, outer case are rusty | Not fixed yet. |
Update History
- February 2022: It turns out that the PRO2 (CZ-653C) uses a Tetris-piece PSU. Added an update tag to that section to mention the difference, so nobody orders anything before they check the inside of their computer.
-
All three of the braces are completely identical. This entire machine has a lot more intelligent cost-reduction and industrial design than the “twin tower” X68000s, and seems much more repairable. I wish I had started with this model… well, maybe not this specific one. ↩
-
The “Takeru” branding is more significant than it seemed on first glance. In Japan, the Takeru system was an experimental method of software distribution over telephone networks by fax and printer giant Brother. Independent developers could submit their software to be published on the service and keep 70% of the proceeds. It also helped keep some of the more niche platforms like the X68K and FM77 alive, as even distant computer stores could still offer new games for them without having to sacrifice shelf space in lieu of faster-selling PC88 products. It could even laser-print user manuals on demand. Brother claims there were about 300 Takeru terminals installed. You can read more about it at this fantastic English-language(!) blog entry by Kazuhisa Minato, a former indie game developer who published on the service. That’s where I found out that the network ended up getting repurposed for the extremely popular Joysound karaoke-music network, still used heavily to this day. ↩