How Test Suite It Is
Tags: console nintendo famicom nes homemade-hardware
You can always tell when it’s the holidays. The days are getting shorter, I’m always going out to shovel snow off the sidewalk, and I have a hankering to build a Famicom cartridge. Or, more specifically, a blog friend asked me to put one together, so I’m using my Tengen Tetris piracy skills… for good?
Just as the calendar moved to December 2022, blog friend Stephen asked around the Famicom World Discord server if anyone was willing to build a 240p Test Suite cartridge. I still had a PCB, case, and parts on hand, so I said yes.
The writeup has taken a little bit longer than that, but they say the best Christmas gifts are actually those that arrive in April.
What is 240p Test Suite?
In its original release, the 240p Test Suite is a collection of software meant to provide consistent audio/video tests for many game consoles. Using it, you can dial in your composite mod, or RGB mod, or fix your buzzy sound. Most versions come with a built-in MDFourier, which is a useful tool for emitting consistent and tricky audio patterns from your system in order to dial in sound modifications or detect noise in the audio path by either ear or scope.
Although the NES/Famicom port doesn’t appear to be an “official” release, some hobbyists have worked hard to make sure it still offers a lot of useful tools in its relatively tiny 64kB size. They also have a Game Boy and Game Boy Advance port in the same source tree, which is probably helpful for figuring out clone compatibility.
Conveniently, I was interested in testing it out because of how dissatisfied I was with the blue push on my Famicom composite mods in the past. Stephen also planned to use it as a tester for his own in-development composite mod, hence his request to have me throw one together from parts on hand. What parts, you ask?
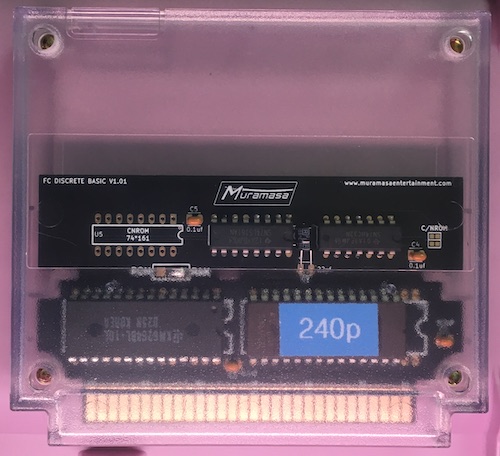
Getting the Parts Together
240p Test Suite uses the UNROM mapper, which almost always (but not always) means that the CHR side of things is a RAM, not a ROM as it is with older NROM games. In an UNROM game, the game program (loaded from the PRG, or Program, ROM) copies graphics into the CHR, or Character, “video RAM” for the Famicom’s PPU to access.
And CHR was RAM in this case, too: the entire 64ish kB file distributed off GitHub is only the PRG ROM. Putting that *.nes file into the rom.solutions web tool shows that the CHR ROM portion is 0kB – in other words, it doesn’t exist. So I needed a compatible SRAM to populate the new board.
Back when I did the Portopia build, I pulled a 6264 SRAM out of the donor Casino Kid cartridge in order to convert it to a CHR ROM. Great, thought I, but when I went to look for the RAM in all the usual spots, I couldn’t find it. I ended up dipping into my stash of UNROM donor carts and pulled up this rental (Blockbuster Video?) Total Recall. Sorry, Arnie. I’ll put your RAM back in when I get a shipment from Bob AliExpress.
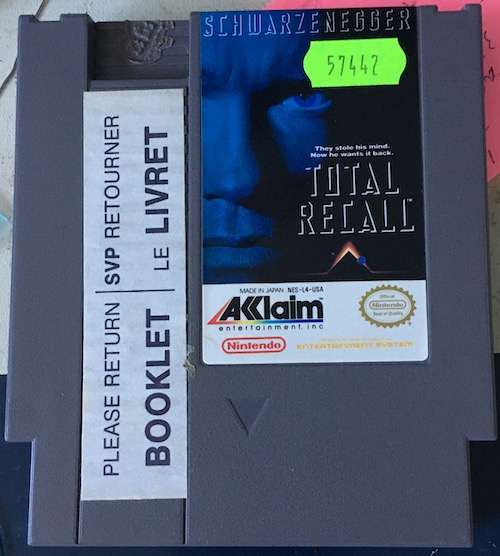
Somehow, while the Total Recall board was flipped over, I managed to desolder the PRG ROM instead of the CHR RAM that I was looking for in the first place. This was despite the fact that I had already touched up all the RAM joints with bright new solder. Having to desolder another 28-pin DIP added a little bit of time to the assembly process, but the Hakko FR-301 desoldering gun continues to pay for itself.
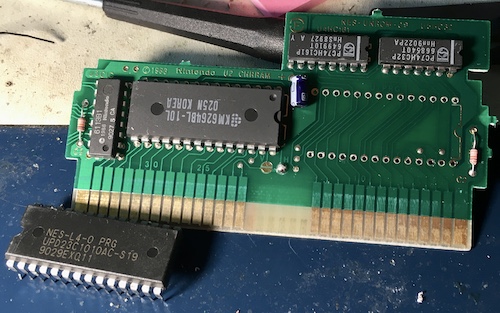
Once the 6264 SRAM had been removed from the Total Recall board, I went ahead and transferred it to the new Muramasa PCB. Before I started populating the PCB, I learned from the mistakes of last time and put some Kapton tape over the new edge connector so it wouldn’t catch stray burps of solder and be ruined. And it’s a good thing I did: the tape protected the edge from at least ten little flecks of solder on it that would have ruined the ENIG plating of the connector.
I reached into my boxes of logic IC tubes to pull out the 74LS161 decade counter and the 74LS32 OR-gate that would make up the decode and page-switching logic for UNROM. Brand new 74s! Now that’s customer service.
ROM Preparation
I used the aforementioned rom.solutions website again to pull the iNES header off of the provided Test Suite ROM – otherwise, it’s sixteen bytes too long, and minipro complains when I try to burn it:
Incorrect file size: 65552 (needed 65536, use -s/S to ignore)
Oops, good thing it caught my dumb mistake. That’s why they put erasers on astronauts.
It burned directly to a 64kB 27c512 EPROM that I had in a drawer, and verified fine. Then I straightened the legs and popped it into the board, making sure to top the EPROM with a label-maker label in order to protect its UV-erase window from sunlight. Hey, it’s a clear case.
Mirroring configuration
In order to finish building the cartridge, I had to set some solder jumpers for the mirroring configuration. What is mirroring, though?
On the NES/Famicom, background (tile map) graphics are constructed using a nametable. You can think of it as basically a big list of tile references, where the PPU memory has been set to say “the tile at (6,8) should use the little bitmap image at xyz when you draw it.”
A nametable is the size of the screen, broken up into 8x8-pixel tiles. It’s 32 tiles wide and 30 tiles tall, producing an output of 256x240 pixels – again, the size of the full screen.
There are two nametables, and although that might sound weird, it makes a lot of sense for scrolling. As you walk off the right edge of one screen, you can scroll that nametable left, and start scrolling in the “next” nametable on the right side of the screen. That way, you don’t have to delete tiles and move them over by hand, which produces chunky, slow, “tile-at-a-time” scrolling like on the ColecoVision and SG-1000.
Super Mario Bros does this, automatically streaming in the “upcoming” parts of the level that lie ahead of our Italian plumber into the offscreen columns of the nametable, so that they’re ready for you to see as Mario arrives there.
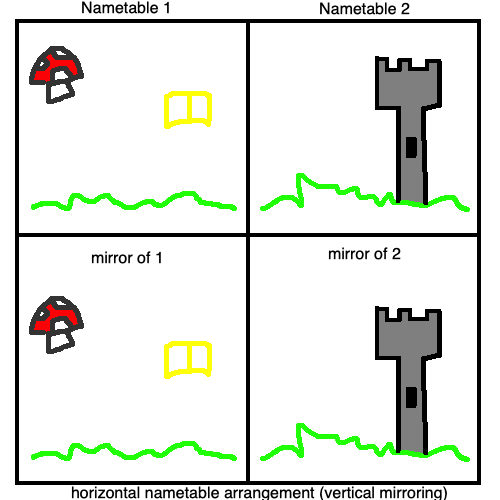
Of course, this system has a limitation. There’s only two nametables, and your cartridge must decide if they’re arranged horizontally or vertically1. If you make a game that scrolls vertically and horizontally, you’ll have to pick one axis to do slow, by-hand scrolling on. That’s part of why many NES games have a weird shimmering effect near the edge of the screen when you scroll in a certain cardinal direction, or claustrophobic black borders that make the screen narrower.
If you try to run vertically off the bottom of a nametable that is arranged horizontally, it will just repeat – it’s mirrored.
Why is this a problem for us building a cartridge? Because the cartridge PCB itself tells the Famicom what orientation to fit in: this toggle can’t be set in software, at least not for an UNROM cart.
So I had two things to do:
- I have to decide whether 240p Test Suite is meant to have a vertical or horizontal arrangement of nametables;
- I have to figure out if the “V” jumper on the cartridge means vertical mirroring or vertical arrangement.
To figure out the first problem, I checked the iNES header on the original 240p Test Suite ROM image using the inestool utility.
% python inestool.py read 240pee.nes
240pee.nes (9EC04AB4):
	PRG ROM         : 64 KiB
	PRG RAM         : 0 KiB
	CHR ROM         : CHR RAM
	Mapper          : 2
	Mirroring       : Vertical <---
	TV System       : NTSC
	Has NVRAM       : False
	Has Trainer     : False
	Is PlayChoice-10: False
	Is VS. UniSystem: False
Vertical mirroring. This told me that the game was meant to be played in a horizontal nametable arrangement.
In order to figure out what each jumper meant on the cartridge, I used the continuity test from my multimeter. The Famicom knows to set horizontal nametables (vertical mirroring) when PPU pin A11 is shorted to VRAM A10.
According to the Famicom cartridge slot pinout, pin 54 is PPU A11 and pin 53 is PPU A10.
A continuity check on the Muramasa cartridge showed that pin 54 was connected to the “V” jumper pad on the cartridge. This meant that soldering the cartridge’s “V” pad meant “vertical nametable.” I soldered the jumper to “H,” for “horizontal nametable.”
This convention is the same on original Famicom cartridges, but I’m told that some cartridges have it reversed – the V and H stand for vertical and horizontal mirroring. Very confusing, right? Yes it is.
Let’s move on.
Final Construction
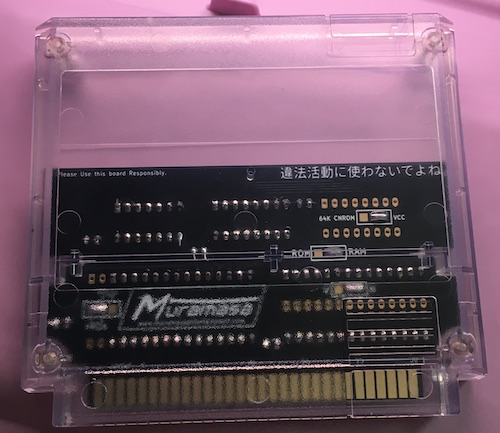
I really like the clear Muramasa cartridge shell. The black one that I used for Tengen Tetris was nice and all, but the clear one adds that little bit of cyberpunk pop that really helps show off the board. And also any bad soldering work, left-over flux, and uncleaned adhesive from the top of the EPROMs. Sort of a double-edged sword.
Looks great. Time to see if it works.
Testing
Because my long-suffering PVM’s colours are off, I plugged the Famicom into my el-cheapo TCL TV in another room. This is… a television, and its most useful feature for this purpose is that it’s easy to get at the composite input ports. Being from this decade, the TCL TV also has a bunch of annoying internet-of-things stuff, which initially kept me from testing the Famicom, because it was too busy updating its firmware.
I went and got a sandwich, and came back.
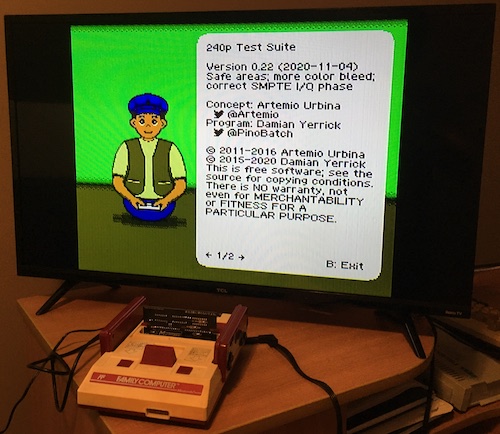
When using the SMPTE colour bars test, I was surprised to find out that the composite mod is better than I expected. There was some hum and buzz on the sound test, which I isolated to the volume slider on the player-two controller’s microphone after some debugging effort (I keep forgetting about this! I should really just add an on-off switch for the microphone circuit.)
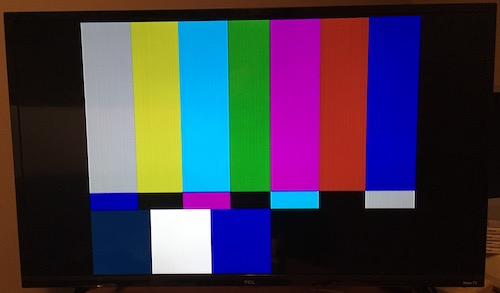
Yeah, these colours look just fine to me! Maybe my composite mod isn’t so bad after all, as long as I play it on $200 hotel-grade LCD TVs from Amazon.
Conclusion
After packing it up (along with the Famicom Disk System I wanted him to service,) I sent the new cartridge off to Stephen’s. He told me that it worked great, which means a job well done. The only problem is: now I have to build another one for myself!
-
Some games with custom mappers implement four nametables. 240p Test Suite isn’t one of those, so we won’t bother going into this. Mostly because I don’t really understand it yet. ↩