Soggy-1000 ][
Tags: console sega sg1000 homemade-hardware homemade-software soggy1000 clone
Once I got the Soggy-1000 playing SG-1000 cartridges, the next thing to do was to extend it. In this phase of the project, we’ll take that leap from “interesting” to “slightly ridiculous,” by adding the feature I’m most excited about – at least until I get excited about a different one – the SK-1100 keyboard connector.
When beefing up the board for v2, I obviously wanted to incorporate all the fixes from v1. Then, I traced out the edge connector from my Mark III using a digital caliper, and got to work making a replacement in KiCad. All of the signals (such as ) were already decoded on the v1 board, so it was just a matter of running a few more cross-board traces, and then hooking up the address and data lines from the nearby cartridge slot.
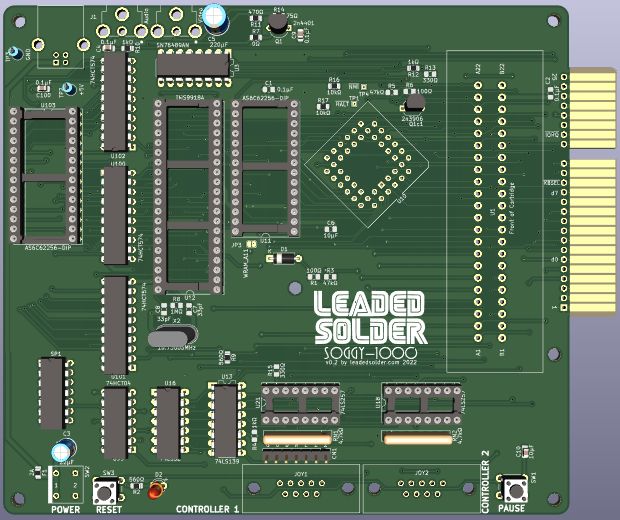
I think this would look cooler if the connector were “sunken” into the board a little bit more, like with the Mark III. Instead, it just kind of juts out into space and makes the board look weird. There might even be strain-relief concerns, and adding some extra “meat” to the board – which I’m paying for already1 – would give me room for a few more ICs. Maybe a fix for a future version, or it can be obscured inside a case somehow.
It sounds like a small improvement, but I also added two more mounting holes near the cartridge slot, and one new hole in the vague centre of the board. Like with the Leako, I wasn’t happy with how much the board flexed when you were trying to put a cartridge in. With some shorter nylon standoffs for feet (8mm seems to be ideal,) it stiffened the board up substantially.
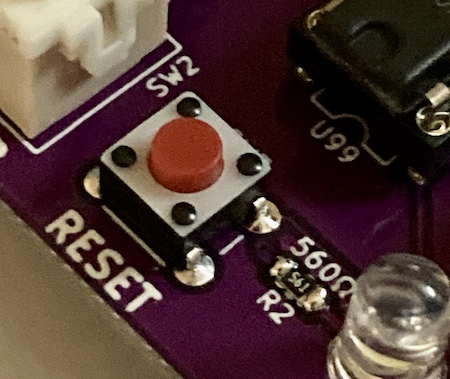
One last tiny change: there is now a reset button. I got tired of repeatedly cycling the toggle button when I was trying to diagnose the sound issue with the original board, so I’ve improved upon Sega’s design.
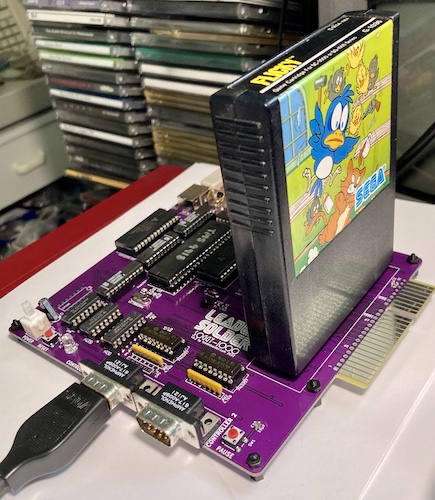
It Arrives
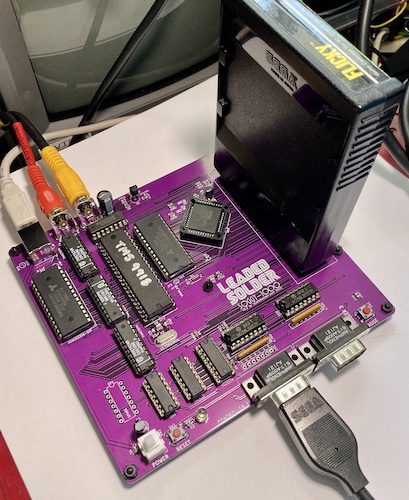
For a couple different reasons, I breathlessly anticipated the delivery of this violet board. And when it arrived, it looked pretty good indeed.
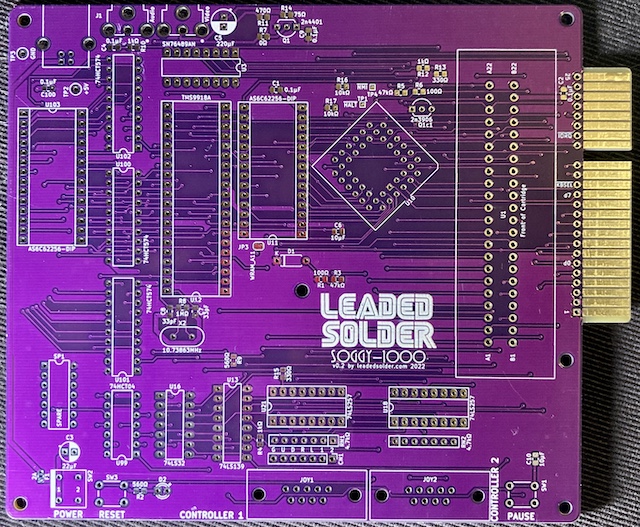
I usually follow the red-yellow-green pattern for solder mask as my confidence level increases with multiple spins of a board. Sometimes I get lucky and a “red” is the final step!
However, I knew that if the v0.2 board incorporated all of the bodges from the “red” v0.1 board, then it would work, and also the JLCPCB yellow colour washes out the nice white silkscreen. And I was really proud of that logo, you know?
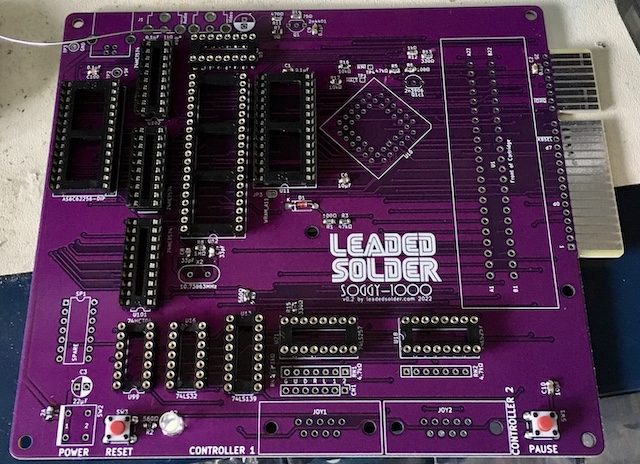
Assembly went quickly this time, too, except that I soldered the Z80 socket in 90 degrees off. That took a while to correct, though it’s much nicer to desolder fresh solder on a brand new board than it is battery-damaged 80s stuff.
Speaking of, I’m also really feeling the wallet pain from these $12 PLCC Z80s. To keep the cost down, I think the next Z80 system I design is going to use a DIP40 version rather than the PLCC. Those used DIP parts – used PLCC Z80 CPUs seem very rare – can be gotten for about a buck a shot from AliExpress, are hopefully from a virtually inexhaustible supply, and sometimes they have cool vintage second-source branding on them, like Sharp or GoldStar. And the pins are fatter, so logic probing is easier. Maybe the routing is easier, too? We’ll see on the next machine, whatever it is.
It Tests
I was really excited for the first run. So excited, in fact, that I cleared some room for the machine to sit instead of just piling it on top of some broken J-PC trash like last time.
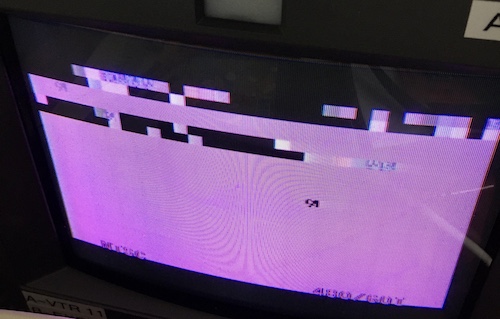
With breathless anticipation, I flicked the switch and… nothing on screen. A white flash, but the PVM didn’t report any discernable sync signal. What was going on?
I tried a few more times, and cleaned cartridges as well. That’s when I got a whiff of hot semiconductors. By deploying my favourite diagnostic tool, my left index finger, I was able to isolate the problem to the 62256 being used for video RAM. That IC was screaming hot.
What was the problem? I put it in backwards. Yep, I ignored both the silkscreen and the little divot on the socket, and convinced myself that the VRAM 62256 IC went in the opposite way to the work-RAM 62256 right next to it for no good reason.
After pulling the (still very hot) RAM out of the socket and putting it back in the right way, I held my breath for another boot, fearful that I had killed the pricey SRAM.
But boot it did!
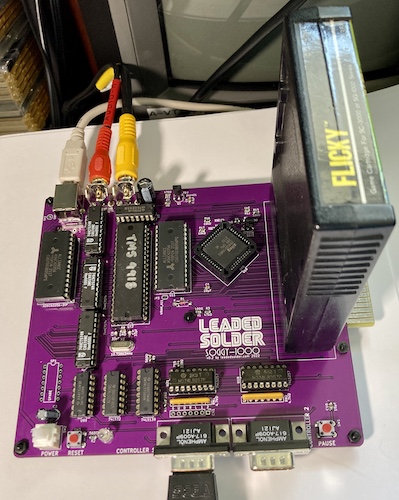
Flicky ran great, with sound, scrolling, and correct controls. I even tested out the new Reset button, which worked great (albeit resetting the TMS and causing the system to lose sync.)
Unfortunately, my clever fix for debounce on the Pause button (adding a 10µF cap between and ground) did not seem to work. Mashing it did indeed pause the game, but it would also hang the music and eventually reset the console.
Pulling out that 10µF fixed it, but without a proper debounce circuit, this is still really glitchy. Is it finally time for me to learn how R-C filters work?
More Carts
One of my regrets on the Leako project is that I didn’t build my own cartridge for it early on, so I ended up having to scrounge up real carts to test it with – losing a few days of RetroChallenge in order to get a second copy of Turbo particularly stung.
I quickly fixed that problem on this machine, designing and ordering a new ROM cartridge board shortly after Soggy v1 was running.
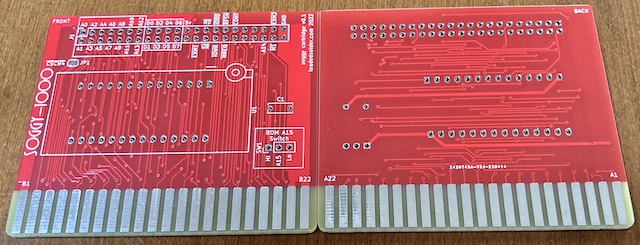
This board is a fairly simple bus extender, with a 27c512 ZIF footprint in the middle. It has a jumper for forcing the A15 line on the 27c512 high or low, offering some primitive multicart functionality. The SG-1000’s memory map only offers a 32k window for , so a 27c512 would otherwise be half-wasted.
Since it’s a bus extender, it needed lots of extra traces, so the routing is pretty hairy. However, this will be good to have later if I want to make an SF-7000 clone or even a FujiNet prototype.
The cartridge also has the ability to cut the B2 trace via jumper, which is part of a plan for the next version of the Soggy-1000. But more on that later.
When tested, the PCB fit pretty well in the Soggy’s slot, although I think it could have done with a few more mils of thickness to help self-centre itself more easily. Overall, very pleased.
It will only support software that doesn’t have any external RAM or weird mappers, but that should be enough to try the majority of games for malfunctions on my system. And it will come in handy for writing programs that will test the keyboard.
For my first test, I grabbed Wonder Boy out of a ROM collection. That ROM file was exactly 32kB, so I figured I could burn it directly to a 27c256. However, when I powered on the system, it acted the same as when a cartridge is not inserted at all.
I did a quick check of the Genesis Plus GX emulator source, and it seemed to make its decision on what mappers to load based on the CRC of the cartridge, unlike an NES emulator, which relies on a prepended “iNES” header. That CRC was not listed, so I knew that Wonder Boy did not need a mapper (or “external” RAM.) This makes sense, since the ROM’s CRC appears to have come from a Sega My Card, which (as far as I know) doesn’t support external RAM or mappers.
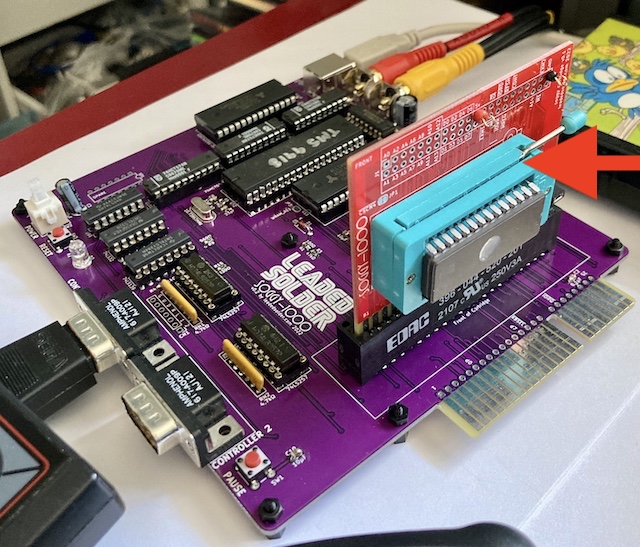
After exhausting some basic checks, I decided that the sketchy 28-pin ZIF socket (it had exploded and bent some of the pins while I was trying to take it apart) was probably not working properly – it never quite reassembled properly, the handle falls out if you shake it, and there’s quite an uncomfortable gap on the “lid.” I stuffed another board with a regular old dual-wipe DIP28 socket, and that one booted right up into Wonder Boy.
I did not particularly like Wonder Boy. The scrolling is stuttery, and there’s tons of flicker from sprite interpolation. But it proved that the cartridge worked; if I want to make my own software, I’m not stuck with scavenging expensive cartridges from Japan to do it.
I made a Girl’s Garden cartridge as well, which is a much more entertaining game. At first, I thought that both cartridges sometimes didn’t quite boot properly on a cold start. My guess was that it was something with the reset timing, like how the SMS Everdrives don’t work properly on Mark IIIs. The CPU, being modern CMOS, might be coming up faster than the pirate EPROM was ready to go, and the mask ROM in the real Flicky cartridge was much faster than my salvage EPROM.
This was not the case at all, and we’ll find out what I was doing wrong in a bit.
More RAM
Like on the v1 board, the main RAM is a 32-kilobyte 62256. This is mostly wasted on the 1-kilobyte SG-1000, but the SG-1000 II2 (and SC-3000) upped this to 2-kilobytes. In order to use 2k of that 32k, I added a jumper on the first version to connect the CPU’s A11 line to the RAM, but I didn’t wire it up at the time because I already had enough bodges going on.
Of course, I didn’t know what (if anything) took advantage of that 2K3. I wrote a very quick program in z88dk to iterate through the memory and test it for mirroring.
…and then I bailed on that project, because z88dk makes the assumption that it is running somewhere in memory. It was very difficult to test the entire memory space of the machine without mangling the stack, running into spurious values, or worse. This should have been obvious to me, but it wasn’t.
I decided instead to write a quick program in Z80 assembly to do this test. It’s not as nice without the handy z88dk console library, but it got the same result. I used some of the TMS9918 initialization code I had from another project4, and mixed it with a public-domain 8x8 font that I was able to find on GitHub.

After a couple weird episodes (the pixels in the rows in the characters in the font are written in right-to-left order, possibly because they wrote a better loader than I did) I had a way to write text. Now, all I had to do was write the tester, which was much easier…
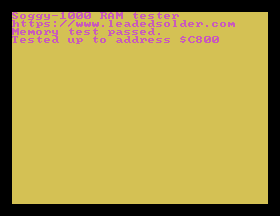
MAME, interestingly enough, always implements an SG-1000 with 2K of RAM. Here it is confirming that it managed to count up to $c000 + $7ff bytes (2K) without encountering any memory errors or mirroring. Of course, MAME also starts us off with completely zeroed memory, which isn’t likely to be the case on a real machine – always important to remember these little differences.
Outside of the font conversion, the hardest part of writing this little tester was doing the hex printing routine. I had to do a bunch of bit shifts and ended up finding this super useful reference page for common 16-bit Z80 bit shifts.
Alright, let’s write it to a real EPROM and give it a shot. I fully expected it to fail, because I hadn’t yet done the bodge to wire the RAM’s A11 pin to the CPU’s A11 pin.
And, indeed, it did fail – but not the way I expected. When started up with my RAM-test ROM installed, the Soggy would generate sync from the VDP, but nothing happened on screen. With the logic probe, I saw activity on the VDP’s pin, which is to be expected. Some step of the initialization process was being foiled, or just not right.
I knew that the program was running, because I had inserted some code to mute the SN76489’s default “uninitialized” drone, and the sound would buzz for a split second on startup before going silent.
Eventually, I managed to get the thing into a mode where I could get some scrambled graphics, but it appeared like they were in the relatively high-rez TMS99xx Mode 3, instead of Mode 0 like I wanted. It took me another couple hours of guessing, paranoid conspiracy theories, and checking, accumulating a small pile of UV EPROMs in the “to erase” pile, until I finally just loaded up Girl’s Garden in the MAME debugger and went single-stepping.
Early on in Girl’s Garden, there’s a massive busy-wait loop where they decrement from $FFFF down to zero, two times. This appears to take just enough time for the VDP to start working properly after coming out of reset. This explained why I thought the Girl’s Garden cartridge wasn’t working at all – it’s a very long delay with a black screen, and I was going “oh no!” and shutting the system off to reinsert the cartridge during it.
I stuck a similar loop into my RAM tester program before I started sending any commands to the VDP, and that solved the problem. Well, some of the problem.
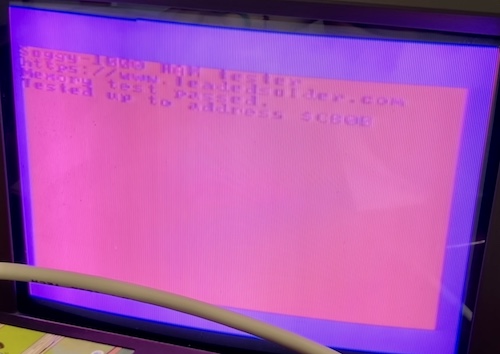
On the first successful run, the tester bragged that it got up to just before $c800 without running into any errors – or mirrored regions.
That was very strange to me, because I thought that I had not yet added 2K of RAM to the Soggy. It should have detected a mirror at $c400 as soon as it stepped off the end of the original 1K and back into itself.
The original configuration, where A11 of the RAM is always pulled low, had not been changed.
Wait a minute…
Let’s add $c800 to decody.py, and see which address bits are hit when it gets there:
1100000000000000 internal RAM (SG-1000)
 bits set: A14, A15
1100010000000000 extra internal RAM (SG-1000 II)
 bits set: A10, A14, A15
1100100000000000 end of 2K of RAM
 bits set: A11, A14, A15
It turns out I had actually done my math incorrectly, and already had a 2K mod installed! A10 is the line I should have jumpered. Well, at least we know it works.
Like Computer Engineering Barbie says, RAM upgrades are hard.
These Next Steps Are Key
With a stable platform, all things are possible. Incorporating all the bodges from version 1 did indeed produce a reliable system that can be assembled. That’s a valuable piece of knowledge on its own!
Now that we have a keyboard edge, the ability to write software for the platform, and a working (expanded, even!) system, it’s time to start building the keyboard – an expensive project, but certainly worth it. There’s so many parts (all of which are stuck in shipping somewhere!) I wish the solder leveling had been a little better on the keyboard edge, but it’ll work.
There are so many possibilities for this keyboard; it’s super exciting.
I also have a lot of (great?) ideas for how to extend the version 3 of the Soggy-1000 even further, which you’ll probably see before any updates on the keyboard.
-
At my preferred fab, they charge by the outer bounding box of the board, so having things that stick out is just wasting money, as you pay for all that empty space between the “jut out” and the rest of the board. ↩
-
Through research (buying an SG-1000 II,) I have discovered that the SG-1000 II actually only has 1K of RAM, just like the original model. This doesn’t materially change the rest of this article, but it is an error which I regret. ↩
-
The aforementioned source code for Genesis Plus GX seems to indicate that only Circus Charlie, Q*Bert and Othello Multivision BIOS expect 2kB. The latter two are Othello Multivision games, while the former appears to be some sort of bootleg. We’ll cover the Othello Multivision in a future entry, so this gave me something else to look into. ↩
-
More on this later. It’s a big project, which I’ve been procrastinating on by doing this one instead. ↩