Soaking it in with the SK-1100 Keyboard
Tags: console keyboard sega sg1000 soggy1000 homemade-hardware pickups
If you’ve been following the Soggy-1000, my clone of the Sega SG-1000, then you know what it needs most of all is a keyboard. The original Sega SK-1100 keyboard is hard to find, but I still managed to luck out and get one at auction. Let’s plug it in and find out if it still works.
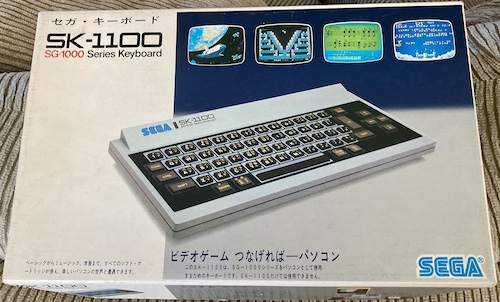
Judging from the katakana on the top left of the box, the “SK” stands for “Sega Keyboard.” We’re through the looking glass here, people.
The Sega SK-1100 keyboard was sold alongside the SG-1000 machines as a way to turn them into a budget home computer. Since the SG-1000 started life as a cut-down clone of the SC-3000 home computer, the combination reintroduces most of the functionality of the SC-3000. And the fact that it serves as a useful Trojan horse to get a game console into kids’ houses under the pretence of “learning computers…”
This boxed SK-1100 was being sold alongside a boxed (and reported as broken) SG-1000 II. I looked over that SG-1000 II in a previous entry, and figured out that it wasn’t actually broken… so we’re going to use it as our initial test machine. Since they were sold together, chances are this keyboard and console have always been together, through their first life in Japan and their trip to a new country. Aww.
One curious aspect of the box is that it uses the SG-1000 II as its photo model:
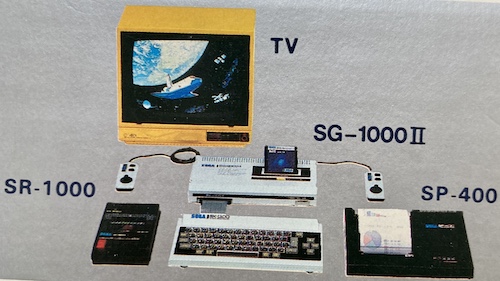
This pictured setup has probably never actually existed in real life. Neither the SR-1000 tape recorder, nor SP-400 plotter module pictured, are actually connected to the SG. Their product photos appear to be superimposed nearby with different lighting.
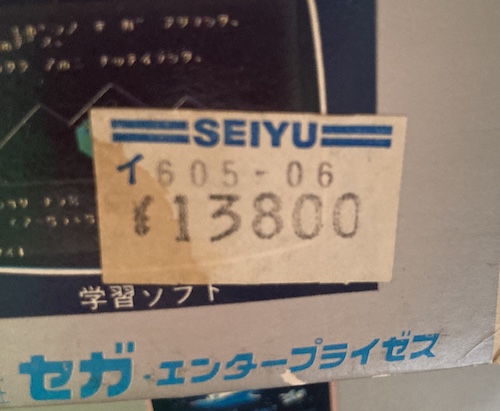
Based on the price tag, this particular keyboard was bought at Seiyu, a huge (Walmart-class) Japanese supermarket/budget-retailer chain. Seiyu may be the department store whose customers Hideki Sato tricked into buying “Sega’s Famicom.” It’s very cool that the price tag survived this long. I certainly wouldn’t try to remove it now.
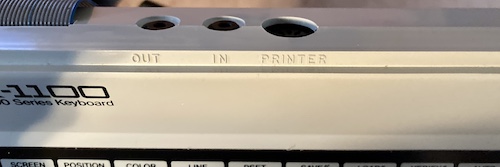
The aforementioned tape recorder and plotter would connect to these ports on the back. Loading from tape and printing are done through the keyboard, as obviously the SG-1000 lacks these connectors.
Gotta get your BASICs right
Sega BASIC Level III-B is the ultimate BASIC for the SC-3000. Not only does it have all the keywords (“Level III”) but it also has onboard RAM (“B”) – and a lot of it.
I wanted to make my own BASIC III-B, as I only possess a BASIC II-A cartridge, which you saw way back in 2020 when I was half-fixing the SC-3000’s keyboard. Said cartridge should work fine in the 2K Soggy, but not in a real SG-1000 II, with its wimpy 1K of RAM. This is because even on a beefy 2K machine like my SC-3000, the BASIC reports a mere 515 bytes free on startup.
Another reason why I had to make my own cartridge has to do with cartridge pinout differences between the SG-1000 and the SC-3000. The BASIC III-B cartridge has dynamic RAM (DRAM) onboard, which means it needs an explicit refresh signal as well as RAS/CAS signals. For whatever reason, the SG-1000 cartridge slot1 doesn’t provide these (possibly to reduce costs.) As a result, my cartridge would have to use static RAM (SRAM,) which doesn’t need to be refreshed and can be addressed like a ROM.
Nick Hook from SC-3000 Survivors provided me with some pictures of the inside of his BASIC III-B cartridge, but I didn’t particularly need them. Enri’s site had a schematic, but once you understand the memory map of the SG-1000, it sort of can’t be done any other way.
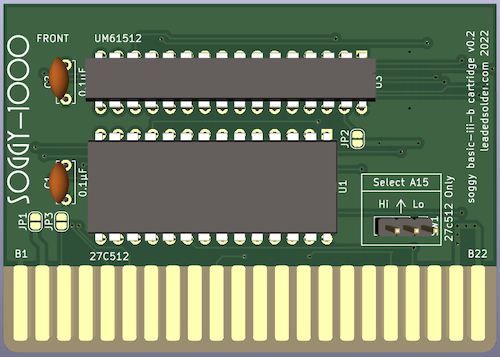
The RAM footprint is a little unusual – I obviously didn’t have any narrow 32-pin DIP sockets around, so I had to make one out of two 16-pin sockets – because I designed the cartridge around the UMC UM61512, a 64k SRAM that I fell in love with on AliExpress2. Hey, I gotta get my thrills somehow.
When I was assembling it, I put masking tape over the edge connector.
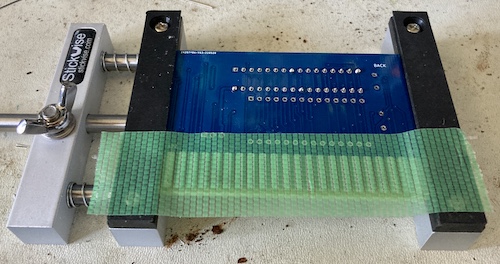
I learned this lesson the hard way when I was putting together the ROM carts for the Soggy-1000 v2 entry: sometimes the Kester solder likes to “spit” onto nearby surfaces. It’s real hard to remove cooled solder from a HASL edge connector, being made of solder itself and all. Better to just tape it up than to ruin an entire board from an errant solder flake.
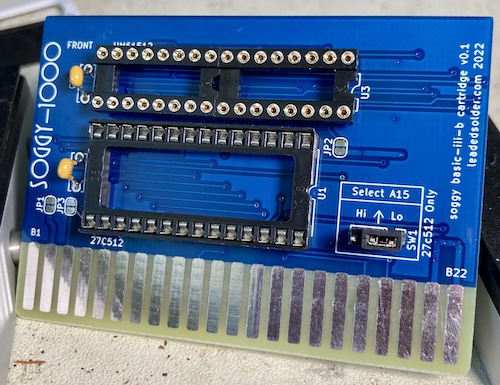
Because I had to order a minimum of five of these boards, and I couldn’t think of four other people who would want a janky pirate copy of BASIC III-B, I set all the tricky stuff onto jumpers. This way, if I didn’t want to have a “RAM cartridge,” I could just cut the jumper that pulls high, and just use it as a regular old single-ROM game cartridge. I find that I’m getting a little better at planning ahead for alternative uses/bodges for a board, but maybe that’s just me getting even cheaper.
OK, that’s enough about BASIC. Let’s get back to the keyboard.
Hook it Up!
The SK-1100 connects to the SG-1000 with a 50-pin ribbon cable. It’s a fairly generous length, and terminates in a female edge connector like a 5.25” floppy drive cable.

Because I’m a connector dork, I couldn’t help but be impressed with the edge connector. It’s got a moulded-in polarizing pin, which must have cost a fortune. Even floppy drive manufacturers usually used an insertable polarizing key, of the kind I used for the supergun project.
I plugged the keyboard into the SG-1000 II, which took a little bit of eyeballing and coercion. There is not a lot of space between the bottom of the case and the male edge connector on the SG’s motherboard.
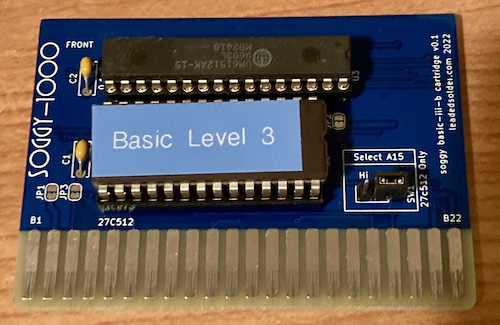
For software, I ran my homemade BASIC III-B cartridge. I honestly did not know if it would work or not. Luckily for me, it booted!
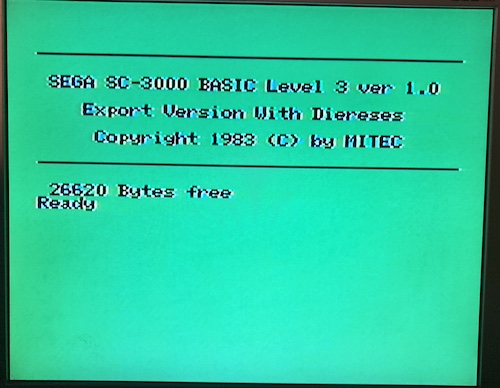
26,620 bytes free is what a real SC-3000 reports with IIIB as well. This is a strange number, because the UM61512 on the cartridge board should be giving it a whole 32K. I’m not sure where the missing 6,148 bytes are going; maybe a good detective story for another day.
So the cartridge works! Unfortunately, the keyboard did nothing. I could wiggle the controllers and put some garbage on the screen, but no amount of key pushing was noticed by the console. Uh oh.
Keyboard, Repair Thyself
The worry did cross my mind that the keyboard was bad. It has no power LED or any kind of indication that it is working. This wouldn’t be the end of the world, since I could certainly repair anything inside the keyboard. The SK-1100 schematics offered by Enri seemed to indicate it’s made entirely of off-the-shelf, common parts – outside of the tape-handling hybrid, of course.
However, I didn’t want to open it up just yet. This keyboard was minty, so I suspected instead that there was just a bad connection with the SG-1000 II. And indeed, when I had the SG-1000 II open to look at the motherboard, it appeared that Japan’s infamous humidity had done a number on the console’s expansion-connector plating:

I went back to my “modern” computer and started making some changes to the RAM-testing program. Initializing the keyboard and then testing for its presence is fairly straightforward:
InitializeKeyboard:
    ; Start SK-1100 keyboard
    ld a, $92
    out ($df), a
    ret

IsKeyboardAttached:
    ; As per Enri (https://web.archive.org/web/20090213004805/http://www2.odn.ne.jp/~haf09260/Mark3/Sk1100.htm):
    ; Determination of SK-1100 connection
    ;  The connection is determined using the latches of the ports A to C of the 8255.
    ;  In SK-1100, the mode is set and port C is output, so use here.
    ;  As a simple method, output 000H to port C and read port C.

    ;  0FFH because it is an unused port only on the main body of MARK III/SG-1000
    ;  When the SK-1100 is connected, the port C latch holds the written value of 000H.

    ; Returns 0 for "no keyboard" on A register
#local
#define TEST_BYTE $cc
#define KEYBOARD_LATCH_PORT $de
    ld a, TEST_BYTE
    out (KEYBOARD_LATCH_PORT), a
    nop
    nop
    in a, (KEYBOARD_LATCH_PORT)
    cp a, TEST_BYTE
    jp z, _YesKeyboard
    ld a, $00 ; no keyboard found
    ret
_YesKeyboard:
    ld a, $ff ; yes, keyboard found
#endlocal
    ret
I burned the new RAM test program and swapped it into the old RAM test cartridge. As I expected, I found that the SG-1000 II was not detecting the keyboard.
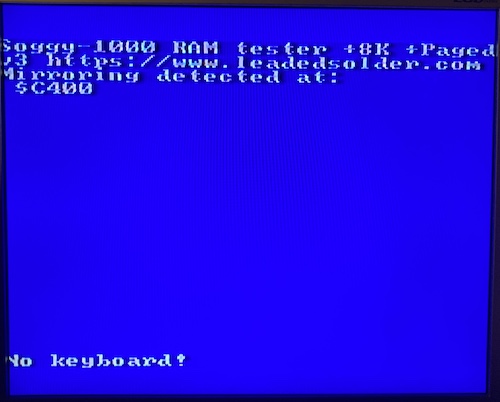
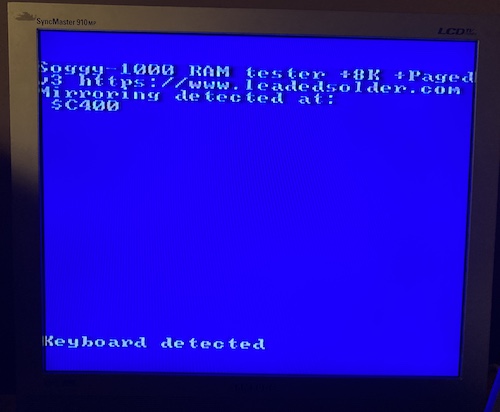
Time to test the theory that it was just a bad connection. I shut down the console, wiggled the keyboard connector forward a little bit, and then powered on the machine again to see if the keyboard would suddenly be detected. And it was:
Moving the connection as little as possible, I changed the cartridge back to my bootleg BASIC. And it works there too:
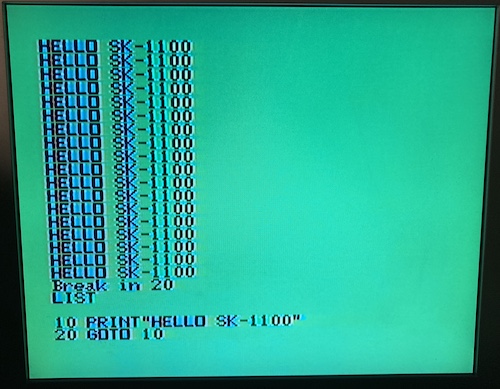
And hey, pushing the gamepad buttons no longer produces junk keyboard input either.
Thanks to testing, this SK-1100 is now a known-good keyboard. It works with a real piece of Sega hardware, and the keys actually feel surprisingly crisp. If my still-crappy SC-3000 keyboard felt half as good as this, I wouldn’t have started the whole Soggy project in the first place.
There is probably some way to repair this edge connector that doesn’t involve replating it, but for now I’ve given it a good cleaning with isopropyl alcohol to clean off some gunk.
Make it about 25% soggier
Now that I knew the keyboard worked, it was time to try it on my clone hardware, the Soggy-1000.

This was a very exciting moment for me. So exciting, in fact, that I had put it off for several days. What if it blew up? What if I got something wrong? What if… it worked fine the first time?

The Soggy is useful as a (toy) computer, not just as a game console! One of the major goals of the project has been met.
What’s Next?
The SK-1100 is nice, and having it around means that I can finally justify spending some time on programs which use the keyboard.
For instance, it would be nice to have a slightly more useful language than BASIC for the Soggy-1000 v3’s new bootable onboard ROM, especially one that will help with exploring the hardware.
-
Sega ran into this problem, too, and offered a “BASIC SK-III” cartridge. Said SK-III cartridge carries SRAM onboard, so that it can be used in the SG-1000 and Mark III when paired with an SK-1100 keyboard. ↩
-
Although the 64k is really nice, it took a long time to get here, and it’s not like BASIC III-B can use it, since some of the memory space is going to be taken up by the 32k ROM, anyway. I feel like I should have done dual footprints so at least I could run my usual 32k 62256s while I was waiting for the new UM61512s to be delivered. ↩